

How To Rebuild Your Ford V-8 351C-351M-400-429-460.pdf - Index of
How To Rebuild Your Ford V-8 351C-351M-400-429-460.pdf - Index of
How To Rebuild Your Ford V-8 351C-351M-400-429-460.pdf - Index of

Create successful ePaper yourself
Turn your PDF publications into a flip-book with our unique Google optimized e-Paper software.
BEARING-CLEARANCE CHECKING<br />
ROTATING METHOD Connecting-Rod Bearings-Connecting- to coincide with the bearing width<br />
The simplest way to confirm you've rod bearings can be checked with the you're checking. The bearing and jourinstalled<br />
the correct size bearings for a crankshaft out <strong>of</strong> the block. This is nal must be free from oil because<br />
given size bearing journal is, first ro- because the pistons cannot be installed Plastigage is oil-soluble, and any oil<br />
tate the journal in the bearing, orvice in their bores for the check. For will cause a false reading, When<br />
versa in the case <strong>of</strong> connecting rods, to checking a rod bearing, install the rod checking the crankshaft, all the other<br />
check for insufficient clearance. If the On its bearing journal after you've caps and bearings must be in place and<br />
rotation is free it's OK. TO check for oiled the journal or bearing. <strong>To</strong>rque tightened first, Lay the Piastigage on<br />
excessive clearance, try to rotate it 90' the rod-bolt nuts to specification, then the top <strong>of</strong> the bearing journal or<br />
to the normal direction <strong>of</strong> rotation. If rotate the rod around on its journal. If centered in the bearing, and caresome<br />
play, or movement is felt, the it's free to rotate there is enough clear- fully install the cap with the crankclearance<br />
is too much. Let's look at ance. Now, try wiggling the rod side- shaft laying in the block on its new<br />
how this applies to crank and rod ways. If there's no movement the clear- bearings, but without its rear-main oil<br />
bearings. ance is not excessive and the bearings seal. Or, the piston and rod assembly<br />
Crankshaft Bearings-Install the crank- are OK. must be positioned against its bearing<br />
shaft using the methods outlined in<br />
journal. <strong>To</strong>rque the bolts or nuts to<br />
this chapter. If you are using a rope- PLASTIGAGE METHOD specification. Be careful not to rotate<br />
type oil seal, don't install it until after Plastigage is a strip <strong>of</strong> wax which, the bearing and journal relative to each<br />
you've checked the bearings. With the when installed between a bearing and other, otherwise the Plastigage will<br />
crankshaft in place, the bearing caps its journal, flattens or squeezes out to smear and you'll have to start over<br />
installed and their bolts torqued to a width inversely proportional to the again. After you've finished torquing<br />
specification, rotate the crankshaft by clearance between the journal and the the cap, remove it and measure the<br />
hand. If it rotates freely, the bearing bearing. Plastigage comes in a Paper bearing clearance by comparing the<br />
clearances are enough. <strong>To</strong> check for sleeve with a printed scale for measur- squeezed wax width with the printed<br />
excessive bearing clearance, lift the ing the flattened Plastigage. It reads scale on the Plastigage sleeve.<br />
crankshaft by its nose. Try to wiggle out directly in thousandths <strong>of</strong> an inch It's not necessary to check all the<br />
it up and down. If you don't feel any bearing-to-journal clearance. You bearings unless you want to be particumovement,<br />
or play, clearance is not bought green Plastigage to measure larly careful. One thing for sure, you<br />
excessive and you can proceed with 0.001-0.003-inch clearance range. can't be faulted for checking to be<br />
your engine assembly. <strong>To</strong> use Plastigage, cut a length <strong>of</strong> it certain.<br />
Line up staggered holes <strong>of</strong> the cam thrust<br />
plate, then install the two 1/4-inch bolts.<br />
<strong>To</strong>rque them 9-1 2 ft.lbs.<br />
solvent such as lacquer thinner-both<br />
front and back. The same thing goes for<br />
the inserts too. The actual bearing surface<br />
will be coated with a white residue<br />
as it comes from the box. It's OK, just<br />
wipe the bearing enough so you're certain<br />
the working surface is clean.<br />
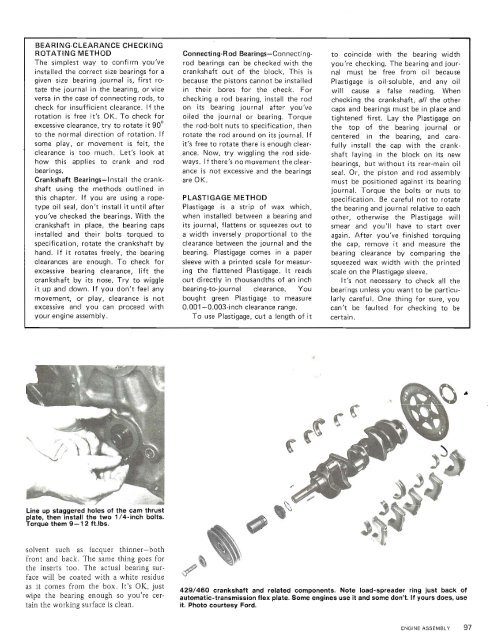
<strong>429</strong>/460 crankshaft and related components. Note load-spreader ring just back <strong>of</strong><br />
automatic-transmission flex plate. Some engines use it and some don't. If yours does, use<br />
it. Photo courtesy <strong>Ford</strong>.<br />
ENGINE ASSEMBLY 97


