

How To Rebuild Your Ford V-8 351C-351M-400-429-460.pdf - Index of
How To Rebuild Your Ford V-8 351C-351M-400-429-460.pdf - Index of
How To Rebuild Your Ford V-8 351C-351M-400-429-460.pdf - Index of

You also want an ePaper? Increase the reach of your titles
YUMPU automatically turns print PDFs into web optimized ePapers that Google loves.
After you've cleaned out the head- and<br />
main-bearing-bolt threads, go after the<br />
water passages. Remove any loose rust,<br />
deposits and core sand. Pay particular<br />
attention to the passages connecting the<br />
cylinder heads to the block to ensure<br />
good coolant flow to the heads. A round<br />
or rat-tail file works well for this iob. but<br />
be careful <strong>of</strong> the head-gasket surtaces. A<br />
gouge in the wrong place can cause aheadgasket<br />
leak. Give the same treatment to<br />
She cylinder heads<br />
During all this scrubbing, scraping and<br />
general clean-up, compressed air for forcing<br />
dirt out <strong>of</strong> hard-to-get-at areas and for<br />
drying the block will be a definite help.<br />
Controlling moisture becomes more <strong>of</strong> a<br />
problem as you recondition more and<br />
more <strong>of</strong> the parts. Bearing-bore surfaces,<br />
cylinder bores, valve seats and any other<br />
machined surface will rust from humidity<br />
in the air. So, prevent this by coating the<br />
machined surfaces with a water-dispersant<br />
oil after cleaning or machining. Several<br />
brands are available from your local store,<br />
such as WD-40 and CRC. They'll do<br />
the job with a lot less fuss and mess than<br />
a squirt can <strong>of</strong> motor oil. Whatever you<br />
use, don't leave any freshly machined surface<br />
unoiled or it will rust for sure<br />
CYLINDER-BLOCK FINAL<br />
INSPECTION & RECONDITIONING<br />
Inspecting your engine block to determine<br />
what must be done to restore it to<br />
tip-top condition is your first reconditioning<br />
step. <strong>To</strong> perform a satisfactory<br />
inspection job, you'll need 3-4.-inch outside<br />
and inside micrometers, a very<br />
straight edge, and feeler gages. A set <strong>of</strong><br />
telescoping gages will eliminate the need<br />
for the inside mikes. You may not need<br />
the straight edge if the head-gasket<br />
checked out OK. If the old gaskets didn't<br />
leak, the new ones won't either, if they<br />
are installed correctly.<br />
Checking Bore Wear-Cylinder-bore wear<br />
dictates whether your block needs boring<br />
or just honing. This, in turn, largely determines<br />
whether you have to install new<br />
pistons-no small investment.<br />
You can check bore wear three ways.<br />
The best is with a dial-bore gage, but you<br />
may not have one, so let's look at the remaining<br />
methods. Next in order <strong>of</strong> accuracy<br />
is the inside micrometer or telescopic<br />
gage and an outside mike. The last method<br />
involves using a piston ring and feeler<br />
gages to compare end-gaps at different<br />
positions in the bore. All <strong>of</strong> these methods<br />
will tell you what each bore's taper is.<br />
Bore Taper-Cylinder walls don't wear the<br />
same from top to bottom. A bore wears<br />
WEAR<br />
(IN.)<br />
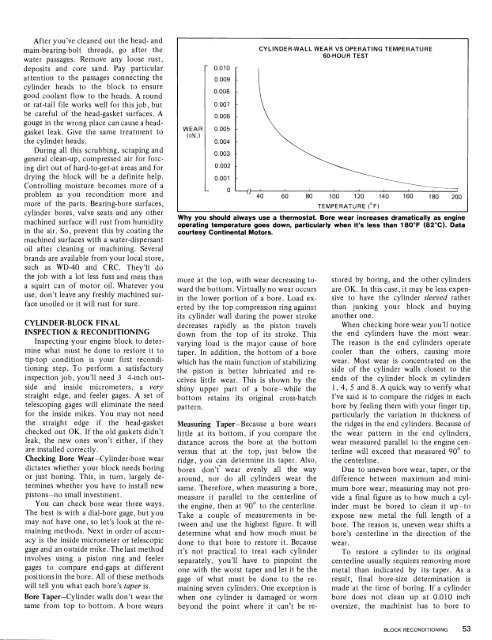
CYLINDER-WALL WEAR VS OPERATING TEWIPERATURE<br />
60-HOUR TEST<br />
TEMPERATURE (OF)<br />
Why you should always use a thermostat. Bore wear increases dramatically as engine<br />
operating temperature goes down, particularly when it's less than 180°F (82°C). Data<br />
courtesy Continental Motors.<br />
more at the top, with wear decreasing toward<br />
the bottom. Virtually no wear occurs<br />
in the lower portion <strong>of</strong> a bore. Load exerted<br />
by the top compression ring against<br />
its cylinder wall during the power stroke<br />
decreases rapidly as the piston travels<br />
down from the top <strong>of</strong> its stroke. This<br />
varying load is the major cause <strong>of</strong> bore<br />
taper. In addition, the bottom <strong>of</strong> a bore<br />
which has the maill function <strong>of</strong> stabilizing<br />
the piston is better lubricated and receives<br />
little wear. This is shown by the<br />
shiny upper part <strong>of</strong> a bore-while the<br />
bottom retains its original cross-hatch<br />
pattern.<br />
Measuring Taper-Because a bore wears<br />
little at its bottom, if you compare the<br />
distance across the bore at the bottom<br />
versus that at the top, just below the<br />
ridge, you can determine its taper. Also,<br />
bores don't' wear evenly all the way<br />
around, nor do all cylinders wear the<br />
same. Therefore, when measuring a bore,<br />
measure it parallel to the centerline <strong>of</strong><br />
the engine, then at 90" to the centerline.<br />
Take a couple <strong>of</strong> measurements in between<br />
and use the highest figure. It will<br />
determine what and how much must be<br />
done to that bore to restore it. Because<br />
it's not practical to treat each cylinder<br />
separately, you'll have to pinpoint the<br />
one with the worst taper and let it be the<br />
gage <strong>of</strong> what must be done to the remaining<br />
seven cylinders. One exception is<br />
when one cylinder is damaged or worn<br />
beyond the point where it can't be re-<br />
stored by boring, and the other cylinders<br />
are OK. In this case, it may be less expensive<br />
to have the cylinder sleeved rather<br />
than junking your block and buying<br />
another one.<br />
When checking bore wear you'll notice<br />
the end cylinders have the most wear.<br />
The reason is the end cylinders operate<br />
cooler than the others, causing more<br />
wear. Most wear is concentrated on the<br />
side <strong>of</strong> the cylinder walls closest to the<br />
ends <strong>of</strong> the cylinder block in cylinders<br />
1, 4, 5 and 8. A quick way to verify what<br />
I've said is to compare the ridges in each<br />
bore by feeling them with your finger tip,<br />
particularly the variation in thickness <strong>of</strong><br />
the ridges in the end cylinders. Because <strong>of</strong><br />
the wear pattern in the end cylinders,<br />
wear measured parallel to the engine centerline<br />
will exceed that measured 90" to<br />
the centerline.<br />
Due to uneven bore wear, taper, or the<br />
difference between maximum and minimum<br />
bore wear, measuring may not provide<br />
a final figure as to how much a cylinder<br />
must be bored to clean it up-to<br />
expose new metal the full length <strong>of</strong> a<br />
bore. The reason is, uneven wear shifts a<br />
bore's centerline in the direction <strong>of</strong> the<br />
wear.<br />
<strong>To</strong> restore a cylinder to its original<br />
centerline usually requires removing more<br />
metal than indicated by its taper. As a<br />
result, final bore-size determination is<br />
made at the time <strong>of</strong> boring. If a cylinder<br />
bore does not clean up at 0.010 inch<br />
oversize, the machinist has to bore to<br />
I<br />
BLOCK RECONDI.rIONING 53


