

How To Rebuild Your Ford V-8 351C-351M-400-429-460.pdf - Index of
How To Rebuild Your Ford V-8 351C-351M-400-429-460.pdf - Index of
How To Rebuild Your Ford V-8 351C-351M-400-429-460.pdf - Index of

You also want an ePaper? Increase the reach of your titles
YUMPU automatically turns print PDFs into web optimized ePapers that Google loves.
-<br />
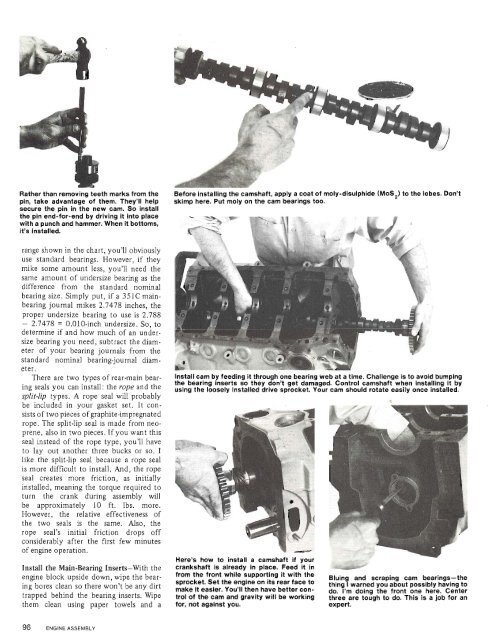
Rather than removing teeth marks from the<br />
pin, take advantage <strong>of</strong> them. They'll help<br />
secure the pin in the new cam. So install<br />
the pin end-for-end by driving it into place<br />
with a punch and hammer. When it bottoms,<br />
it's installed.<br />
range shown in the chart, you'll obviously<br />
use standard bearings. <strong>How</strong>ever, if they<br />
mike some amount less, you'll need the<br />
same amount <strong>of</strong> undersize bearing as the<br />
difference from the standard nominal<br />
bearing size. Simply put, if a <strong>351C</strong> mainbearing<br />
journal mikes 2.7478 inches, the<br />
proper undersize bearing to use is 2.788<br />
- 2.7478 = 0.010-inch undersize. So, to<br />
determine if and how much <strong>of</strong> an undersize<br />
bearing you need, subtract the diameter<br />
<strong>of</strong> your bearing journals from the<br />
standard nominal bearing-journal diameter.<br />
There are two types <strong>of</strong> rear-main bearing<br />
seals you can install: the rope and the<br />
split-lip types. A rope seal will probably<br />
be included in your gasket set. It consists<br />
<strong>of</strong> two pieces <strong>of</strong> graphite-impregnated<br />
rope. The split-lip seal is made from neoprene,<br />
also in two pieces. If you want this<br />
seal instead <strong>of</strong> the rope type, you'll have<br />
to lay out another three bucks or so. I<br />
like the split-lip seal because a rope seal<br />
is more difficult to install. And, the rope<br />
seal creates more friction, as initially<br />
installed, meaning the torque required to<br />
turn the crank during assembly will<br />
be approximately 10 ft. lbs. more.<br />
<strong>How</strong>ever, the relative effectiveness <strong>of</strong><br />
the two seals is the same. Also, the<br />
rope seal's initial friction drops <strong>of</strong>f<br />
considerably after the first few minutes<br />
<strong>of</strong> engine operation.<br />
Install the Main-Bearing Inserts-With the<br />
engine block upside down, wipe the bearing<br />
bores clean so there won't be any dirt<br />
trapped behind the bearing inserts. Wipe<br />
them clean using paper towels and a<br />
Before installing the camshaft, apply a coat <strong>of</strong> moly-disulphide (MoS,) to the lobes. Don't<br />
skimp here. Put moly on the cam bearings too.<br />
Install cam by feeding it through one bearing web at a time. Challenge is to avoid bumping<br />
the bearing inserts so they don't get damaged. Control camshaft when installing it by<br />
using the loosely Installed drive sprocket. <strong>Your</strong> cam should rotate easily once installed.<br />
Here's how to install a camshaft If your<br />
crankshaft is already in place. Feed it in<br />
from the front while supporting it with the<br />
sprocket. Set the engine on its rear face to<br />
make It easier. You'll then have better control<br />
<strong>of</strong> the cam and gravity will be working<br />
for, not against you.<br />
3<br />
Bluing and scraping cam bearings-the<br />
thing I warned you about possibly having to<br />
do. I'm doing the front one here. Center<br />
three are tough to do. This is a job for an<br />
expert.


