

How To Rebuild Your Ford V-8 351C-351M-400-429-460.pdf - Index of
How To Rebuild Your Ford V-8 351C-351M-400-429-460.pdf - Index of
How To Rebuild Your Ford V-8 351C-351M-400-429-460.pdf - Index of

Create successful ePaper yourself
Turn your PDF publications into a flip-book with our unique Google optimized e-Paper software.
file the end <strong>of</strong> the ring like the one shown<br />
in the accompanying photo. Wrap tape<br />
around the ring so you don't cut your<br />
fingers on it.<br />
Be careful, no matter which method<br />
you use. Caution: Don't remove any metal<br />
or scratch the grooves, just get rid <strong>of</strong> the<br />
deposits. Be especially careful to avoid<br />
removing metal from the side surfaces <strong>of</strong><br />
the grooves as they are the surfaces against<br />
which the rings seal.<br />
Measuring Ring-Groove Width-Again,<br />
chances are if a ring groove is worn or<br />
damaged, it will be the top one because<br />
<strong>of</strong> its higher loads. So start with it. This<br />
doesn't mean you don't have to check the<br />
others if the top one is OK. Unforeseen<br />
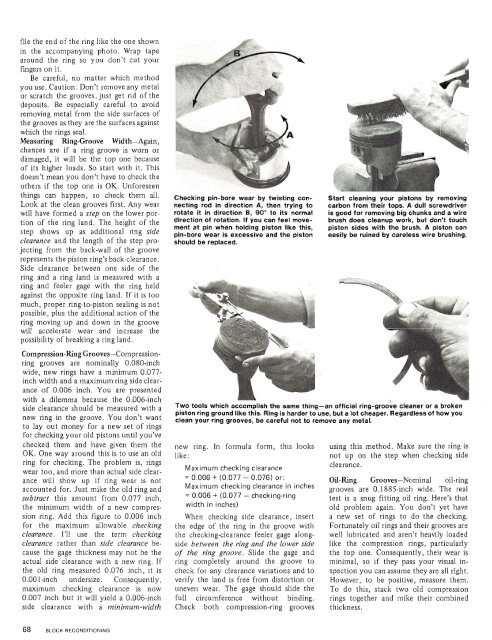
things can happen, check them Checking pin-bore wear by twisting con-<br />
Look at the clean grooves first. Any wear necting rod in direction A, then trying to<br />
will have formed a ster, on the lower por- rotate it in direction 6, 90" to its normal<br />
tion <strong>of</strong> the ring land.-~he height <strong>of</strong>'the direction <strong>of</strong> rotation. If you can feel movement<br />
at pin when holding piston like this,<br />
step up as ring side dn-bore wear is excessive and the &ton<br />
~ - - - - - - - - - -<br />
clearance and the length <strong>of</strong> the step pro- ;hould be redaced.<br />
jecting from the back-wall <strong>of</strong> the groove<br />
represents the piston ring's back-clearance.<br />
Side clearance between one side <strong>of</strong> the<br />
ring and a ring land is measured with a<br />
ring and feeler gage with the ring held<br />
against the opposite ring land. If it is too<br />
much, proper ring-to-piston sealing is not<br />
possible, plus the additional action <strong>of</strong> the<br />
ring moving up and down in the groove<br />
will accelerate wear and increase the<br />
possibility <strong>of</strong> breaking a ring land.<br />
Start cleaning your pistons by removing<br />
carbon from their tops. A dull screwdriver<br />
is good for removing big chunks and a wire<br />
brush does cleanup work, but don't touch<br />
piston sides with the brush. A piston can<br />
easily be ruined by careless wire brushing.<br />
Compression-Ring Grooves-Compressionring<br />
grooves are nominally 0.080-inch<br />
wide, new rings have a minimum 0.077-<br />
inch width and a maximum ring side clearance<br />
<strong>of</strong> 0.006 inch. You are presented<br />
with a dilemma because the 0.006-inch .+<br />
side clearance should be measured with a TWO tools which accomplish the same thing-an <strong>of</strong>ficial ring-groove cleaner or a broken<br />
piston ring ground like this. Ring is harder to use, but a lot cheaper. Regardless <strong>of</strong> how you<br />
new ring in the groove. You don't want clean your ring grooves, be careful not to remove any metal.<br />
to lay out money for a new set <strong>of</strong> rings<br />
for checking your old pistons until you've<br />
checked them and have given them the new ring. In formula form, this looks using this method. Make sure the ring is<br />
OK. One way around this is to use an old like:<br />
not up on the step when checking side<br />
ring for checking. The problem is, rings<br />
Maximum checking clearance<br />
clearance.<br />
wear too, and more than actual side clearance<br />
will show up if ring wear is not<br />
= 0.006 + (0.077- 0.076) or:<br />
accounted for. J~~~ mike the old ring and<br />
Maximum checking clearance in inches<br />
subtract this amount from 0.077 inch,<br />
= 0.006 + (0.077- checking-ring<br />
the minimum width <strong>of</strong> a new compres- width in inches)<br />
sion ring. Add this figure to 0.006 inch When checking side clearance, insert<br />
for the maximum allowable checking the edge <strong>of</strong> the ring in the groove with<br />
clearance. I'll use the term checking the checking-clearance feeler gage alongclearance<br />
rather than side clearance be- side between the ring and the lower side<br />
cause the gage thickness may not be the <strong>of</strong> the ring groove. Slide the gage and<br />
actual side clearance with a new ring. If ring completely around the groove to<br />
the old ring measured 0.076 inch, it is check for any clearance variations and to<br />
0.001-inch undersize. Consequently, verify the land is free from distortion or<br />
maximum checking clearance is now uneven wear. The gage should slide the<br />
0.007 inch but it will yield a 0.006-inch full circumference without binding.<br />
side clearance with a minimum-width Check both compression-ring grooves<br />
Oil-Ring Grooves-Nominal oil-ring<br />
grooves are 0.1885-inch wide. The real<br />
test is a snug fitting oil ring. Here's that<br />
old problem again. You don't yet have<br />
a new set <strong>of</strong> rings to do the checking.<br />
Fortunately oil rings and their grooves are<br />
well lubricated and aren't heavily loaded<br />
like the compression rings, particularly<br />
the top one. Consequently, their wear is<br />
minimal, so if they pass your visual inspection<br />
you can assume they are all right.<br />
<strong>How</strong>ever, to be positive, measure them.<br />
<strong>To</strong> do this, stack two old compression<br />
rings together and mike their combined<br />
thickness.


