

How To Rebuild Your Ford V-8 351C-351M-400-429-460.pdf - Index of
How To Rebuild Your Ford V-8 351C-351M-400-429-460.pdf - Index of
How To Rebuild Your Ford V-8 351C-351M-400-429-460.pdf - Index of

Create successful ePaper yourself
Turn your PDF publications into a flip-book with our unique Google optimized e-Paper software.
kc, -<br />
I . ><br />
1 ..-<br />
A<br />
Installing alternator with its two brackets<br />
and spacers. Don't tighten pivot bolt or one<br />
at the adjusting bracket yet.<br />
Pilot the exhaust pipes into the manifolds,<br />
slide the mounting flanges up each<br />
pipe, then hold them in place with a nut<br />
on one <strong>of</strong> the studs. This will support the<br />
pipe too. Run the other nuts on and<br />
torque them all to 30 ft.lbs.<br />
Oil Filter-Check before lowering the car.<br />
It may be easier to install the oil filter<br />
from below. Fill it about half full first so<br />
you'll get oil pressure sooner. Smear some<br />
oil on the seal, then run the filter up until<br />
it contacts the block, and give it another<br />
half turn. While you're under there, check<br />
the oil-pan drain plug just to make certain<br />
it's there and tight. Set the car down now<br />
that you're ready to go top-side.<br />
Engine Oil-If for no other reason than to<br />
take a break, now is a good time to fill<br />
the crankcase with oil. Because the filter<br />
has some oil in it, add a quart less than<br />
what's specified. You can check oil level<br />
after running the engine and add oil as<br />
necessary to bring it up to the mark.<br />
Carburetor Linkage-The accelerator<br />
linkage will be either the rod-and-lever or<br />
cable type.<br />
If you have a cable type, there will be<br />
a bracket which attaches to the intake<br />
manifold to mount the carburetor end <strong>of</strong><br />
the cable conduit. Install it if it's not already<br />
on the manifold. The cable will<br />
either clip or bolt onto this bracket. At<br />
the carburetor end <strong>of</strong> the cable, there will<br />
be a socket which attaches to a ball on<br />
the carburetor bellcrank. Shove it on with<br />
your thumb and it'll stay in place.<br />
The rod-type linkage attaches the same<br />
way, but it doesn't require a manifold<br />
bracket. The rod will extend from a lever<br />
mounted on the firewall. This type is<br />
used on most trucks.<br />
Try doing this without pouring oil on your<br />
clean engine. If you don't have a spout,<br />
make sure there's a rag handy. Regardless<br />
<strong>of</strong> the brand <strong>of</strong> oil you're using, just make<br />
sure it's SE grade.<br />
Hooking up this <strong>400</strong>'s accelerator cable.<br />
The automatic-transmission kick-down rod<br />
has already been installed. Next comes the<br />
cruise-control linkage.<br />
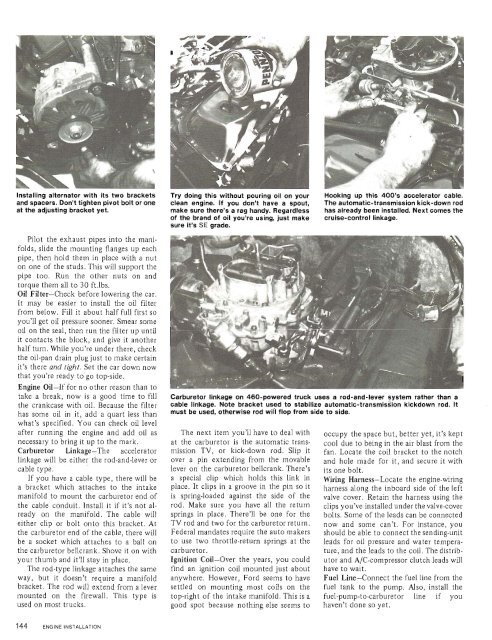
Carburetor linkage on 460-powered truck uses a rod-and-lever system rather than a<br />
cable linkage. Mote bracket used to stabilize automatlc-transmisdion kickdown rod. It<br />
must be used, otherwise rod will flop from side to side.<br />
The next item you'll have to deal with<br />
at the carburetor is the automatic transmission<br />
TV, or kick-down rod. Slip it<br />
over a pin extending from the movable<br />
lever on the carburetor bellcrank. There's<br />
a special clip which holds this link in<br />
place. It clips in a groove in the pin so it<br />
is spring-loaded against the side <strong>of</strong> the<br />
rod. Make sure you have all the return<br />
springs in place. There'll be one for the<br />
TV rod and two for the carburetor return.<br />
Federal mandates require the auto makers<br />
to use two throttle-return springs at the<br />
carburetor.<br />
Ignition Coil-Over the years, you could<br />
find an ignition coil mounted just about<br />
anywhere. <strong>How</strong>ever, <strong>Ford</strong> seems to have<br />
settled on mounting most coils on the<br />
top-right <strong>of</strong> the intake manifold. This is a<br />
good spot because nothing else seems to<br />
occupy the space but, better yet, it's kept<br />
cool due to being in the air blast from the<br />
fan. Locate the coil bracket to the notch<br />
and hole made for it, and secure it with<br />
its one bolt.<br />
Wiring Harness-Locate the engine-wiring<br />
harness along the inboard side <strong>of</strong> the left<br />
valve cover. Retain the harness using the<br />
clips you've installed under the valve-cover<br />
bolts. Some <strong>of</strong> the leads can be connected<br />
now and some can't. For instance, you<br />
should be able to connect the sending-unit<br />
leads for oil pressure and water temperature,<br />
and the leads to the coil. The distributor<br />
and A/C-compressor clutch leads will<br />
have to wait.<br />
Fuel Line-Connect the fuel line from the<br />
fuel tank to the pump. Also, install the<br />
fuel-pump-to-carburetor line if you<br />
haven't done so yet.


