

How To Rebuild Your Ford V-8 351C-351M-400-429-460.pdf - Index of
How To Rebuild Your Ford V-8 351C-351M-400-429-460.pdf - Index of
How To Rebuild Your Ford V-8 351C-351M-400-429-460.pdf - Index of

You also want an ePaper? Increase the reach of your titles
YUMPU automatically turns print PDFs into web optimized ePapers that Google loves.
metal cover. You can tap the seal in by<br />
working around its shell gradually, however<br />
this method is somewhat chancy.<br />
You can also use a vise with the aluminum<br />
cover, however a cylinder is required<br />
between the vise jaws and the seal so the<br />
vise will clear the cover. Gradually force<br />
the seal into place by tightening the vise<br />
jaws. Regardless <strong>of</strong> the type cover you<br />
have, the seal lip must point toward the<br />
engine when it is installed.<br />
Prepare the Damper or Spacer Sleeve-If<br />
you haven't cleaned your damper yet, do<br />
it now. The main area to inspect is the<br />
rubber bond between the outer ring and<br />
the inner. It must be secure. Try to force<br />
them apart longitudinally, or back and<br />
forth. If there is noticeable movement,<br />
the bond has failed and the damper should<br />
be replaced. Also inspect the inner bore<br />
and front-cover sealing surface. Give the<br />
sealing surface <strong>of</strong> the <strong>351C</strong> and <strong>351M</strong>/<br />
<strong>400</strong> damper nose the same treatment you<br />
gave the crankshaft bearing journals, page<br />
61, but don't polish it. Some tooth is required<br />
to carry oil for lubricating the seal.<br />
The <strong>429</strong>1460 uses a separate spacer<br />
between its damper and the crankshaft<br />
sprocket. 35 1 C and 351 MI<strong>400</strong> spacers are<br />
an integral part <strong>of</strong> their dampers. The<br />
separate-<strong>429</strong>1460 spacer provides the surface<br />
which rides against the front cover<br />
seal on these engines. Give the spacer the<br />
same treatment you gave the crankshaft<br />
bearing journals, page 61.<br />
If your damper nose or spacer seal surface<br />
is badly grooved or unfit for sealing<br />
for one reason or another, you'll have to<br />
replace the damper spacer, or better yet,<br />
install a sleeve over the original seal surface.<br />
This relatively inexpensive part is<br />
available at most automotive parts stores.<br />
The sleeve is approximately 0.030-inch<br />
thick. The lip-type seal will comply with<br />
the additional thickness, so you can use a<br />
stock seal when using a sleeve.<br />
<strong>To</strong> install a repair sleeve, clean the<br />
original seal surface and remove any burrs.<br />
Coat it with silicone sealer to prevent oil<br />
leaks between the sleeve and the damper<br />
or spacer. If you have a <strong>351C</strong>, <strong>351M</strong>1<strong>400</strong>,<br />
support the damper so the rubber bond<br />
will not be loaded and drive or press the<br />
sleeve on. Place a flat plate-steel, alumi-<br />
num or wood-across the end <strong>of</strong> the<br />
sleeve as it sits on the end <strong>of</strong> the damper<br />
or spacer, to spread the load. Make sure<br />
the sleeve is started straight and install<br />
it until it's flush with the end <strong>of</strong> the<br />
damper nose or spacer. Wipe the excess<br />
sealer <strong>of</strong>f and your seal surface is as<br />
good as new.<br />
Water-Pump-to-Cover-Before<br />
installing<br />
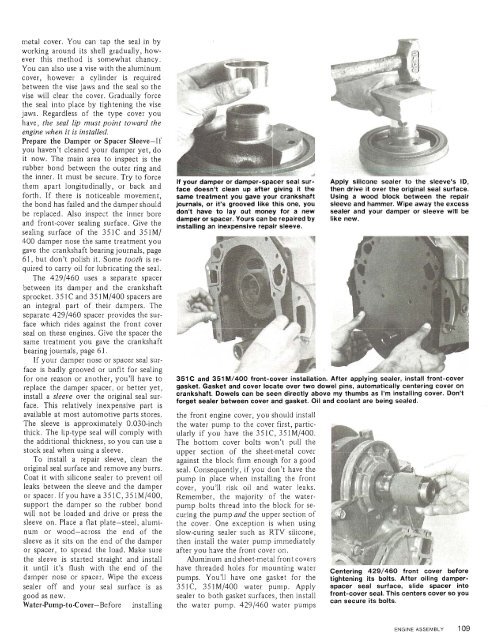
If your damper or damper-spacer seal surface<br />
doesn't clean up after giving it the<br />
same treatment you gave your crankshaft<br />
journals, or it's grooved like this one, you<br />
don't have to lay out money for a new<br />
damper or spacer. <strong>Your</strong>s can be repaired by<br />
installing an inexpensive repair sleeve.<br />
Apply silicone sealer to the sleeve's ID,<br />
then drive it over the original seal surface.<br />
Using a wood block between the repair<br />
sleeve and hammer. Wipe away the excess<br />
sealer and your damper or sleeve will be<br />
like new.<br />
351 C and 351 M/<strong>400</strong> front-cover installation. After applying sealer, install front-cover<br />
gasket. Gasket and cover locate over two dovr re1 pins, automatically centering cover on<br />
crankshaft. Dowels can be seen directly abovr my thumbs as I'm installing cover. Don't<br />
forget sealer between cover and gasket. Oil ar ~d coolant are being sealed.<br />
the front engine cover, you should install<br />
the water pump to the cover first, particularly<br />
if you have the <strong>351C</strong>, <strong>351M</strong>1<strong>400</strong>.<br />
The bottom cover bolts won't pull the<br />
upper section <strong>of</strong> the sheet-metal cover<br />
against the block firm enough for a good<br />
seal. Consequently, if you don't have the<br />
pump in place when installing the front<br />
cover, you'll risk oil and water leaks.<br />
Remember, the majority <strong>of</strong> the waterpump<br />
bolts thread into the block for securing<br />
the pump and the upper section <strong>of</strong><br />
the cover. One exception is when using<br />
slow-curing sealer such as RTV silicone,<br />
then install the water purnp inimediately<br />
after you have the front cover on.<br />
Aluminum and sheet-metal front covers<br />
have threaded holes for mounting water<br />
pumps. You'll have one gasket for the<br />
<strong>351C</strong>, <strong>351M</strong>/<strong>400</strong> water pump. Apply<br />
sealer to both gasket surfaces, then install<br />
the water pump. <strong>429</strong>1460 water pumps<br />
Centering <strong>429</strong>/460 front cover before<br />
tightening its bolts. After oiling damperspacer<br />
seal surface, slide spacer into<br />
front-cover seal. This centers cover so you<br />
can secure its bolts.


