

How To Rebuild Your Ford V-8 351C-351M-400-429-460.pdf - Index of
How To Rebuild Your Ford V-8 351C-351M-400-429-460.pdf - Index of
How To Rebuild Your Ford V-8 351C-351M-400-429-460.pdf - Index of

You also want an ePaper? Increase the reach of your titles
YUMPU automatically turns print PDFs into web optimized ePapers that Google loves.
You're now ready for the last big operation,<br />
putting your newly rebuilt engine<br />
back where it came from-its engine compartment.<br />
Get those boxes <strong>of</strong> bolts, nuts<br />
and parts out from where you've been<br />
storing them. You'll also need to round<br />
up the engine hoist, jack and jack stands<br />
again.<br />
Before getting into the installation,<br />
thoroughly clean your engine compartment,<br />
the accessories, related brackets<br />
and hardware so the total job under the<br />
hood will look really good. Cleaning an<br />
engine compartment requires a spray can<br />
<strong>of</strong> engine cleaner, a stiff-bristle brush for<br />
the stubborn grease and dirt and a garden<br />
hose. Don't forget to protect your car's<br />
body paint. Engine cleaner is strong stuff.<br />
You can use the same process to clean all<br />
the bolt-on parts and accessories, or you<br />
can load them up for a trip to the local<br />
car wash. The advantage in doing this is<br />
you leave the mess there, and the hot<br />
high-pressure water and soap makes the<br />
job much easier. Let's get on with<br />
installing your engine.<br />
FRONT TRANSMISSION SEAL<br />
Any leakage into the clutch or converter<br />
housing which obviously didn't<br />
come from the engine should be corrected<br />
now. This is usually accomplished by replacing<br />
the transmission front seal in the<br />
case <strong>of</strong> an automatic, or the bearing retainer<br />
gasket and/or seal in the case <strong>of</strong> a<br />
standard transmission.<br />
Automatic Transmission-If you have an<br />
automatic transmission, replace the frontpump<br />
seal whether it shows signs <strong>of</strong><br />
leaking or not. Chances are, it will start<br />
leaking before you get out <strong>of</strong> the driveway<br />
if you don't, and now's the opportune<br />
time.<br />
Before you can replace the front-pump<br />
seal, you'll have to remove the converter.<br />
Drain the converter before or after it's<br />
removed. This will 'prevent spilling fluid<br />
while reinstalling it. It's best to drain it<br />
now and fill the transmission after you<br />
get everything back together. <strong>To</strong> drain it<br />
before removal, position one <strong>of</strong> the converter<br />
drain plugs at the bottom. Put a<br />
bucket or drain pan directly underneath<br />
before removing the plug. After the fluid<br />
has drained, replace the plug and remove<br />
the converter simply by pulling on it, but<br />
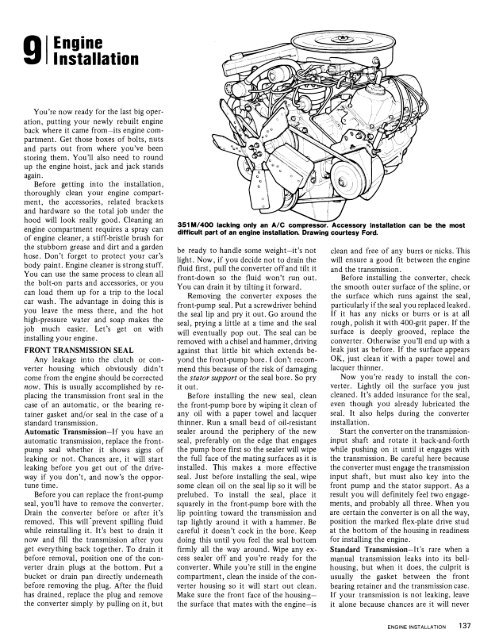
351 M/<strong>400</strong> lacking only an A/C compressor. Accessory installation can be<br />
difficult part <strong>of</strong> an engine installation. Drawing courtesy <strong>Ford</strong>.<br />
be ready to handle some weight-it's not<br />
light. Now, if you decide not to drain the<br />
fluid first, pull the converter <strong>of</strong>f and tilt it<br />
front-down so the iluid won't run out.<br />
You can drain it by tilting it forward.<br />
Removing the converter exposes the<br />
front-pump seal. Put a screwdriver behind<br />
the seal lip and pry it out. Go around the<br />
seal, prying a little at a time and the seal<br />
will eventually pop out. The seal can be<br />
removed with a chisel and hammer, driving<br />
against that little bit which extends beyond<br />
the front-pump bore. I don't recommend<br />
this because <strong>of</strong> the risk <strong>of</strong> damaging<br />
the stator support or the seal bore. So pry<br />
it out.<br />
Before installing the new seal, clean<br />
the front-pump bore by wiping it clean <strong>of</strong><br />
any oil with a paper towel and lacquer<br />
thinner. Run a small bead <strong>of</strong> oil-resistant<br />
sealer around the periphery <strong>of</strong> the new<br />
seal, preferably on the edge that engages<br />
the pump bore first so the sealer will wipe<br />
the full face <strong>of</strong> the mating surfaces as it is<br />
installed. This makes a more effective<br />
seal. Just before installing the seal, wipe<br />
some clean oil on the seal lip so it will be<br />
prelubed. <strong>To</strong> install the seal, place it<br />
squarely in the front-pump bore with the<br />
lip pointing toward the transmission and<br />
tap lightly around it with a hammer. Be<br />
careful it doesn't cock in the bore. Keep<br />
doing this until you feel the seal bottom<br />
firmly all the way around. Wipe any excess<br />
sealer <strong>of</strong>f and you're ready for the<br />
converter. While you're still in the engine<br />
compartment, clean the inside <strong>of</strong> the converter<br />
housing so it will start out clean.<br />
Make sure the front face <strong>of</strong> the housingthe<br />
surface that mates with the engine-is<br />
the most<br />
clean and free <strong>of</strong> any burrs or nicks. This<br />
will ensure a good fit between the engine<br />
and the transmission.<br />
Before installing the converter, check<br />
the smooth outer surface <strong>of</strong> the spline, or<br />
the surface which runs against the seal,<br />
particularly if the seal you replaced leaked.<br />
If it has any nicks or burrs or is at all<br />
rough, polish it with <strong>400</strong>-grit paper. If the<br />
surface is deeply grooved, replace the<br />
converter. Otherwise you'll end up with a<br />
leak just as before. If the surface appears<br />
OK, just clean it' with a paper towel and<br />
lacquer thinner.<br />
Now you're ready to install the converter.<br />
Lightly oil the surface you just<br />
cleaned. It's added insurance for the seal,<br />
even though you already lubricated the<br />
seal. It also helps during the converter<br />
installation.<br />
Start the converter on the transmissioninput<br />
shaft and rotate it back-and-forth<br />
while pushing on it until it engages with<br />
the transn~ission. Be careful here because<br />
the converter must engage the transmission<br />
input shaft, but must also key into the<br />
front pump and the stator support. As a<br />
result you will definitely feel two engagements,<br />
and probably all three. When you<br />
are certain the converter is on all the way,<br />
position the marked flex-plate drive stud<br />
at the bottom <strong>of</strong> the housing in readiness<br />
for installing the engine.<br />
Standard Transmission-It's rare when a<br />
manual transmission leaks into its bellhousing,<br />
but when it does, the culprit is<br />
usually the gasket between the front<br />
bearing retainer and the transmission case.<br />
If your transmission is not leaking, leave<br />
it alone because chances are it will never


