

How To Rebuild Your Ford V-8 351C-351M-400-429-460.pdf - Index of
How To Rebuild Your Ford V-8 351C-351M-400-429-460.pdf - Index of
How To Rebuild Your Ford V-8 351C-351M-400-429-460.pdf - Index of

Create successful ePaper yourself
Turn your PDF publications into a flip-book with our unique Google optimized e-Paper software.
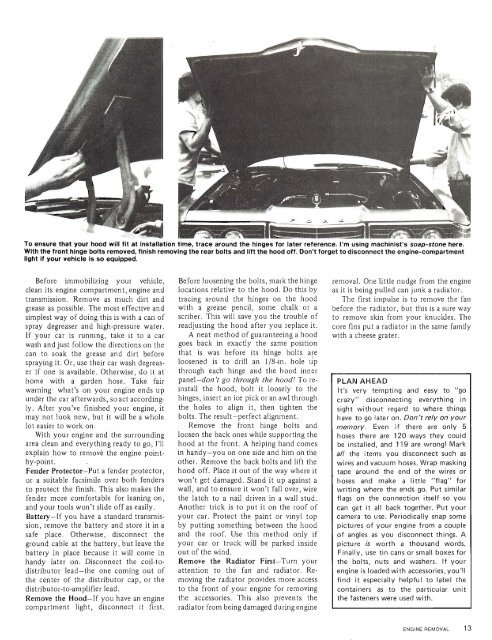
<strong>To</strong> ensure that your hood will fit at installation time, trace around the hinges for later reference. I'm using machinist's soap-stone here.<br />
With the front hinge bolts removed, finish removing the rear bolts and lift the hood <strong>of</strong>f. Don't forget to disconnect the engine-compartment<br />
light if your vehicle is so equipped.<br />
Before immobilizing your vehicle,<br />
clean its engine compartment, engine and<br />
transmission. Remove as much dirt and<br />
grease as possible. The most effective and<br />
simplest way <strong>of</strong> doing this is with a can <strong>of</strong><br />
spray degreaser and high-pressure water.<br />
If your car is running, take it to a car<br />
wash and just follow the directions on the<br />
can to soak the grease and dirt before<br />
spraying it. Or, use their car wash degreaser<br />
if one is available. Otherwise, do it at<br />
home with a garden hose. Take fair<br />
warning: what's on your engine ends up<br />
under the car afterwards, so act accordingly.<br />
After you've finished your engine, it<br />
may not look new, but it will be a whole<br />
lot easier to work on.<br />
With your engine and the surrounding<br />
area clean and everything ready to go, I'll<br />
explain how to remove the engine pointby-point.<br />
Fender Protector-Put a fender protector,<br />
or a suitable facsimile over both fenders<br />
to protect the finish. This also makes the<br />
fender more comfortable for leaning on,<br />
and your tools won't slide <strong>of</strong>f as easily.<br />
Battery-If you have a standard transmission,<br />
remove the battery and store it in a<br />
safe place. Otherwise, disconnect the<br />
ground cable at the battery, but leave the<br />
battery in place because it will come in<br />
handy later on. Disconnect the coil-todistributor<br />
lead-the one coming out <strong>of</strong><br />
the center <strong>of</strong> the distributor cap, or the<br />
distributor-to-amplifier lead.<br />
Remove the Hood-If you have an engine<br />
compartment light, disconnect it first.<br />
Before loosening the bolts, mark the hinge<br />
locations relative to the hood. Do this by<br />
tracing around the hinges on the hood<br />
with a grease pencil, some chalk or a<br />
scriber. This will save you the trouble <strong>of</strong><br />
readjusting the hood after you replace it.<br />
A neat method <strong>of</strong> guaranteeing a hood<br />
goes back in exactly the same position<br />
that is was before its hinge bolts are<br />
loosened is to drill an 118-in. hole up<br />
through each hinge and the hood inner<br />
panel-don't go through the hood! <strong>To</strong> reinstall<br />
the hood, bolt it loosely to the<br />
hinges, insert an ice pick or an awl through<br />
the holes to align it, then tighten the<br />
bolts. The result-perfect alignment.<br />
Remove the front hinge bolts and<br />
loosen the back ones while supporting the<br />
hood at the front. A helping hand comes<br />
in handy-you on one side and him on the<br />
other. Remove the back bolts and lift the<br />
hood <strong>of</strong>f. Place it out <strong>of</strong> the way where it<br />
won't get damaged. Stand it up against a<br />
wall, and to ensure it won't fall over, wire<br />
the latch to a nail driven in a wall stud.<br />
Another trick is to put it on the ro<strong>of</strong> <strong>of</strong><br />
your car. Protect the paint or vinyl top<br />
by putting something between the hood<br />
and the ro<strong>of</strong>. Use this method only if<br />
your car or truck will be parked inside<br />
out <strong>of</strong> the wind.<br />
Remove the Radiator First-Turn your<br />
attention to the fan and radiator. Removing<br />
the radiator provides more access<br />
to the front <strong>of</strong> your engine for removing<br />
the accessories. This also prevents the<br />
radiator from being damaged during engine<br />
removal. One little nudge from the engne<br />
as it is being pulled can junk a radiator.<br />
The first impulse is to remove the fan<br />
before the radiator, but ths is a sure way<br />
to remove skin from your knuckles. The<br />
core fins put a radiator in the same family<br />
with a cheese grater.<br />
PLAN AHEAD<br />
It's very tempting and easy to "go<br />
crazy" disconnecting everything in<br />
sight without regard to where things<br />
have to go later on. Don't rely on your<br />
memory. Even if there are only 5<br />
hoses there are 120 ways they could<br />
be installed, and 119 are wrong! Mark<br />
all the items you disconnect such as<br />
wires and vacuum hoses. Wrap masking<br />
tape around the end <strong>of</strong> the wires or<br />
hoses and make a little "flag" for<br />
writing where the ends go. Put similar<br />
flags on the connection itself so you<br />
can get it all back together. Put your<br />
camera to use. Periodically snap some<br />
pictures <strong>of</strong> your engine from a couple<br />
<strong>of</strong> angles as you disconnect things. A<br />
picture is worth a thousand words.<br />
Finally, use tin cans or small boxes for<br />
the bolts, nuts and washers. If your<br />
engine is loaded with accessories, you'll<br />
find it especially helpful to label the<br />
containers as to the particular unit<br />
the fasteners were used with.


