

How To Rebuild Your Ford V-8 351C-351M-400-429-460.pdf - Index of
How To Rebuild Your Ford V-8 351C-351M-400-429-460.pdf - Index of
How To Rebuild Your Ford V-8 351C-351M-400-429-460.pdf - Index of

You also want an ePaper? Increase the reach of your titles
YUMPU automatically turns print PDFs into web optimized ePapers that Google loves.
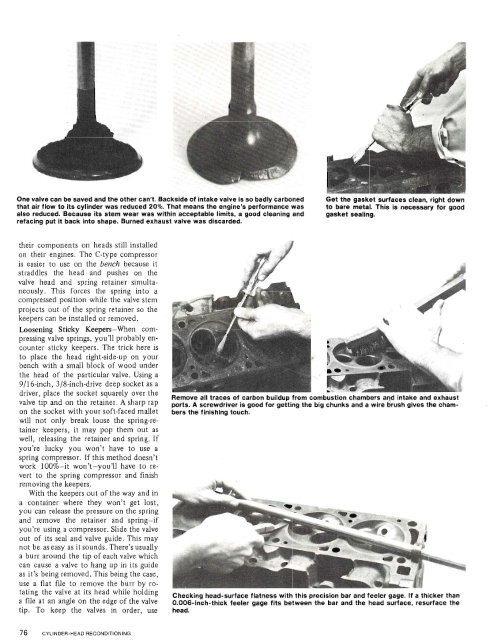
One valve can be saved and the other can't. Backside <strong>of</strong> intake valve is so badly carboned<br />
that air flow to its cylinder was reduced 20%. That means the engine's performance was<br />
also reduced. Because its stem wear was within acceptable limits, a good cleaning and<br />
refacing put it back into shape. Burned exhaust valve was discarded.<br />
Get the gasket surfaces clean, right down<br />
to bare metal. This is necessary for good<br />
gasket sealing.<br />
their components on heads still installed<br />
on their engines. The C-type compressor<br />
is easier to use on the bench because it<br />
straddles the head and pushes on the<br />
valve head and spring retainer simultaneously.<br />
This forces the spring into a<br />
compressed position while the valve stem<br />
projects out <strong>of</strong> the spring retainer so the<br />
keepers can be installed or removed.<br />
Loosening Sticky Keepers-When compressing<br />
valve springs, you'll probably encounter<br />
sticky keepers. The trick here is<br />
to place the head right-side-up on your<br />
bench with a small block <strong>of</strong> wood under<br />
the head <strong>of</strong> the particular valve. Using a<br />
9116-inch, 318-inch-drive deep socket as a<br />
driver* Place the socket<br />
Over the<br />
Valve tip and On the retainer. A sharp<br />
on the socket with your s<strong>of</strong>t-faced mallet<br />
will not only break loose the spring-retainer<br />
keepers, it may pop them out as<br />
well, releasing the retainer and spring. If<br />
you're lucky you won't have to use a<br />
spring compressor. If this method doesn't<br />
work 100%-it won't-you'll have to revert<br />
to the spring compressor and finish<br />
removing the keepers.<br />
With the keepers out <strong>of</strong> the way and in<br />
a container where they won't get lost,<br />
you can release the pressure on the spring<br />
and remove the retainer and spring-if<br />
you're using a compressor. Slide the valve<br />
out <strong>of</strong> its seal and valve guide. This may<br />
not be as easy as it sounds. There's usually<br />
a burr around the tip <strong>of</strong> each valve which<br />
can cause a valve to hang up in its guide<br />
as it's being removed. This being the case,<br />
use a flat file to remove the burr by rotating<br />
the at its head<br />
bers the finishing touch.<br />
k<br />
1 14.p.-fL<br />
I<br />
/<br />
-.+ ..<br />
L-<br />
exh<br />
ombustion cha&rs a". intake and<br />
big chunks and a wire 6rush gives the cham-<br />
Cnec~lng neaa-surtace t~arness wlrn rnls precision bar and feeler gage. If a thicker than<br />
2 file at an on the edge <strong>of</strong> the valve 0.006-inch-thick feeler gage fits between the bar and the head surface, resurface the<br />
tip. <strong>To</strong> keep the valves in order, use head.


