

How To Rebuild Your Ford V-8 351C-351M-400-429-460.pdf - Index of
How To Rebuild Your Ford V-8 351C-351M-400-429-460.pdf - Index of
How To Rebuild Your Ford V-8 351C-351M-400-429-460.pdf - Index of

Create successful ePaper yourself
Turn your PDF publications into a flip-book with our unique Google optimized e-Paper software.
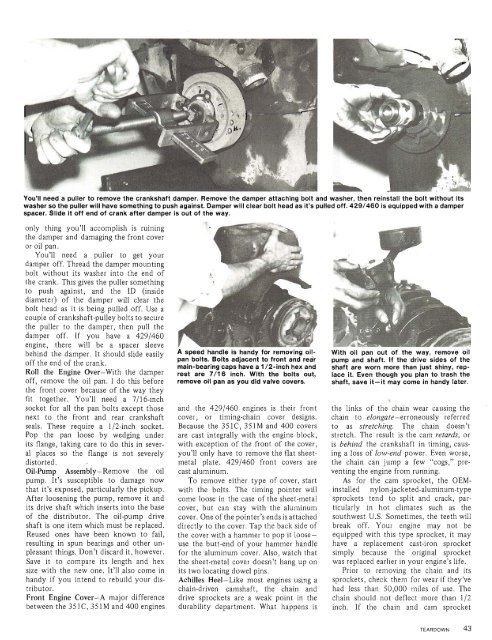
You'll need a puller to remove the crankshaft damper. Remove the damper attaching bolt and washer, then reinstall the bolt without its<br />
washer so the puller will have something to push against. Damper will clear bolt head as it's pulled <strong>of</strong>f. <strong>429</strong>/460 is equipped with a damper<br />
spacer. Slide it <strong>of</strong>f end <strong>of</strong> crank after damper is out <strong>of</strong> the way.<br />
only thing you'll accomplish is ruining<br />
the damper and damaging the front cover<br />
or oil pan.<br />
You'll need a puller to get your<br />
damper <strong>of</strong>f. Thread the damper mounting<br />
bolt without its washer into the end <strong>of</strong><br />
the crank. This gives the puller something<br />
to push against, and the ID (inside<br />
diameter) <strong>of</strong> the damper will clear the<br />
bolt head as it is being pulled <strong>of</strong>f. Use a<br />
couple <strong>of</strong> crankshaft-Pulley bolts to secure<br />
the puller to the damper, then pull the<br />
damper <strong>of</strong>f. If you have a <strong>429</strong>1460<br />
engine, there will be a spacer sleeve<br />
behind the damper. It should slide easily<br />
<strong>of</strong>f the end <strong>of</strong> the crank.<br />
Roll the Engine Over-With the damper<br />
<strong>of</strong>f, remove the oil pan. I do this before<br />
the front cover because <strong>of</strong> the way they<br />
fit together. You'll need a 7116-inch<br />
socket for all the pan bolts except those<br />
next to the front and rear crankshaft<br />
seals. These require a 112-inch socket.<br />
Pop the pan loose by wedging under<br />
its flange, taking care to do this in several<br />
places so the flange is not severely<br />
distorted.<br />
Oil-Pump Assembly-Remove the oil<br />
pump. It's susceptible to damage now<br />
that it's exposed, particularly the pickup.<br />
After loosening the pump, remove it and<br />
its drive shaft which inserts into the base<br />
<strong>of</strong> the distributor. The oil-pump drive<br />
shaft is one item whch must be replaced.<br />
Reused ones have been known to fail.<br />
resulting in spun bearings and other unpleasant<br />
things. Don't discard it, however.<br />
Save it to compare its length and hex<br />
size with the new one. It'll also come in<br />
handy if you intend to rebuild your distributor.<br />
Front Engine Cover-A major difference<br />
between the 351 C, 351 M and <strong>400</strong> engines<br />
A speec ._ .moving oilpan<br />
bolts. Bolts adjacent to front and redr<br />
main-bearing caps have a 1 /2-inch hex and<br />
rest are 7/16 inch. With the bolts out,<br />
remove oil pan as you did valve covers.<br />
and the <strong>429</strong>/460 engines is their front<br />
cover, or timing-chain cover designs.<br />
Because the 35 lC, 351 M and <strong>400</strong> covers<br />
are cast integrally with the engine block,<br />
with exception <strong>of</strong> the front <strong>of</strong> the cover,<br />
you'll only have to remove the flat sheetmetal<br />
plate. <strong>429</strong>1460 front covers are<br />
cast aluminum.<br />
<strong>To</strong> remove either type <strong>of</strong> cover, start<br />
with the bolts. The timing pointer will<br />
come loose in the case <strong>of</strong> the sheet-metal<br />
cover, but can stay with the aluminum<br />
cover. One <strong>of</strong> the pointer's ends is attached<br />
directly to the cover. Tap the back side <strong>of</strong><br />
the cover with a hammer to pop it looseuse<br />
the butt-end <strong>of</strong> your hammer handle<br />
for the aluminum cover. Also, watch that<br />
the sheet-metal cover doesn't hang up on<br />
its two locating dowel pins.<br />
Achilles Heel-Like most engines using a<br />
chain-driven camshaft, the chain and<br />
drive sprockets are a weak point in the<br />
durability department. What happens is<br />
With oil pan c-. -. ~ay, remove oil<br />
pump and shaft. If the drive sides <strong>of</strong> the<br />
shaft are worn more than just shiny, replace<br />
it. Even though you plan to trash the<br />
shaft, save it-it may come in handy later.<br />
5<br />
the links <strong>of</strong> the chain wear causing the<br />
chain to elongate-erroneously referred<br />
to as stretching. The chain doesn't<br />
stretch. The result is the cam retards, or<br />
is behind the crankshaft in timing, causing<br />
a loss <strong>of</strong> low-end power. Even worse,<br />
the chain can jump a few "cogs," preventing<br />
the engine from running.<br />
As for the cam sprocket, the OEMinstalled<br />
nylon-jacketed-aluminum-type<br />
sprockets tend to split and crack, particularly<br />
in hot climates such as the<br />
southwest U.S. Sometimes, the teeth will<br />
break <strong>of</strong>f. <strong>Your</strong> engine may not be<br />
equipped with this type sprocket, it may<br />
have a replacement cast-iron sprocket<br />
simply because the orignal sprocket<br />
was replaced earlier in your engine's life.<br />
Prior to removing the chain and its<br />
sprockets, check them for wear if they've<br />
had less than 50,000 miles <strong>of</strong> use. The<br />
Chain should not deflect more than 112<br />
inch. If the chain and cam sprocket<br />
TEARDOWN 43


