

How To Rebuild Your Ford V-8 351C-351M-400-429-460.pdf - Index of
How To Rebuild Your Ford V-8 351C-351M-400-429-460.pdf - Index of
How To Rebuild Your Ford V-8 351C-351M-400-429-460.pdf - Index of

You also want an ePaper? Increase the reach of your titles
YUMPU automatically turns print PDFs into web optimized ePapers that Google loves.
ENGINE REMOVAL<br />
Don't Trust <strong>Your</strong> Memory-Use a camera<br />
and/or some masking tape. Label each<br />
hose and wire before disconnecting it.<br />
Disconnect all the hoses and wires from<br />
the top <strong>of</strong> the engine. There'll be a hose<br />
from the power-brake booster to the intake<br />
manifold, or one to a vacuum manifold<br />
mounted on the firewall and many<br />
smaller hoses, depending on the year and<br />
how your vehicle is equipped. An enginewiring<br />
harness usually lays along the inboard<br />
flange <strong>of</strong> the left valve cover, held<br />
by clips under two or three valve-cover<br />
bolts. Disconnect the harness leads from<br />
the oil-pressure sending unit, water-temperature<br />
sending unit, coil and/or distributor,<br />
A/C compressor clutch and any<br />
emission-related devices. Remove the harness<br />
with the valve-cover clips, or if they<br />
are the type which bend over for retention,<br />
bend them open to release the harness.<br />
Disconnect the heater hoses. Plan on replacing<br />
them if they are more than twoyears<br />
old.<br />
ACCESSORY REMOVAL<br />
Pulleys and Belts-Engine accessories can<br />
be the most difficult part <strong>of</strong> removing<br />
and replacing an engine. Loosen all<br />
the belts and remove them. This will<br />
free the water-pump pulley, but you may<br />
not be able to remove it if your engine<br />
has a three-belt accessory-drive system.<br />
You'll have to remove the crank pulley<br />
first. After the crank-pulley bolts are out,<br />
tap on the backside <strong>of</strong> the pulley using a<br />
rubber or plastic mallet to loosen it. The<br />
pulley pilots over the center <strong>of</strong> the crankshaft<br />
damper, so it may be a little tight.<br />
The water-pump pulley will now be free<br />
to come <strong>of</strong>f.<br />
A/C Compressor and Power-Steering<br />
Pump-I'll describe an engine with a complete<br />
array <strong>of</strong> accessories, so disregard<br />
those areas which don't apply to your<br />
engine. Start with the A/C compressor<br />
and power-steering pump. Remove the<br />
triangular bracket which sometimes is installed<br />
between the compressor and the<br />
power-steering brackets. With this bracket<br />
out <strong>of</strong> the way you'll be able to see most<br />
<strong>of</strong> the power-steering bracket bolts. Before<br />
removing the A/C compressor, you'll<br />
have to remove the power-steering pump<br />
and its bracket because it mounts to the<br />
bottom compressor bracket. Unbolt the<br />
pump bracket from the block, being careful<br />
to support the pump right-side up to<br />
prevent fluid loss. Leave the hoses connected<br />
to the pump and set the pump<br />
aside. Wire it to the left-front fender<br />
apron if you can't position the pump so it<br />
won't fall over and spill its fluid.<br />
Avoid Disconnecting the A/C Hoses-<br />
Here's where you can save time, trouble<br />
and money. Rather than disconnecting<br />
the A/C-compressor hoses for removing<br />
the compressor from the engine compartment,<br />
set it aside like the power-steering<br />
pump. This avoids the need to recharge<br />
the A/C system after you've reinstalled<br />
your engine.<br />
Begin removing the compressor from<br />
the engine by first removing the upper<br />
support bracket-the one that also mounts<br />
the adjustable idler pulley. Follow this up<br />
by unbolting the compressor and lower<br />
bracket from the front <strong>of</strong> the engine as an<br />
assembly, then lay it to the side out <strong>of</strong><br />
the way. If your engine compartment is<br />
small, such as the Mustang's or Cougar's,<br />
you'll need to get the compressor and its<br />
lines up out <strong>of</strong> the way. Support the compressor<br />
from the left fender with a strong<br />
cord tied to a bent nail. Tie the free end<br />
<strong>of</strong> the cord to a bolt threaded into the<br />
compressor. Lift the compressor and<br />
bracket high on the fender apron, then<br />
hook the nail to the wheel-opening flange<br />
with a rag or a piece <strong>of</strong> cardboard under<br />
the nail. This will keep the paint from "<br />
being damaged. Tie the cord short enough<br />
to support the compressor high and out<br />
<strong>of</strong> your way.<br />
Alternator and Air Pump-The left-front<br />
side <strong>of</strong> your engine now should be bare,<br />
so shift your attention to the opposite<br />
side. There will be an alternator, and possibly,<br />
an air pump-used with <strong>Ford</strong>'s<br />
Thermactor emission-control system. One<br />
will be mounted above the other, but<br />
which way depends on the year and<br />
model. If yours has an air pump, remove<br />
it after disconnecting the hose. Also remove<br />
the bypass valve and other related<br />
hardware. As for the alternator, don't remove<br />
it yet as it'll have to be in place for<br />
a little while longer. You can remove its<br />
adjusting bracket and loosen its long<br />
pivot bolt.<br />
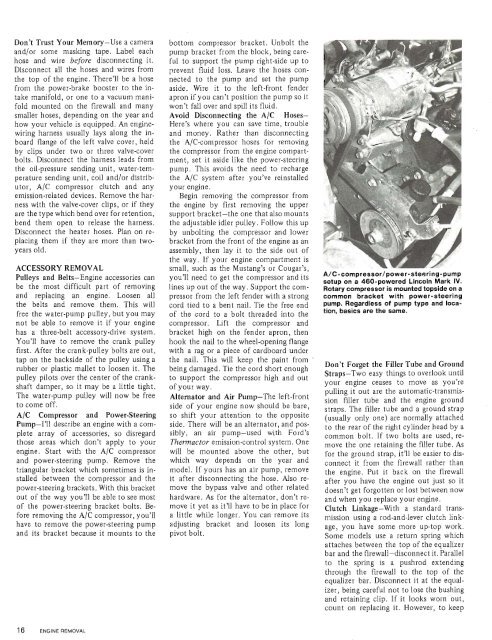
A/C-compressor/power-steering-pump<br />
setup on a 460-powered Lincoln Mark IV.<br />
Rotary compressor is mounted topside on a<br />
common bracket with power-steering<br />
pump. Regardless <strong>of</strong> pump type and location,<br />
basics are the same.<br />
Don't Forget the Filler Tube and Ground<br />
Straps-Two easy things to overlook until<br />
your engine ceases to move as you're<br />
pulling it out are the automatic-transmission<br />
filler tube and the engine ground<br />
straps. The filler tube and a ground strap<br />
(usually only one) are normally attached<br />
to the rear <strong>of</strong> the right cylinder head by a<br />
common bolt. If two bolts are used, remove<br />
the one retaining the filler tube. As<br />
for the ground strap, it'll be easier to disconnect<br />
it from the firewall rather than<br />
the engine. Put it back on the firewall<br />
after you have the engine out just so it<br />
doesn't get forgotten or lost between now<br />
and when you replace your engine.<br />
Clutch Linkage-With a standard transmission<br />
using a rod-and-lever clutch linkage,<br />
you have some more up-top work.<br />
Some models use a return spring which<br />
attaches between the top <strong>of</strong> the equalizer<br />
bar and the firewall-disconnect it. Parallel<br />
to the spring is a pushrod extending<br />
through the firewall to the top <strong>of</strong> the<br />
equalizer bar. Disconnect it at the equalizer,<br />
being careful not to lose the bushing<br />
and retaining clip. If it looks worn out,<br />
count on replacing it. <strong>How</strong>ever, to keep


