

How To Rebuild Your Ford V-8 351C-351M-400-429-460.pdf - Index of
How To Rebuild Your Ford V-8 351C-351M-400-429-460.pdf - Index of
How To Rebuild Your Ford V-8 351C-351M-400-429-460.pdf - Index of

You also want an ePaper? Increase the reach of your titles
YUMPU automatically turns print PDFs into web optimized ePapers that Google loves.
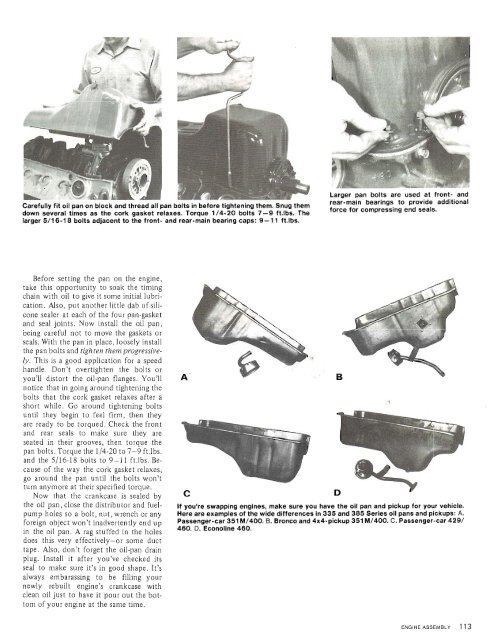
Carefully fit oil pan on block and thread all pan bolts in before tightening them. Snug them<br />
down several times as the cork gasket relaxes. <strong>To</strong>rque 1/4-20 bolts 7-9 ft.lbs. The<br />
larger 5/16-18 bolts adjacent to the front- and rear-main bearing caps: 9-1 1 ft-lbs.<br />
Larger pan bolts are used at front- and<br />
rear-main bearings to provide additional<br />
force for compressing end seals.<br />
Before setting the pan on the engine,<br />
take this opportunity to soak the timing<br />
chain with oil to give it some initial lubrication.<br />
Also, put another little dab <strong>of</strong> silicone<br />
sealer at each <strong>of</strong> the four pan-gasket<br />
and seal joints. Now install the oil pan,<br />
being careful not to move the gaskets or<br />
seals. With the pan in place, loosely install<br />
the pan bolts and tighten them progressively.<br />
This is a good application for a speed<br />
handle. Don't overtighten the bolts or<br />
you'll distort the oil-pan flanges. You'll<br />
notice that in going around tightening the<br />
bolts that the cork gasket relaxes after a<br />
short while. Go around tightening bolts<br />
until they begin to feel firm, then they<br />
are ready to be torqued. Check the front<br />
and rear seals to make sure they are<br />
seated in their grooves, then torque the<br />
pan bolts. <strong>To</strong>rque the 1/4-20 to 7-9 ft.lbs.<br />
and the 5/16-18 bolts to 9-1 1 ft.lbs. Because<br />
<strong>of</strong> the way the cork gasket relaxes,<br />
go around the pan until the bolts won't<br />
turn anymore at their specified torque.<br />
Now that the crankcase is sealed by<br />
the oil pan, close the distributor and fuelpump<br />
holes so a bolt, nut, wrench or any<br />
foreign object won't inadvertently end up<br />
in the oil pan. A rag stuffed in the holes<br />
does this very effectively-or some duct<br />
tape. Also, don't forget the oil-pan drain<br />
plug. Install it after you've checked its<br />
seal to make sure it's in good shape. It's<br />
always embarassing to be filling your<br />
newly rebuilt engine's crankcase with<br />
clean oil just to have it pour out the bottom<br />
<strong>of</strong> your engine at the same time.<br />
If you're swapping engines, make sure you have the oil pan and pickup for your vehicle.<br />
Here are examples <strong>of</strong> the wide differences in 335 and 385 Series oil pans and pickups: A.<br />
Passenger-car 351 M/<strong>400</strong>. B. Bronco and 4x4-pickup 351 M/<strong>400</strong>. C. Passenger-car <strong>429</strong>/<br />
460. D. Econoline 460.


