

How To Rebuild Your Ford V-8 351C-351M-400-429-460.pdf - Index of
How To Rebuild Your Ford V-8 351C-351M-400-429-460.pdf - Index of
How To Rebuild Your Ford V-8 351C-351M-400-429-460.pdf - Index of

Create successful ePaper yourself
Turn your PDF publications into a flip-book with our unique Google optimized e-Paper software.
cam sprocket and chain, and then the<br />
crankshaft sprocket.<br />
After you have the chain and sprockets<br />
<strong>of</strong>f, check the nylon teeth for cracks or<br />
breakage. If there are any, replace that<br />
sprocket. Also, treat it like a chain. Replace<br />
the cam sprocket if it has more than<br />
50,000 miles on it regardless <strong>of</strong> its visual<br />
condition. This is particularly true if you<br />
live in a hot climate and your engine is a<br />
'73 or later emission-controlled model<br />
whch operates at higher temperatures. In<br />
this case, I suggest replacing your aluminumlnylon<br />
cam sprocket with the castiron<br />
type.<br />
As for the cast-iron type sprocket,<br />
they won't be cracked, but the plates<br />
which make up a silent chain may have<br />
worn ridges in the sprocket teeth so one<br />
or both <strong>of</strong> the sprockets should be replaced.<br />
<strong>To</strong> judge tooth wear is difficult.<br />
Drag your fingernail across the face <strong>of</strong> a<br />
tooth. It if is rough to the point <strong>of</strong> making<br />
your fingernail hang up or jump from<br />
ridge to ridge, replace the sprocket/s.<br />
REMOVE CRANK, RODS & PISTONS<br />
BEFORE THE CAM<br />
A camshaft can be removed before<br />
the crankshaft and rod-and-piston assemblies<br />
are out, but it's more convenient to<br />
reverse the procedure. With the crank and<br />
rods out <strong>of</strong> the way, you'll have access to<br />
the full length <strong>of</strong> the cam from inside the<br />
block rather than just the end <strong>of</strong> it from<br />
the front <strong>of</strong> the block.<br />
Remove the Ridge-Because the top piston<br />
ring doesn't travel all the way to the<br />
top <strong>of</strong> its bore when its piston is at TDC,<br />
there is approximately 114 inch <strong>of</strong> unworn<br />
bore and carbon buildup at the top<br />
<strong>of</strong> the cylinder called a ridge. It should be<br />
removed before you attempt to remove<br />
the rod and piston assemblies, particularly<br />
if your pistons can be saved. They can be<br />
damaged easily if forced out over the<br />
ridge. If you know you aren't going to<br />
be using your old pistons, they can be<br />
driven out the top <strong>of</strong> their bores using a<br />
long punch or bar which reaches up under<br />
the dome <strong>of</strong> each piston. Don't hammer<br />
on the rods.<br />
<strong>To</strong> remove the ridges, you'll have to<br />
use a tool appropriately called a ridge<br />
reamer. This tool has a cutter mounted<br />
in a fixture which can be adjusted to fit<br />
the bore. A socket and handle or wrench<br />
from your tool box is all you need to<br />
rotate the tool to do the cutting, or<br />
reaming.<br />
As you go from bore to bore, youll<br />
need to rotate the crankshaft periodically<br />
to move the pistons down their bores so<br />
you'll have clearance for the ridge reamer.<br />
Fate <strong>of</strong> most high-mileage aluminum/nylon<br />
cam sprockets: cracked and broken teeth.<br />
Hot climates and emission controls cause<br />
an engine to operate at higher temperatures<br />
and aggravate the problem.<br />
When cutting a ridge, cut the ridge orzly<br />
to match the worn bore. This is all that's<br />
required to remove a piston. Remove any<br />
more material and you may have to<br />
4'<br />
rebore your engine-whether it needed it<br />
or not.<br />
Now you can get on with the rod-andpiston<br />
removal process. Roll the engine<br />
over on its back to expose the bottom<br />
end. Before removing any corznectingrod<br />
caps, make certain each rod and cap<br />
is numbered to match its respective cylinder.<br />
This for locating the rod-andpiston<br />
assembly in the correct bore and<br />
to assemble the rod correctly to its piston.<br />
Numbers should be on the small machined<br />
flat next to the junction <strong>of</strong><br />
each rod and cap. Also, the numbers<br />
should be on the right side <strong>of</strong> the rods<br />
and caps that are for the right cylinder<br />
bank, and on the left side for those in the<br />
left bank. This check is a precautionary<br />
step because <strong>Ford</strong> stamps the numbers on<br />
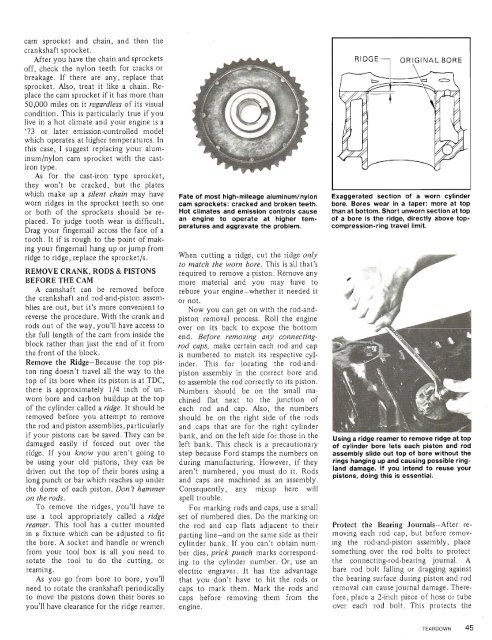
Exaggerated section <strong>of</strong> a worn cylinder<br />
bore. Bores wear in a taper: more at top<br />
than at bottom. Short unworn section at top<br />
<strong>of</strong> a bore is the ridge, directly above topcompression-ring<br />
':<br />
travel limit.<br />
fl<br />
I'<br />
Using a ridge reamer to remove ridge at top<br />
<strong>of</strong> cylinder bore lets each piston and rod<br />
assembly slide out top <strong>of</strong> bore without the<br />
du;ing manufacturing. o ow ever, if they rings hanging up and causing possible ringaren't<br />
you must do it. ~~d~ land damage. If you intend to reuse your<br />
pistons, doing this is essential.<br />
and caps are machined as an assembly.<br />
consequently, any mixup here will<br />
spell trouble.<br />
For marking rods and caps, use a small<br />
set <strong>of</strong> numbered dies. Do the marking on<br />
the rod and cap flats adjacent to their<br />
parting line-and on the same side as their<br />
cylinder bank. If you can't obtain number<br />
dies, prick punch marks corresponding<br />
to the cylinder number. Or, use an<br />
electric engraver. It has the advantage<br />
that you don't have to hit the rods or<br />
caps to mark them. Mark the rods and<br />
caps before removing them from the<br />
engine.<br />
Protect the Bearing Journals-After removing<br />
each rod cap, but before removing<br />
the rod-and-piston assembly, place<br />
something over the rod bolts to protect<br />
the connecting-rod-bearing journal. A<br />
bare rod bolt falling or dragging against<br />
the bearing surface during piston and rod<br />
removal can cause journal damage. Therefore,<br />
place a 2-inch piece <strong>of</strong> hose or tube<br />
over each rod bolt. This protects the<br />
I<br />
TEARDOWN 45


