

How To Rebuild Your Ford V-8 351C-351M-400-429-460.pdf - Index of
How To Rebuild Your Ford V-8 351C-351M-400-429-460.pdf - Index of
How To Rebuild Your Ford V-8 351C-351M-400-429-460.pdf - Index of

You also want an ePaper? Increase the reach of your titles
YUMPU automatically turns print PDFs into web optimized ePapers that Google loves.
1<br />
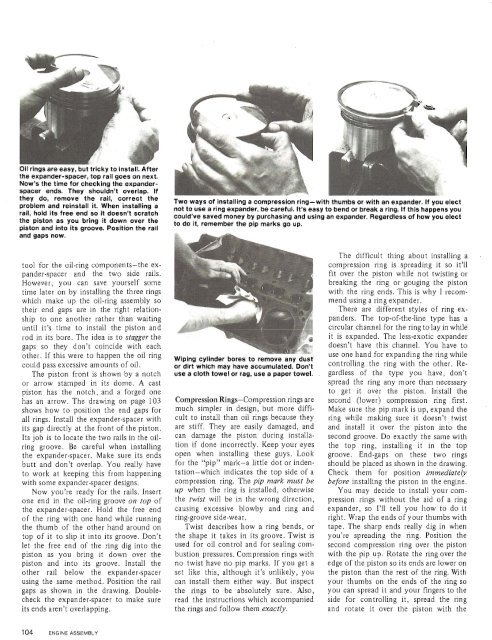
Oil rings are easy, but tricky to install. After<br />
the expander-spacer, top rail goes on next.<br />
Now's the time for checking the expanderspacer<br />
ends. They shouldn't overlap. If<br />
they the rail9 'Orrect the<br />
Two ways <strong>of</strong> installing a compression ring-with thumbs or with an expander. If you elect<br />
problem and reinstall When installing a<br />
not to use a ring expander, be careful. It's easy to bend or break a ring. If this happens you<br />
its free end it scratch could've saved money by purchasing and using an expander. Regardless <strong>of</strong> how you elect<br />
the piston as YOU bring it down over the<br />
to do it, remember the pip marks go up,<br />
piston and into its groove. - Position the rail<br />
and gaps now.<br />
tool for the oil-ring components-the expander-spacer<br />
and the two side rails.<br />
<strong>How</strong>ever, you can save yourself some<br />
time later on by installing the three rings<br />
which make up the oil-ring assembly so<br />
their end gaps are in the right relationship<br />
to one another rather than waiting<br />
until it's time to install the piston and<br />
rod in its bore. The idea is to stagger the<br />
gaps so they don't coincide with each<br />
other. If this were to happen the oil ring<br />
could pass excessive amounts <strong>of</strong> oil.<br />
The piston front is shown by a notch<br />
or arrow stamped in its dome. A cast<br />
piston has the notch, and a forged one<br />
has an arrow. The drawing on page 103<br />
shows how to position the end gaps for<br />
all rings. Install the expander-spacer with<br />
its gap directly at the front <strong>of</strong> the piston.<br />
Its job is to locate the two rails in the oilring<br />
groove. Be careful when installing<br />
the expander-spacer. Make sure its ends<br />
butt and don't overlap. You really have<br />
to work at keeping this from happening<br />
with some expander-spacer designs.<br />
Now you're ready for the rails. Insert<br />
one end in the oil-ring groove on top <strong>of</strong><br />
the expander-spacer. Hold the free end<br />
<strong>of</strong> the ring with one hand while running<br />
the thumb <strong>of</strong> the other hand around on<br />
top <strong>of</strong> it to slip it into its groove. Don't<br />
let the free end <strong>of</strong> the ring dig into the<br />
piston as you bring it down over the<br />
piston and into its groove. Install the<br />
other rail below the expander-spacer<br />
using the same method. Position the rail<br />
gaps as shown in the drawing. Doublecheck<br />
the expander-spacer to make sure<br />
its ends aren't overlapping.<br />
Wlplng cylinder bores to remove any dust<br />
or dirt which may have accumulated. Don't<br />
use a cloth towel or rag, use a paper towel.<br />
Compression Rings-Compression rings are<br />
much simpler in design, but more difficult<br />
to install than oil rings because they<br />
are stiff. They are easily damaged, and<br />
can damage the piston during installation<br />
if done incorrectly. Keep your eyes<br />
open when installing these guys. Look<br />
for the "pip" mark-a little dot or indentation-which<br />
indicates the top side <strong>of</strong> a<br />
compression ring. The pip mark must be<br />
up when the ring is installed, otherwise<br />
the twist will be in the wrong direction,<br />
causing excessive blowby and ring and<br />
ring-groove side-wear.<br />
Twist describes how a ring bends, or<br />
the shape it takes in its groove. Twist is<br />
used for oil control and for sealing combustion<br />
pressures. Compression rings with<br />
no twist have no pip marks. If you get a<br />
set like this, although it's unlikely, you<br />
can install them either way. But inspect<br />
the rings to be absolutely sure. Also,<br />
read the instructions which accompanied<br />
the rings and follow them exactly.<br />
The difficult thing about installing a<br />
compression ring is spreading it so it'll<br />
fit over the piston while not twisting or<br />
breaking the ring or gouging the piston<br />
with the ring ends. This is why I recommend<br />
using a ring expander.<br />
There are different styles <strong>of</strong> ring expanders.<br />
The top-<strong>of</strong>-the-line type has a<br />
circular channel for the ring to lay in while<br />
it is expanded. The less-exotic expander<br />
doesn't have this channel. You have to<br />
use one hand for expanding the ring while<br />
controlling the ring with the other, Regardless<br />
<strong>of</strong> the type you have, don't<br />
spread the ring any more than necessary<br />
to get it over the piston. Install the<br />
second (lower) omp press ion ring first.<br />
Make sure the pip mark is up, expand the<br />
ring while making sure it doesn't twist<br />
and install it over the piston into the<br />
second groove. Do exactly the same with<br />
the top ring, installing it in the top<br />
groove. End-gaps on these two rings<br />
should be placed as shown in the drawing.<br />
Check them for position immediately<br />
before installing the piston in the engine.<br />
You may decide to install your compression<br />
rings without the aid <strong>of</strong> a ring<br />
expander, so I'll tell you how to do it<br />
right. Wrap the ends <strong>of</strong> your thumbs with<br />
tape. The sharp ends really dig in when<br />
you're spreading the ring. Position the<br />
second compression ring over the piston<br />
with the pip up. Rotate the ring over the<br />
edge <strong>of</strong> the piston so its ends are lower on<br />
the piston than the rest <strong>of</strong> the ring. With<br />
your thumbs on the ends <strong>of</strong> the ring so<br />
you can spread it and your fingers to the<br />
side for controlling it, spread the ring<br />
and rotate it over the piston with the


