

How To Rebuild Your Ford V-8 351C-351M-400-429-460.pdf - Index of
How To Rebuild Your Ford V-8 351C-351M-400-429-460.pdf - Index of
How To Rebuild Your Ford V-8 351C-351M-400-429-460.pdf - Index of

You also want an ePaper? Increase the reach of your titles
YUMPU automatically turns print PDFs into web optimized ePapers that Google loves.
will be sealed the first time the valve<br />
closes. Leakage due to poor seating can<br />
cause a warped valve, or a burned valve<br />
and seat.<br />
The other two angles, 30" and 60°, are<br />
the top cut and the bottom cut, respectively.<br />
The 30' and 60" angles are important<br />
for low-valve-lift air flow. The 30'<br />
top cut is on the combustion-chamber<br />
side. It trues up and establishes the seat's<br />
outside diameter. The 60" bottom cut on<br />
the port side establishes seat ID, but more<br />
importantly, valve-seat width. Valve seat<br />
OD should be ground approximately ..,. A<br />
1/16-inch Smaller than the Valve OD.<br />
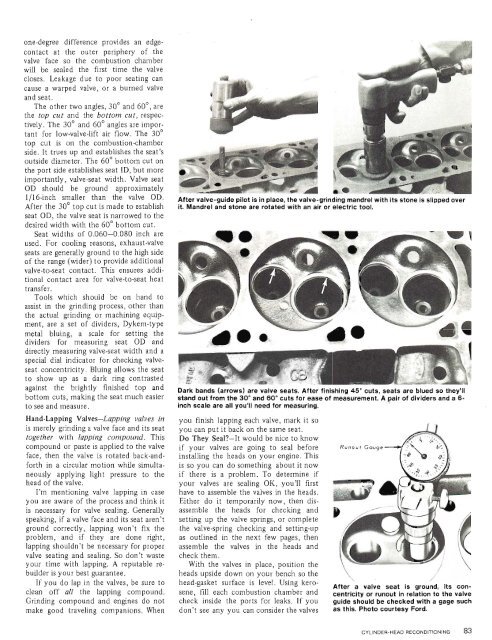
grinding mandrel wlm 1. s=ed over<br />
After the 30" top cut is made to establish it. Mandrel and stone are rotated with en air or electric tool.<br />
seat OD, the valve seat is narrowed to the<br />
desired width with the 60" bottom cut.<br />
Seat widths <strong>of</strong> 0.060-0.080 inch are<br />
used. For cooling reasons, exhaust-valve<br />
seats are generally ground to the high side<br />
<strong>of</strong> the range (wider) to provide additional<br />
valve-to-seat contact. This ensures additional<br />
contact area for valve-to-seat heat<br />
transfer.<br />
<strong>To</strong>ols which should be on hand to<br />
assist in the grinding process, other than<br />
the actual grinding or machining equipment,<br />
are a set <strong>of</strong> dividers, Dykem-type<br />
metal bluing, a scale for setting the<br />
dividers for measuring seat OD and<br />
directly measuring valve-seat width and a<br />
special dial indicator for checking valve-<br />
seat concentricity. Bluing allows the seat r g * ,<br />
to show up as a dark ring contrasted<br />
+ - &.<br />
against the top and<br />
bottom cuts, making the seat much easier<br />
to see and measure.<br />
Hand-Lapping Valves-Lapping valves in<br />
is merely grinding a valve face and its seat<br />
together with lapping compound. This<br />
compound or paste is applied to the valve<br />
face, then the valve is rotated back-andforth<br />
in a circular motion while simultaneously<br />
applying light pressure to the<br />
head <strong>of</strong> the valve.<br />
I'm mentioning valve lapping in case<br />
you are aware <strong>of</strong> the process and think it<br />
is necessary for valve sealing. Generally<br />
speaking, if a valve face and its seat aren't<br />
ground correctly, lapping won't fix the<br />
problem, and if they are done right,<br />
lapping shouldn't be necessary for proper<br />
valve seating and sealing. So don't waste<br />
your time with lapping. A reputable rebuilder<br />
is your best guarantee.<br />
If you do lap in the valves, be sure to<br />
clean <strong>of</strong>f all the lapping compound.<br />
Grinding compound and engines do not<br />
make good traveling companions. When<br />
you finish lapping each valve, mark it so<br />
you can put it back on the same seat.<br />
Do They Seal-It would be nice to know<br />
if your valves are going to seal before<br />
installing the heads on your engine. This<br />
is so you can do something about it now<br />
if there is a problem. <strong>To</strong> determine if<br />
your valves are sealing OK, you'll first<br />
have to assemble the valves in the heads.<br />
Either do it temporarily now, then disassemble<br />
the heads for checking and<br />
setting up the valve springs, or complete<br />
the valve-spring checking and setting-up<br />
as outlined in the next few pages, then<br />
assemble the valves in the heads and<br />
check them.<br />
With the valves in place, position the<br />
heads upside down on your bench so the<br />
head-gasket surface is level. Using kerosene,<br />
fill each combustion chamber and<br />
check inside the ports for leaks. If you<br />
don't see any you can consider the valves<br />
. . . - I<br />
/'<br />
I<br />
I ,<br />
After a valve seat is its<br />
centricity or runout in relation to the valve<br />
guide should be checked with a gage such<br />
as this. Photo courtesy <strong>Ford</strong>.


