How To Rebuild Your Ford V-8 351C-351M-400-429-460.pdf - Index of
How To Rebuild Your Ford V-8 351C-351M-400-429-460.pdf - Index of
How To Rebuild Your Ford V-8 351C-351M-400-429-460.pdf - Index of
Create successful ePaper yourself
Turn your PDF publications into a flip-book with our unique Google optimized e-Paper software.
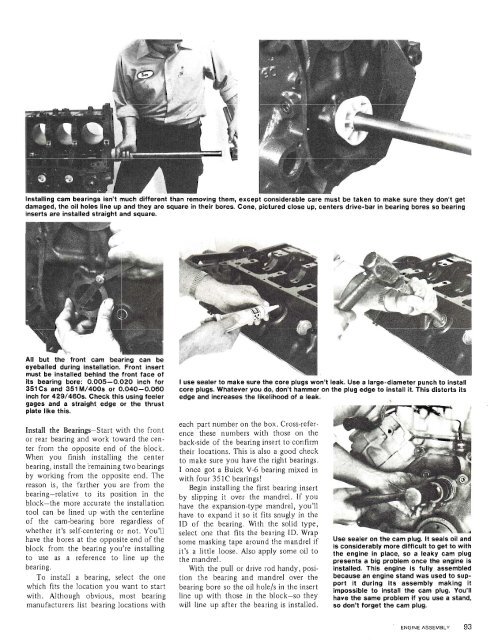
.,., ....., ,. ,., .,. . .,. different than removing them, except c ~_ ._ lust be taken to make sure they don't get<br />
damaged, the oil holes line up and they are square in their bores. Cone, pictured close up, centers drive-bar in bearing bores so bearing<br />
inserts are installed straight and square.<br />
eyeballed during installation. Front insert<br />
must be installed behind the front face <strong>of</strong><br />
its bearing bore: 0.005-0.020 inch for I use sealer to make sure the core plugs won't leak. Use a large-diameter punch to install<br />
351 Cs and 351 M/<strong>400</strong>s or 0.040-0.060 core plugs. Whatever you do, don't hammer on the plug edge to Install it. This distorts its<br />
inch for <strong>429</strong>/460s. Check this using feeler edge and increases the likelihood <strong>of</strong> a leak.<br />
gages and a straight edge or the thrust<br />
plate like this.<br />
Install the Bearings-Start with the front<br />
or rear bearing and work toward the center<br />
from the opposite end <strong>of</strong> the block.<br />
When you finish installing the center<br />
bearing, install the -remaining two bearings<br />
by working from the opposite end. The<br />
reason is, the farther you are from the<br />
bearing-relative to its position in the<br />
block-the more accurate the installation<br />
tool can be lined up with the centerline<br />
<strong>of</strong> the cam-bearing bore regardless <strong>of</strong><br />
whether it's self-centering or not. You'll<br />
have the bores at the opposite end <strong>of</strong> the<br />
block from the bearing you're installing<br />
to use as a reference to line up the<br />
bearing.<br />
<strong>To</strong> install a bearing, select the one<br />
which fits the location you want to start<br />
with. Although obvious, most bearing<br />
manufacturers list bearing locations with<br />
each part number on the box. Cross-reference<br />
these numbers with those on the<br />
back-side <strong>of</strong> the bearing insert to confirm<br />
their locations. This is also a good check<br />
to make sure you have the right bearings.<br />
I once got a Buick V-6 bearing mixed in<br />
with four <strong>351C</strong> bearings!<br />
Begin installing the first bearing insert<br />
by slipping it over the mandrel. If you<br />
have the expansion-type mandrel, you'll<br />
have to expand it so it fits snugly in the<br />
ID <strong>of</strong> the bearing. With the solid type,<br />
select one that fits the bearing ID. Wrap<br />
some masking tape around the mandrel if<br />
it's a little loose. Also apply some oil to<br />
the mandrel.<br />
With the pull or drive rod handy, position<br />
the bearing and mandrel over the<br />
bearing bore so the oil hole/s in the insert<br />
line up with those in the block-so they<br />
will line up after the bearing is installed.<br />
Use sealer on the cam plug. It seals oil and<br />
is considerably more difficult to get to with<br />
the engine in place, so a leaky cam plug<br />
presents a big problem once the engine is<br />
installed. This engine is fully assembled<br />
because an engine stand was used to support<br />
it during its assembly making it<br />
impossible to install the cam plug. You'll<br />
have the same problem if you use a stand,<br />
so don't forget the cam plug.<br />
ENGINE ASSEMBLY 93


