

Tsunami - Beckman Institute Laser Resource Center
Tsunami - Beckman Institute Laser Resource Center
Tsunami - Beckman Institute Laser Resource Center

You also want an ePaper? Increase the reach of your titles
YUMPU automatically turns print PDFs into web optimized ePapers that Google loves.
<strong>Tsunami</strong><br />
On rare occasions, the lower surface requires cleaning:<br />
3. Remove the filter from its mount.<br />
a. Turn the micrometer counterclockwise until the mounting set<br />
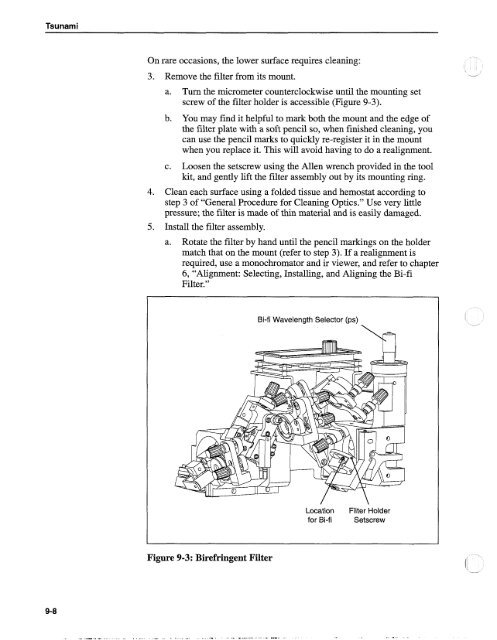
screw of the filter holder is accessible (Figure 9-3).<br />
b. You may find it helpful to mark both the mount and the edge of<br />
the filter plate with a soft pencil so, when finished cleaning, you<br />
can use the pencil marks to quickly re-register it in the mount<br />
when you replace it. This will avoid having to do a realignment.<br />
c. Loosen the setscrew using the Allen wrench provided in the tool<br />
kit, and gently lift the filter assembly out by its mounting ring.<br />
4. Clean each surface using a folded tissue and hemostat according to<br />
step 3 of "General Procedure for Cleaning Optics." Use very little<br />
pressure; the filter is made of thin material and is easily damaged.<br />
5. Install the filter assembly.<br />
a. Rotate the filter by hand until the pencil markings on the holder<br />
match that on the mount (refer to step 3). If a realignment is<br />
required, use a monochromator and ir viewer, and refer to chapter<br />
6, "Alignment: Selecting, Installing, and Aligning the Bi-fi<br />
Filter."<br />
Bi-fi Wavelength Selector (ps)<br />
Location<br />
for Bi-fi<br />
Filter Holder<br />
Setscrew<br />
Figure 9-3: Birefringent Filter<br />
I<br />
-


