

Tsunami - Beckman Institute Laser Resource Center
Tsunami - Beckman Institute Laser Resource Center
Tsunami - Beckman Institute Laser Resource Center

Create successful ePaper yourself
Turn your PDF publications into a flip-book with our unique Google optimized e-Paper software.
<strong>Tsunami</strong><br />
Refer to the tables at the end of chapter 10, "Options and Accessories,"<br />
to match mirror part numbers to the respective mirror positions.<br />
-"/<br />
Optic part numbers are written on the barrel of each optic along with<br />
a v-shaped arrow that points to the coated, intracavity surface. Always<br />
close the shutter when replacing optics.<br />
4. Clean the <strong>Tsunami</strong> windows.<br />
Refer to chapter 9, "Maintenance: Removing and Cleaning <strong>Tsunami</strong><br />
Optics: Brewster Windows."<br />
5. Clean the beam splitter(s), Brewster windows, and all other optical<br />
surfaces in the ion laser as required. Refer to your ion laser manual.<br />
6. Open both laser shutters and check the alignment of the pump beam<br />
into the <strong>Tsunami</strong> laser.<br />
Refer to chapter 5, "Installation: Installing the Pump <strong>Laser</strong>" and "Installing<br />
the <strong>Tsunami</strong> <strong>Laser</strong> Head," for initial alignment information.<br />
Close the shutter when you are done.<br />
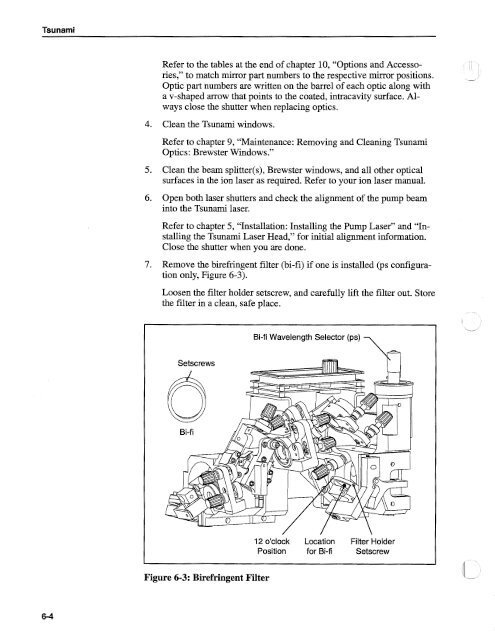
7. Remove the birefringent filter (bi-fi) if one is installed (ps configuration<br />
only, Figure 6-3).<br />
Loosen the filter holder setscrew, and carefully lift the filter out. Store<br />
the filter in a clean, safe place.<br />
Bi-fi Wavelength Selector (ps)<br />
7<br />
12 o'clock Location Filter Holder<br />
Position for Bi-fi Setscrew<br />
Figure 6-3: Birefringent Filter


