sepam 20 user manual - Schneider Electric
sepam 20 user manual - Schneider Electric
sepam 20 user manual - Schneider Electric

You also want an ePaper? Increase the reach of your titles
YUMPU automatically turns print PDFs into web optimized ePapers that Google loves.
6<br />
MT10490<br />
DE80068<br />
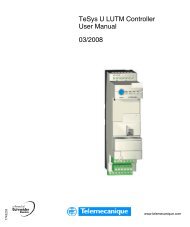
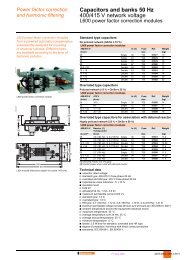
Installation 1 A/5 A Current transformers<br />
Bridging of terminals<br />
1, 2, 3 and 9<br />
6/18<br />
DE80069<br />
Bridging of terminals<br />
1, 2 and 3<br />
CAUTION<br />
HAZARD OF IMPROPER OPERATION<br />
Do not use a CCA634 and residual current input<br />
I0 on connector A (terminals 18 and 19).<br />
Even if it is not connected to a sensor, a CCA634<br />
will disturb input I0 on connector A<br />
Failure to follow this instruction can cause<br />
equipment damage.<br />
.<br />
Connecting and assembling the CCA630 connector<br />
1. Open the 2 side shields for access to the connection terminals. The shields can<br />
be removed, if necessary, to make wiring easier. If removed, they must be replaced<br />
after wiring.<br />
2. If necessary, remove the bridging strap linking terminals 1, 2 and 3. This strap is<br />
supplied with the CCA630.<br />
3. Connect the wires using 4 mm (0.16 in) ring lugs and check the tightness of the<br />
6 screws that guarantee the continuity of the CT secondary circuits.<br />
The connector accommodates wires with cross-sections of 1.5 to 6 mm²<br />
(AWG 16-10).<br />
4. Close the side shields.<br />
5. Plug the connector into the 9-pin inlet on the rear panel (item B<br />
).<br />
6. Tighten the 2 CCA630 connector fastening screws on the rear panel of Sepam.<br />
Connecting and assembling the CCA634 connector<br />
1. Open the 2 side shields for access to the connection terminals. The shields can<br />
be removed, if necessary, to make wiring easier. If removed, they must be replaced<br />
after wiring.<br />
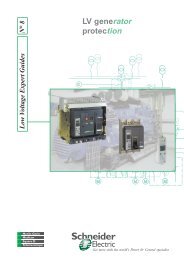
2. According to the wiring required, remove or reverse the bridging strap. This is used<br />
to link either terminals 1, 2 and 3, or terminals 1, 2, 3 and 9 (see picture opposite).<br />
3. Use terminal 7 (1 A) or 8 (5 A) to measure the residual current according to the<br />
CT secondary.<br />
4. Connect the wires using 4 mm (0.16 in) ring lugs and check the tightness of the<br />
6 screws that guarantee the continuity of the CT secondary circuits.<br />
The connector accommodates wires with cross-sections of 1.5 to 6 mm²<br />
(AWG 16-10).<br />
The wires only exit from the base.<br />
5. Close the side shields.<br />
6. Insert the connector pins into the slots on the base unit.<br />
7. Flatten the connector against the unit to plug it into the 9-pin SUB-D connector<br />
(principle similar to that of the MES module).<br />
8. Tighten the mounting screw.<br />
PCRED301005EN - 06/<strong>20</strong>08