DS7200V2-EXP - Simon Technologies
DS7200V2-EXP - Simon Technologies
DS7200V2-EXP - Simon Technologies

You also want an ePaper? Increase the reach of your titles
YUMPU automatically turns print PDFs into web optimized ePapers that Google loves.
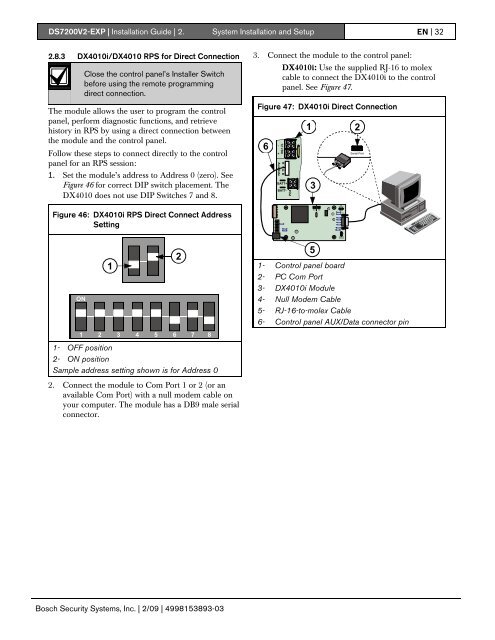
P3LEDENABLEP2P6P1<strong>DS7200V2</strong>-<strong>EXP</strong> | Installation Guide | 2. System Installation and Setup EN | 322.8.3 DX4010i/DX4010 RPS for Direct ConnectionClose the control panel’s Installer Switchbefore using the remote programmingdirect connection.The module allows the user to program the controlpanel, perform diagnostic functions, and retrievehistory in RPS by using a direct connection betweenthe module and the control panel.Follow these steps to connect directly to the controlpanel for an RPS session:1. Set the module’s address to Address 0 (zero). SeeFigure 46 for correct DIP switch placement. TheDX4010 does not use DIP Switches 7 and 8.3. Connect the module to the control panel:DX4010i: Use the supplied RJ-16 to molexcable to connect the DX4010i to the controlpanel. See Figure 47.Figure 47: DX4010i Direct Connection6BATT+BATT-1 23Serial PortFigure 46: DX4010i RPS Direct Connect AddressSettingRxTx Tx RxBUS SERDB9 GNDEN ABLEON1251- Control panel board2- PC Com Port3- DX4010i Module4- Null Modem Cable5- RJ-16-to-molex Cable6- Control panel AUX/Data connector pin1 2 3 4 5 6 7 81- OFF position2- ON positionSample address setting shown is for Address 02. Connect the module to Com Port 1 or 2 (or anavailable Com Port) with a null modem cable onyour computer. The module has a DB9 male serialconnector.Bosch Security Systems, Inc. | 2/09 | 4998153893-03