Adept Cobra s600/s800 Robot User's Guide - pulsar.com.tr
Adept Cobra s600/s800 Robot User's Guide - pulsar.com.tr
Adept Cobra s600/s800 Robot User's Guide - pulsar.com.tr
Create successful ePaper yourself
Turn your PDF publications into a flip-book with our unique Google optimized e-Paper software.
Chapter 6 - Optional Equipment Installation<br />
ESTOP Connector<br />
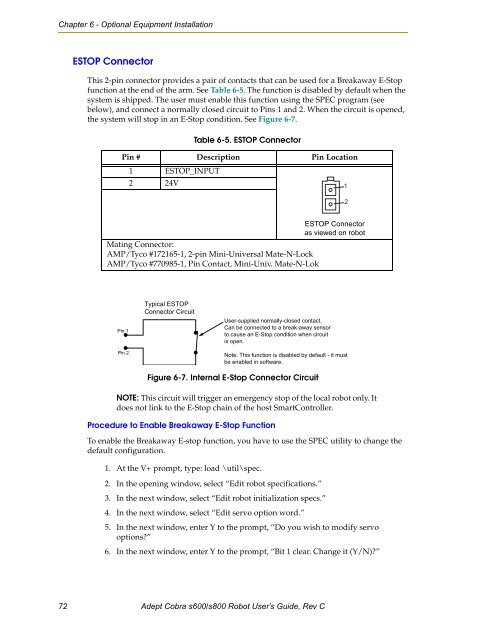
This 2-pin connector provides a pair of contacts that can be used for a Breakaway E-Stop<br />
function at the end of the arm. See Table 6-5. The function is disabled by default when the<br />
system is shipped. The user must enable this function using the SPEC program (see<br />
below), and connect a normally closed circuit to Pins 1 and 2. When the circuit is opened,<br />
the system will stop in an E-Stop condition. See Figure 6-7.<br />
Table 6-5. ESTOP Connector<br />
Pin # Description Pin Location<br />
1 ESTOP_INPUT<br />
2 24V<br />
1<br />
2<br />
Mating Connector:<br />
AMP/Tyco #172165-1, 2-pin Mini-Universal Mate-N-Lock<br />
AMP/Tyco #770985-1, Pin Contact, Mini-Univ. Mate-N-Lok<br />
ESTOP Connector<br />
as viewed on robot<br />
Pin 1<br />
Pin 2<br />
Typical ESTOP<br />
Connector Circuit<br />
User-supplied normally-closed contact.<br />
Can be connected to a break-away sensor<br />
to cause an E-Stop condition when circuit<br />
is open.<br />
Note: This function is disabled by default - it must<br />
be enabled in software.<br />
Figure 6-7. Internal E-Stop Connector Circuit<br />
NOTE: This circuit will <strong>tr</strong>igger an emergency stop of the local robot only. It<br />
does not link to the E-Stop chain of the host SmartCon<strong>tr</strong>oller.<br />
Procedure to Enable Breakaway E-Stop Function<br />
To enable the Breakaway E-stop function, you have to use the SPEC utility to change the<br />
default configuration.<br />
1. At the V+ prompt, type: load \util\spec.<br />
2. In the opening window, select “Edit robot specifications.”<br />
3. In the next window, select “Edit robot initialization specs.”<br />
4. In the next window, select “Edit servo option word.”<br />
5. In the next window, enter Y to the prompt, “Do you wish to modify servo<br />
options?”<br />
6. In the next window, enter Y to the prompt, “Bit 1 clear. Change it (Y/N)?”<br />
72 <s<strong>tr</strong>ong>Adept</s<strong>tr</strong>ong> <s<strong>tr</strong>ong>Cobra</s<strong>tr</strong>ong> <s<strong>tr</strong>ong>s600</s<strong>tr</strong>ong>/<s<strong>tr</strong>ong>s800</s<strong>tr</strong>ong> <s<strong>tr</strong>ong>Robot</s<strong>tr</strong>ong> User’s <s<strong>tr</strong>ong>Guide</s<strong>tr</strong>ong>, Rev C


