

Adept Cobra s600/s800 Robot User's Guide - pulsar.com.tr
Adept Cobra s600/s800 Robot User's Guide - pulsar.com.tr
Adept Cobra s600/s800 Robot User's Guide - pulsar.com.tr

Create successful ePaper yourself
Turn your PDF publications into a flip-book with our unique Google optimized e-Paper software.
Installing <s<strong>tr</strong>ong>Robot</s<strong>tr</strong>ong> Solenoid Kit<br />
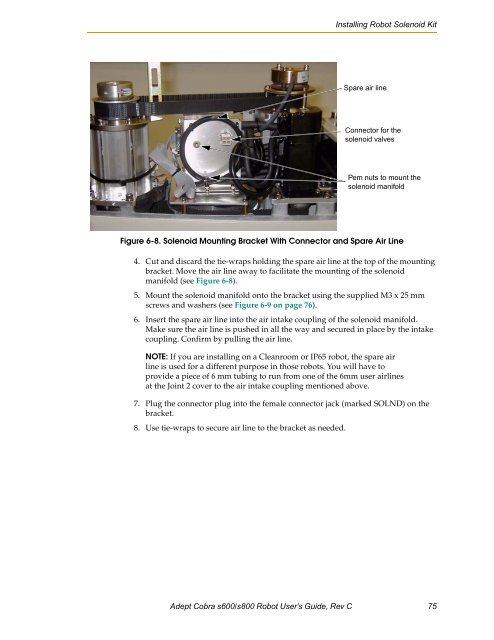
Spare air line<br />
Connector for the<br />
solenoid valves<br />
Pem nuts to mount the<br />
solenoid manifold<br />
Figure 6-8. Solenoid Mounting Bracket With Connector and Spare Air Line<br />
4. Cut and discard the tie-wraps holding the spare air line at the top of the mounting<br />
bracket. Move the air line away to facilitate the mounting of the solenoid<br />
manifold (see Figure 6-8).<br />
5. Mount the solenoid manifold onto the bracket using the supplied M3 x 25 mm<br />
screws and washers (see Figure 6-9 on page 76).<br />
6. Insert the spare air line into the air intake coupling of the solenoid manifold.<br />
Make sure the air line is pushed in all the way and secured in place by the intake<br />
coupling. Confirm by pulling the air line.<br />
NOTE: If you are installing on a Cleanroom or IP65 robot, the spare air<br />
line is used for a different purpose in those robots. You will have to<br />
provide a piece of 6 mm tubing to run from one of the 6mm user airlines<br />
at the Joint 2 cover to the air intake coupling mentioned above.<br />
7. Plug the connector plug into the female connector jack (marked SOLND) on the<br />
bracket.<br />
8. Use tie-wraps to secure air line to the bracket as needed.<br />
<s<strong>tr</strong>ong>Adept</s<strong>tr</strong>ong> <s<strong>tr</strong>ong>Cobra</s<strong>tr</strong>ong> <s<strong>tr</strong>ong>s600</s<strong>tr</strong>ong>/<s<strong>tr</strong>ong>s800</s<strong>tr</strong>ong> <s<strong>tr</strong>ong>Robot</s<strong>tr</strong>ong> User’s <s<strong>tr</strong>ong>Guide</s<strong>tr</strong>ong>, Rev C 75


