Adept Cobra s600/s800 Robot User's Guide - pulsar.com.tr
Adept Cobra s600/s800 Robot User's Guide - pulsar.com.tr
Adept Cobra s600/s800 Robot User's Guide - pulsar.com.tr
Create successful ePaper yourself
Turn your PDF publications into a flip-book with our unique Google optimized e-Paper software.
Chapter 7 - Maintenance<br />
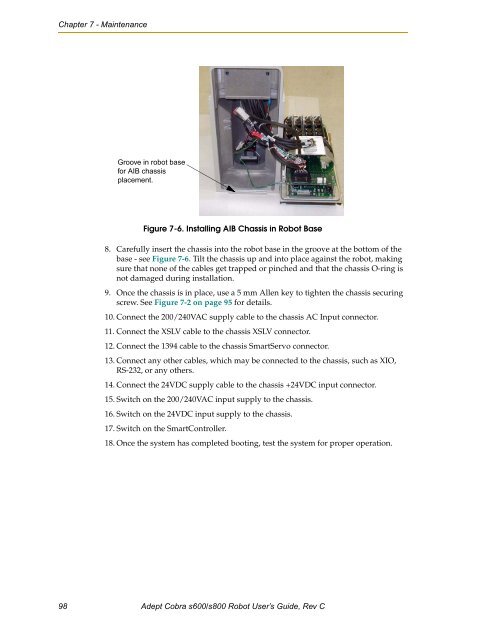
Groove in robot base<br />
for AIB chassis<br />
placement.<br />
Figure 7-6. Installing AIB Chassis in <s<strong>tr</strong>ong>Robot</s<strong>tr</strong>ong> Base<br />
8. Carefully insert the chassis into the robot base in the groove at the bottom of the<br />
base - see Figure 7-6. Tilt the chassis up and into place against the robot, making<br />
sure that none of the cables get <strong>tr</strong>apped or pinched and that the chassis O-ring is<br />
not damaged during installation.<br />
9. Once the chassis is in place, use a 5 mm Allen key to tighten the chassis securing<br />
screw. See Figure 7-2 on page 95 for details.<br />
10. Connect the 200/240VAC supply cable to the chassis AC Input connector.<br />
11. Connect the XSLV cable to the chassis XSLV connector.<br />
12. Connect the 1394 cable to the chassis SmartServo connector.<br />
13. Connect any other cables, which may be connected to the chassis, such as XIO,<br />
RS-232, or any others.<br />
14. Connect the 24VDC supply cable to the chassis +24VDC input connector.<br />
15. Switch on the 200/240VAC input supply to the chassis.<br />
16. Switch on the 24VDC input supply to the chassis.<br />
17. Switch on the SmartCon<strong>tr</strong>oller.<br />
18. Once the system has <s<strong>tr</strong>ong>com</s<strong>tr</strong>ong>pleted booting, test the system for proper operation.<br />
98 <s<strong>tr</strong>ong>Adept</s<strong>tr</strong>ong> <s<strong>tr</strong>ong>Cobra</s<strong>tr</strong>ong> <s<strong>tr</strong>ong>s600</s<strong>tr</strong>ong>/<s<strong>tr</strong>ong>s800</s<strong>tr</strong>ong> <s<strong>tr</strong>ong>Robot</s<strong>tr</strong>ong> User’s <s<strong>tr</strong>ong>Guide</s<strong>tr</strong>ong>, Rev C


