

Adept Cobra s600/s800 Robot User's Guide - pulsar.com.tr
Adept Cobra s600/s800 Robot User's Guide - pulsar.com.tr
Adept Cobra s600/s800 Robot User's Guide - pulsar.com.tr

Create successful ePaper yourself
Turn your PDF publications into a flip-book with our unique Google optimized e-Paper software.
Chapter 6 - Optional Equipment Installation<br />
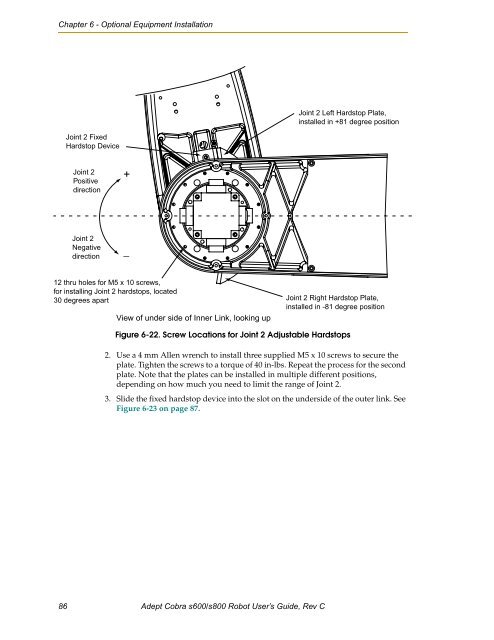
Joint 2 Left Hardstop Plate,<br />
installed in +81 degree position<br />
Joint 2 Fixed<br />
Hardstop Device<br />
Joint 2<br />
Positive<br />
direction<br />
+<br />
Joint 2<br />
Negative<br />
direction<br />
_<br />
12 thru holes for M5 x 10 screws,<br />
for installing Joint 2 hardstops, located<br />
30 degrees apart<br />
View of under side of Inner Link, looking up<br />
Joint 2 Right Hardstop Plate,<br />
installed in -81 degree position<br />
Figure 6-22. Screw Locations for Joint 2 Adjustable Hardstops<br />
2. Use a 4 mm Allen wrench to install three supplied M5 x 10 screws to secure the<br />
plate. Tighten the screws to a torque of 40 in-lbs. Repeat the process for the second<br />
plate. Note that the plates can be installed in multiple different positions,<br />
depending on how much you need to limit the range of Joint 2.<br />
3. Slide the fixed hardstop device into the slot on the underside of the outer link. See<br />
Figure 6-23 on page 87.<br />
86 <s<strong>tr</strong>ong>Adept</s<strong>tr</strong>ong> <s<strong>tr</strong>ong>Cobra</s<strong>tr</strong>ong> <s<strong>tr</strong>ong>s600</s<strong>tr</strong>ong>/<s<strong>tr</strong>ong>s800</s<strong>tr</strong>ong> <s<strong>tr</strong>ong>Robot</s<strong>tr</strong>ong> User’s <s<strong>tr</strong>ong>Guide</s<strong>tr</strong>ong>, Rev C


