- Page 1:
Manual TextMaker © 1987-2012 SoftM
- Page 4 and 5:
Simple formatting .................
- Page 6 and 7:
The paragraph style Normal ........
- Page 8 and 9:
Object mode .......................
- Page 10 and 11:
Creating a new database ...........
- Page 12 and 13:
Starting a fax transmission .......
- Page 14 and 15:
Installing additional dictionaries
- Page 16 and 17:
Additional features in SoftMaker Of
- Page 18 and 19:
The Enter key is represented by (¢
- Page 20 and 21:
Installing under Windows Mobile or
- Page 22 and 23:
The title bar indicates the name of
- Page 24 and 25:
Indentations and tab stops are not
- Page 26 and 27:
and most of the toolbars are hidden
- Page 28 and 29:
Altogether the following direction
- Page 30 and 31:
Deleting large sections of text: Th
- Page 32 and 33:
Using document templates Apart from
- Page 34 and 35:
Using Quick Paths With the Quick Pa
- Page 37 and 38:
The TextMaker Tour Welcome to the T
- Page 39 and 40:
The finished text Next, we need to
- Page 41 and 42:
control panel, or by pressing (Esc)
- Page 43 and 44:
Now it is time once again to save t
- Page 45 and 46:
32 is not present in the list of fo
- Page 47 and 48:
Note: Paragraph format actions - in
- Page 49 and 50:
2. Choose the desired tab type in t
- Page 51 and 52:
Of course, what is still missing is
- Page 53 and 54:
This time we will select the MicroS
- Page 55 and 56:
Since we only want to change the to
- Page 57 and 58:
Working with selections This chapte
- Page 59 and 60:
Canceling the selection When you wa
- Page 61:
Pasting with special formatting In
- Page 64 and 65:
Modifying character formatting Ther
- Page 66 and 67:
Superscript (e.g. r 2 ) and subscri
- Page 68 and 69:
Letter spacing and character pitch
- Page 70 and 71:
Hiding text You can hide sections o
- Page 72 and 73:
Important note: If you select a ran
- Page 74 and 75:
Paragraph styles (for the advanced
- Page 76 and 77:
To change the line spacing, do the
- Page 78 and 79:
To change these settings, invoke th
- Page 80 and 81:
Setting the default language Import
- Page 82 and 83:
Deactivating hyphenation for a docu
- Page 84 and 85:
desired character format (see chapt
- Page 86 and 87:
Centered Decimal The text after the
- Page 88 and 89:
Creating bulleted lists is an easy
- Page 90 and 91:
Default and Custom Here you can sel
- Page 92 and 93:
Note: Drop caps can be used only in
- Page 94 and 95:
Borders and lines With the command
- Page 96 and 97:
Thickness Determines the width of t
- Page 98 and 99:
Application example: If you enable
- Page 100 and 101:
performed, and the text is continue
- Page 102 and 103:
Paper bins Available only under Win
- Page 104 and 105:
Insert the page count (as a field)
- Page 106 and 107:
Page width: This is the default set
- Page 108 and 109:
Deleting headers and footers You ca
- Page 110 and 111:
Locking master page objects in norm
- Page 112 and 113:
Paper format, orientation and margi
- Page 114 and 115:
Borders and shading of master pages
- Page 117 and 118:
Styles Styles are very useful aides
- Page 119 and 120:
Creating character styles To create
- Page 121 and 122:
Applying character styles To apply
- Page 123 and 124:
Deleting or renaming styles To dele
- Page 125 and 126:
1. First, create a character style
- Page 127 and 128:
Paragraph styles You can save a fre
- Page 129 and 130:
Proceed as follows: 1. Set up the p
- Page 131 and 132:
Important: Changing a paragraph sty
- Page 133 and 134:
The paragraph style Normal A paragr
- Page 135 and 136:
A little menu with commands for man
- Page 137 and 138:
Delete button To delete styles, sel
- Page 139 and 140:
1. Invoke File > New. 2. A dialog a
- Page 141 and 142:
Multi-column page layouts In TextMa
- Page 143 and 144:
Presets group box Here you can sele
- Page 145:
What are sections? The term “sect
- Page 148 and 149:
Searching You can search a document
- Page 150 and 151:
Hint: A search operation can also b
- Page 152 and 153:
Any number (^#) - if you specify, f
- Page 154 and 155:
To continue searching, click on the
- Page 156 and 157:
1. Invoke the Edit > Go to ... comm
- Page 158 and 159:
Objects Footnotes Footnote referenc
- Page 160 and 161:
Select the type of field to be inse
- Page 162 and 163:
graph style “Heading 1”) in the
- Page 164 and 165:
ddd weekday abbreviated to three le
- Page 167 and 168:
Inserting special characters Some c
- Page 169 and 170:
Automatic numbering TextMaker has s
- Page 171 and 172:
5. As required, set the desired opt
- Page 173 and 174:
Before and After As required, you c
- Page 175 and 176:
2. 3. etc. In the above example, th
- Page 177 and 178:
Preview The Preview field shows how
- Page 179 and 180:
Character button (custom bullets on
- Page 181 and 182:
4. Select the desired numbered list
- Page 183 and 184:
Numbering with Auto numbers You can
- Page 185:
First line number is the number wit
- Page 188 and 189:
Insert a table (into the current ce
- Page 190 and 191:
Mouse: With the left mouse button p
- Page 192 and 193:
If you did not select complete rows
- Page 194 and 195:
4. Confirm with OK. The cell is now
- Page 196 and 197:
Height Here you can modify the heig
- Page 198 and 199:
Size Here you can change the Width
- Page 200 and 201:
in the Sample field (click on the c
- Page 202 and 203:
The options at the bottom of the di
- Page 204 and 205:
4. Next, specify the number of rows
- Page 206 and 207:
4. Confirm with OK. The table rows
- Page 208 and 209:
The specification of a column as th
- Page 211 and 212:
Pictures You can insert pictures in
- Page 213 and 214:
Copy to document’s folder If this
- Page 215 and 216:
Changing position and size of a pic
- Page 217:
When you activate the Mix with colo
- Page 220 and 221:
The Object > New OLE Object command
- Page 222 and 223:
2. Open the Edit menu. At the botto
- Page 224 and 225:
The property sheets listed below ar
- Page 226 and 227:
3. Select the entry SoftMaker Equat
- Page 228 and 229:
Text frames (page 254) contain boxe
- Page 230 and 231:
When you switch to Object mode, you
- Page 232 and 233:
Changing the position, size and mar
- Page 234 and 235:
Changing the size and margins of ob
- Page 236 and 237:
Distribute Horizontally Distribute
- Page 238 and 239:
Centered Inside Outside The object
- Page 240 and 241:
Paragraph The offset is relative to
- Page 242 and 243:
You will find additional informatio
- Page 244 and 245:
If desired, you can also change the
- Page 246 and 247:
Line variants Offers some pre-defin
- Page 248 and 249:
Options available: 3D effect varian
- Page 250 and 251:
If you wish, you can give the objec
- Page 252 and 253:
Options property sheet to make all
- Page 254 and 255:
This concludes the general descript
- Page 256 and 257:
Format: For changing the size of th
- Page 258 and 259:
1. Click on the icon in the Formatt
- Page 260 and 261:
Changing the properties of picture
- Page 262 and 263:
Export button Available only for pi
- Page 264 and 265:
Layout, Format, Filling, etc. prope
- Page 266 and 267:
Drawings behave like frames: they a
- Page 268 and 269:
Connectors (straight, elbow and cur
- Page 270 and 271:
If you want to change the formattin
- Page 272 and 273:
Inner margins group box Lets you mo
- Page 275 and 276:
Forms Forms are documents to be “
- Page 277 and 278:
In the following list, you will lea
- Page 279 and 280:
If a form is protected in this mann
- Page 281 and 282:
Inserting forms objects To insert a
- Page 283 and 284: Start a new document with File > Ne
- Page 285 and 286: Forms objects in detail In this sec
- Page 287 and 288: Borders property sheet With this pr
- Page 289 and 290: Value Here you can specify the init
- Page 291 and 292: To change the order: Select one of
- Page 293 and 294: Forms Object property sheet On this
- Page 295 and 296: Naturally, you can lock not only th
- Page 297 and 298: Language tools TextMaker offers a s
- Page 299 and 300: 3. Select the desired language from
- Page 301 and 302: FreeOffice: SoftMaker FreeOffice do
- Page 303 and 304: Manual spell checking FreeOffice: S
- Page 305 and 306: The background spell checker consta
- Page 307 and 308: Conversion to new German spelling N
- Page 309 and 310: command. This command refers to add
- Page 311 and 312: TextMaker now searches for the word
- Page 313 and 314: SmartText entry a name (e.g., “sd
- Page 315 and 316: Alternatively, you can use a dialog
- Page 317 and 318: Database Writing letters is only on
- Page 319 and 320: dBase/Unicode Database with Unicode
- Page 321 and 322: PHONE FAX REMARK1 REMARK2 REMARK3 T
- Page 323 and 324: Calling up a data record by its rec
- Page 325 and 326: Search only selected records If thi
- Page 327 and 328: Deleting all selected data records
- Page 329 and 330: In the Windows Mobile version, only
- Page 331 and 332: List/Form With the options List and
- Page 333: You can also enter a new address by
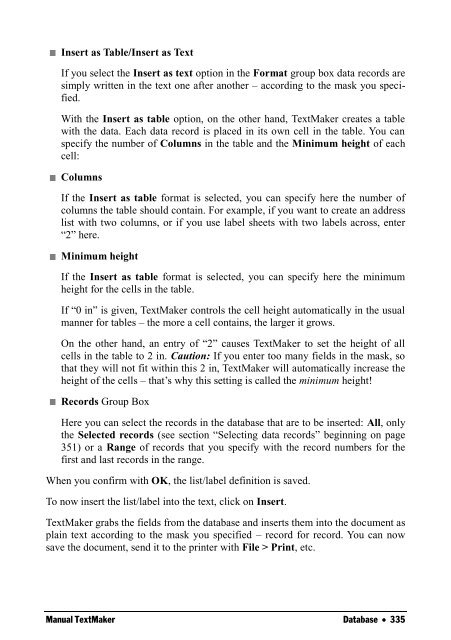
- Page 337 and 338: 10. Click on Insert to insert the l
- Page 339 and 340: Append to document: Appends the env
- Page 341 and 342: 3. Define the first database field.
- Page 343: Note: Most databases are stored in
- Page 346 and 347: 2. Start a new document. 3. With To
- Page 348 and 349: Detaching a database You can detach
- Page 350 and 351: Practice letter Practice makes perf
- Page 352 and 353: Selecting by condition The command
- Page 354 and 355: To select, for example, all data re
- Page 356 and 357: To do this, don’t invoke the usua
- Page 359 and 360: Calculations in the text With TextM
- Page 361 and 362: More information For more detailed
- Page 363 and 364: 3. The formula that you have to ent
- Page 365 and 366: Calculating the sum over a range of
- Page 367 and 368: Objects in calculations Certain typ
- Page 369 and 370: In practice, this means that if you
- Page 371 and 372: Important: In contrast to calculati
- Page 373 and 374: 1. When you enter dates in formulas
- Page 375 and 376: Operators The following operators c
- Page 377 and 378: AVG(n1;n2) Returns the average valu
- Page 379: TRIM(t) TRUNC(n1;n2) UPPER(t) USER(
- Page 382 and 383: Style references A style reference
- Page 384 and 385:
The Outline view is suitable not on
- Page 386 and 387:
The Text button furthest to the rig
- Page 388 and 389:
Hint: There are also two keyboard s
- Page 390 and 391:
Note: Normally, you should not chan
- Page 392 and 393:
7. You can change other settings to
- Page 394 and 395:
Now you can set up headers and foot
- Page 396 and 397:
Now you have added the selected ter
- Page 398 and 399:
1. Position the text cursor at the
- Page 400 and 401:
3. Specify whether a new table of c
- Page 402 and 403:
For example, if you have inserted c
- Page 404 and 405:
Format Use this option to choose th
- Page 406 and 407:
Figure 1...................9 Figure
- Page 408 and 409:
Step 2: Next, invoke Tools > Biblio
- Page 410 and 411:
Step 2: Assigning the bibliography
- Page 412 and 413:
The Parentheses option allows you t
- Page 414 and 415:
2. Important: Make sure that the Pl
- Page 416 and 417:
Cross-references FreeOffice: This f
- Page 418 and 419:
For bookmarks, the number of the pa
- Page 420 and 421:
main heading of the text segment wh
- Page 422 and 423:
By default, TextMaker automatically
- Page 424 and 425:
For example, if you delete the foot
- Page 426 and 427:
Type Here you can change the type o
- Page 429 and 430:
Document revisions You can add comm
- Page 431 and 432:
2. Invoke the command Tools > Comme
- Page 433 and 434:
Note: Regular text will be reduced
- Page 435 and 436:
Position Allows you to set the posi
- Page 437 and 438:
Tip: When the document already cont
- Page 439 and 440:
Turns the Show Changes option on or
- Page 441 and 442:
Internet functions TextMaker is equ
- Page 443 and 444:
The background image file should re
- Page 445 and 446:
Width of line The width of horizont
- Page 447:
Tip: You can also follow links by c
- Page 450 and 451:
E-mailing a document When you would
- Page 452 and 453:
A dialog box appears, allowing you
- Page 454 and 455:
Drop pictures Skips over all pictur
- Page 456 and 457:
Once you have completed this, you c
- Page 458 and 459:
Pages Here you can choose to fax th
- Page 460 and 461:
Important: To be able to send form
- Page 462 and 463:
General property sheet On this prop
- Page 464 and 465:
View property sheet This property s
- Page 466 and 467:
the Permission section of the dialo
- Page 469 and 470:
Document management TextMaker provi
- Page 471 and 472:
2. A menu of all the previously def
- Page 473 and 474:
Under Windows and Linux, the File M
- Page 475 and 476:
You can search for files that meet
- Page 477 and 478:
Document protection You can protect
- Page 479 and 480:
Write protection When the document
- Page 481 and 482:
Working with other file formats Nor
- Page 483 and 484:
OpenOffice.org 1.x Text (import onl
- Page 485:
Available options: CR+LF: This is t
- Page 488 and 489:
Problems with the display of Arabic
- Page 490 and 491:
2. Switch to the Columns property s
- Page 493:
Scripts (BasicMaker) Note: BasicMak
- Page 496 and 497:
Closing a document window If you wa
- Page 498 and 499:
Using document tabs FreeOffice: Thi
- Page 501 and 502:
Customizing TextMaker TextMaker giv
- Page 503 and 504:
OLE object guidelines Windows only:
- Page 505 and 506:
(mobile devices, for example), whic
- Page 507 and 508:
open a document containing such obj
- Page 509 and 510:
Apply character formatting to entir
- Page 511 and 512:
Windows Mobile: This option is avai
- Page 513 and 514:
Tip: If you want to employ more tha
- Page 515 and 516:
want TextMaker to leave your quote
- Page 517 and 518:
een a failure and offers to open th
- Page 519 and 520:
Note: Checking for updates is possi
- Page 521 and 522:
Close button behavior Windows Mobil
- Page 523 and 524:
Document properties, View property
- Page 525 and 526:
If instead you select the Use place
- Page 527 and 528:
2. Set the desired color (see the s
- Page 529 and 530:
Document properties, Internet prope
- Page 531 and 532:
Opening and/or saving a protected d
- Page 533 and 534:
Continuous Switches to the continuo
- Page 535 and 536:
To change the zoom level, either dr
- Page 537 and 538:
Visible in mode ... Some toolbars a
- Page 539 and 540:
Managing toolbars You can create ne
- Page 541 and 542:
The icons for the individual comman
- Page 543 and 544:
As soon as you exit the dialog box
- Page 545 and 546:
Note: If you simply want to add or
- Page 547 and 548:
1. Invoke the Tools > Customize > K
- Page 549 and 550:
Removing a keyboard shortcut Any ti
- Page 551 and 552:
You can set up horizontal and verti
- Page 553 and 554:
Mouse: In Object mode, guides can s
- Page 555 and 556:
When you click on the icon displaye
- Page 557 and 558:
Keyboard shortcuts The following pa
- Page 559 and 560:
Command Automatic single line spaci
- Page 561:
Manual TextMaker Keyboard shortcuts
- Page 564 and 565:
with objects 367 with table cells 3
- Page 566 and 567:
Edit > Go to 154, 155, 157 Edit > G
- Page 568 and 569:
Hidden Text 523, 524 Hiding objects
- Page 570 and 571:
Object > New Drawing 266 Object > N
- Page 572 and 573:
Record number 320, 321 Rectangles d
- Page 574 and 575:
sorting 205 splitting cells 193 spl


