- Page 1:
Tivoli®Storage Manager for Windows
- Page 5:
Contents|Tables . . . . . . . . . .
- Page 10 and 11:
||Tcpclientaddress . . . . . . . .
- Page 12:
xIBM Tivoli Storage Manager for Win
- Page 15 and 16:
PrefaceIBM ® Tivoli ® Storage Man
- Page 17 and 18:
Table 3. Tivoli Storage Manager sto
- Page 19 and 20:
vvvSupport linksEducation linksAbil
- Page 21 and 22:
Software_support_(general). Sign in
- Page 23 and 24:
►►cmd_nameA►◄When two or mo
- Page 25 and 26:
New for Version 6.2Tivoli Storage M
- Page 27 and 28:
VMware off-host backupOff-host supp
- Page 29 and 30:
Chapter 1. Installing the Tivoli St
- Page 31 and 32:
v When a client performs a selectiv
- Page 33 and 34:
vvvThe scheduler must be started fr
- Page 35 and 36:
Table 7. Windows client software re
- Page 37 and 38:
Installation requirements for backi
- Page 39 and 40:
- The Tivoli Storage Manager client
- Page 41 and 42:
||a previous version of this produc
- Page 43 and 44:
7. To fix missing or corrupt files,
- Page 45 and 46:
Chapter 2. Configure the Tivoli Sto
- Page 47 and 48:
Related concepts“Client options r
- Page 49 and 50:
To install and configure the Web cl
- Page 51 and 52:
With client scheduling, you can per
- Page 53 and 54:
Configuring Tivoli Storage Manager
- Page 55 and 56:
command line (dsmc schedule), wait
- Page 57 and 58:
If you use a self-signed certificat
- Page 59 and 60:
To use certificates issued by any o
- Page 61 and 62:
Syntax for stanzas:[StanzaName]Synt
- Page 63 and 64:
dsm.opt: tsmjbbd.iniEXCLUDE c:\test
- Page 65 and 66:
which currently owns the resource a
- Page 67 and 68:
OverviewTwo types of data deduplica
- Page 69 and 70:
vvvvClient-side data deduplication
- Page 71 and 72:
shows the amount of data that was d
- Page 73 and 74:
For ASR, system state, and system o
- Page 75 and 76:
where is the directory location wh
- Page 77 and 78:
the Tivoli Storage Manager Client S
- Page 79 and 80:
information in an ASCII configurati
- Page 81 and 82:
The new scheduler service is now as
- Page 83 and 84:
Perform the steps under Step 2 of
- Page 85 and 86:
Repeat this procedure for each clus
- Page 87 and 88:
2. Click on the Edit button and sel
- Page 89 and 90:
option with dsmcutil.exe, only when
- Page 91 and 92:
6. If you selected as the provider
- Page 93 and 94:
||||||||||||||||||||||Tip: See the
- Page 95 and 96:
You can use the following methods t
- Page 97 and 98:
In the following example Z: is a ma
- Page 99 and 100:
Table 12. Options for controlling p
- Page 101 and 102:
Related concepts“Wildcard charact
- Page 103 and 104:
Table 15. Using wildcard characters
- Page 105 and 106:
If the client options file include-
- Page 107 and 108:
Table 17. UNC name patterns and DOS
- Page 109 and 110:
Chapter 3. Getting startedThis topi
- Page 111 and 112:
This group has a limited set of use
- Page 113 and 114:
User account controlStarting a Java
- Page 115 and 116:
Related concepts“Backup-archive c
- Page 117 and 118:
Related reference“Fromnode” on
- Page 119 and 120:
Related concepts“Tivoli Storage M
- Page 121 and 122:
Displaying online helpEnding a sess
- Page 123 and 124: You can get maintenance information
- Page 125 and 126: Chapter 4. Backing up your dataUse
- Page 127 and 128: example, because C:\windows\system3
- Page 129 and 130: 1. You can use the include.fs optio
- Page 131 and 132: Related reference“Domain” on pa
- Page 133 and 134: Deleting backup dataRelated concept
- Page 135 and 136: For more information about installi
- Page 137 and 138: vvvvconsulted to determine whether
- Page 139 and 140: Attention: If the encryption key pa
- Page 141 and 142: to restore a file you have deleted,
- Page 143 and 144: The journal engine service does not
- Page 145 and 146: vvIndividual server attributes are
- Page 147 and 148: For example, to perform a full back
- Page 149 and 150: vUse the same encryption key for al
- Page 151 and 152: Related concepts“Backup (Windows)
- Page 153 and 154: ||On Windows Vista, Windows 7, and
- Page 155 and 156: |||||||||||||||||||||||||||||||||No
- Page 157 and 158: |||||||||||||||||||||||||||||||||||
- Page 159 and 160: The traditional offline image backu
- Page 161 and 162: vRestores new and changed files fro
- Page 163 and 164: vvTo perform an online image backup
- Page 165 and 166: Related concepts“NDMP support req
- Page 167 and 168: Table 24. NAS options and commands
- Page 169 and 170: data flow through a Tivoli Storage
- Page 171 and 172: |||||||||||||||||||||||||||||||||||
- Page 173: |||||||||||||||||||||||||||||||||||
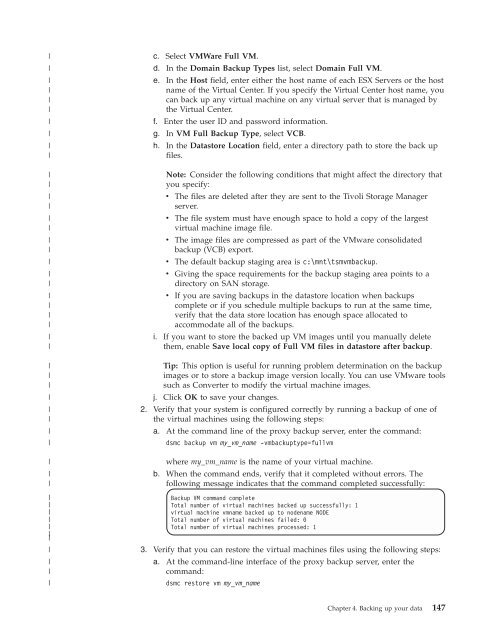
- Page 177 and 178: ||||||||||||||||||||||Backup VM com
- Page 179 and 180: VM backups can only be performed by
- Page 181 and 182: Table 25. Client command line infor
- Page 183 and 184: Open filesSome files on your system
- Page 185 and 186: If the label of the d: drive does n
- Page 187 and 188: You can also specify UNC names for
- Page 189 and 190: v If a Dfs root is added or modifie
- Page 191 and 192: Chapter 5. Restoring your dataDupli
- Page 193 and 194: item. To display only the active ve
- Page 195 and 196: Related conceptsChapter 13, “Usin
- Page 197 and 198: Restartable restore process:If the
- Page 199 and 200: System services components can incl
- Page 201 and 202: Related concepts“Recovering a com
- Page 203 and 204: |||||||||||||||||||||||||||||||||||
- Page 205 and 206: Related concepts“Recovering a com
- Page 207 and 208: 4. Burn the CD using the method des
- Page 209 and 210: Restoring an imageIf the junction m
- Page 211 and 212: vIn the Restore Options window, you
- Page 213 and 214: Table 28. Backup set GUI restore re
- Page 215 and 216: vYou cannot restore image data from
- Page 217 and 218: 4. Application data restore if the
- Page 219 and 220: |||||||||||||||||||||||||||||||||||
- Page 221 and 222: |||||||||||||||||||||||||||||||||||
- Page 223 and 224: objects). On the Windows Server 200
- Page 225 and 226:
Related reference“Query Adobjects
- Page 227 and 228:
If the Web client is already set up
- Page 229 and 230:
from which the files were backed up
- Page 231 and 232:
If you request a point-in-time rest
- Page 233 and 234:
Web browser session, current NAS op
- Page 235 and 236:
Table 30. NAS options and commands
- Page 237 and 238:
Chapter 6. Archive and retrieve you
- Page 239 and 240:
1. Click the Archive button in the
- Page 241 and 242:
To enable this option, follow these
- Page 243 and 244:
all of the copies. After the first
- Page 245 and 246:
Chapter 7. Tivoli Storage Manager s
- Page 247 and 248:
Scheduler processing optionsThis to
- Page 249 and 250:
Related reference“Postschedulecmd
- Page 251 and 252:
To increase the reliability of the
- Page 253 and 254:
Table 34. Sample enhanced query sch
- Page 255 and 256:
User: DILE\AdministratorComputer: M
- Page 257 and 258:
4103: Backup-Archive Client Service
- Page 259 and 260:
daemon-managed scheduling this is n
- Page 261 and 262:
Chapter 8. Client return codesThe b
- Page 263 and 264:
Chapter 9. Storage management polic
- Page 265 and 266:
An archive copy group contains attr
- Page 267 and 268:
Retain only version attributeThe re
- Page 269 and 270:
When the specified number of days e
- Page 271 and 272:
Overriding the management class usi
- Page 273 and 274:
vThe management class to which a fi
- Page 275 and 276:
Chapter 10. Using the Client Servic
- Page 277 and 278:
client directory and options file f
- Page 279 and 280:
Use the Dsmcutil command3. Use the
- Page 281 and 282:
Taskmust reside on the remote works
- Page 283 and 284:
Command:dsmcutil remove vmwaretools
- Page 285 and 286:
vvvv/httpport/webports/clientdir/pa
- Page 287 and 288:
cadschedname:schedulernameSpecifies
- Page 289 and 290:
name:servicenameSpecifies the name
- Page 291 and 292:
Chapter 11. Windows XP and Windows
- Page 293 and 294:
waitforevent.exeProgram that detect
- Page 295 and 296:
Setup was unable to start the recov
- Page 297 and 298:
Setup Executable",0x0000000144. [IB
- Page 299 and 300:
Windows XP and Windows Server 2003
- Page 301 and 302:
Chapter 12. Processing optionsProce
- Page 303 and 304:
Table 37. TCP/IP options (continued
- Page 305 and 306:
|||||Table 42. Backup and archive p
- Page 307 and 308:
Table 42. Backup and archive proces
- Page 309 and 310:
Table 42. Backup and archive proces
- Page 311 and 312:
Table 42. Backup and archive proces
- Page 313 and 314:
Table 43 lists the restore and retr
- Page 315 and 316:
Table 43. Restore and retrieve proc
- Page 317 and 318:
Table 44. Scheduling options (conti
- Page 319 and 320:
Transaction processing optionsTrans
- Page 321 and 322:
Entering options with a commandThis
- Page 323 and 324:
Table 52. Client command options (c
- Page 325 and 326:
Table 52. Client command options (c
- Page 327 and 328:
Table 53. Options that are valid on
- Page 329 and 330:
vvvva syntax diagramdetailed descri
- Page 331 and 332:
domain. This management class overr
- Page 333 and 334:
||||YesSpecifies that Tivoli Storag
- Page 335 and 336:
Parametersoff Specifies that the au
- Page 337 and 338:
\\patmos\c$\test\dir204/21/2007 15:
- Page 339 and 340:
If the new file space name already
- Page 341 and 342:
Syntax►► BACKMc= management_cla
- Page 343 and 344:
skipped. In all cases, messages are
- Page 345 and 346:
ClientviewThe clientview option is
- Page 347 and 348:
drives which appear as volume mount
- Page 349 and 350:
Table 55. Clusternode and clusterdi
- Page 351 and 352:
Considerations:v Use the collocateb
- Page 353 and 354:
CommrestartdurationThe commrestartd
- Page 355 and 356:
No Backup-archive client objects ar
- Page 357 and 358:
ParameterscomputernameSpecifies the
- Page 359 and 360:
||||||||and run a full incremental
- Page 361 and 362:
date when pruning the log. When cha
- Page 363 and 364:
DedupcachesizeParameterspathSpecifi
- Page 365 and 366:
ExamplesOptions file:deduplication
- Page 367 and 368:
displayed on the screen. If you spe
- Page 369 and 370:
If the differential snapshot is not
- Page 371 and 372:
ExamplesOptions file:dirm managdirC
- Page 373 and 374:
Syntax►► DISKBuffsize size ►
- Page 375 and 376:
You can exclude objects from the do
- Page 377 and 378:
Table 56. Interaction of domain def
- Page 379 and 380:
Syntax►►DOMAIN.Nas▼all-nasdom
- Page 381 and 382:
-vm=vmname-VM keyword specifies tha
- Page 383 and 384:
vmhost=hostnameProcess all virtual
- Page 385 and 386:
EnablearchiveretentionprotectionThe
- Page 387 and 388:
deduplication is not enabled, this
- Page 389 and 390:
DES56DES 56-bit data encryption.Exa
- Page 391 and 392:
ErrorlogmaxThe errorlogmax option s
- Page 393 and 394:
Restriction: You cannot specify err
- Page 395 and 396:
2. The exclude statements are not c
- Page 397 and 398:
Table 58. System services component
- Page 399 and 400:
FbbranchvvvvYou must set the subfil
- Page 401 and 402:
If you do not specify any values fo
- Page 403 and 404:
Syntax►►,(1)FBPolicyname ▼ po
- Page 405 and 406:
The myFbServer parameter specifies
- Page 407 and 408:
1. At least one FBpolicyName is alw
- Page 409 and 410:
Supported ClientsThis option is val
- Page 411 and 412:
You cannot restore or retrieve dire
- Page 413 and 414:
ExamplesCommand line:dsmc query arc
- Page 415 and 416:
Supported ClientsThis option is val
- Page 417 and 418:
|||||||||||||||||||||||||||||||||||
- Page 419 and 420:
Related reference“Exclude options
- Page 421 and 422:
Supported ClientsThis option is val
- Page 423 and 424:
Include optionsFor example, a non-U
- Page 425 and 426:
include.encryptIncludes the specifi
- Page 427 and 428:
Table 59. Other optional parameters
- Page 429 and 430:
Note: The include.fs.nas option doe
- Page 431 and 432:
ExamplesCommand line:res i d: -incr
- Page 433 and 434:
Syntax►► LANFREECommmethod comm
- Page 435 and 436:
Options FilePlace this option in th
- Page 437 and 438:
Syntax►► LANGuage language ►
- Page 439 and 440:
ManagedservicesThe managedservices
- Page 441 and 442:
Syntax►► MAXCMDRetries maxcmdre
- Page 443 and 444:
The mode option has no effect on a
- Page 445 and 446:
NamedpipenameNo Specifies that you
- Page 447 and 448:
NodenameUse the nodename option in
- Page 449 and 450:
NopromptThe noprompt option suppres
- Page 451 and 452:
v Germanv Italianv Spanish6 1'000,0
- Page 453 and 454:
PasswordaccessThe passwordaccess op
- Page 455 and 456:
ParametersThere are no parameters f
- Page 457 and 458:
Postschedulecmd/PostnschedulecmdThe
- Page 459 and 460:
Use a blank, or null, string for "c
- Page 461 and 462:
By default, the Tivoli Storage Mana
- Page 463 and 464:
NONeRestores all selected source fi
- Page 465 and 466:
Options FilePlace this option in th
- Page 467 and 468:
vvvThe aggregate amount of data of
- Page 469 and 470:
Syntax►► QUIET ►◄Parameters
- Page 471 and 472:
eporting purposes. Tivoli Storage M
- Page 473 and 474:
This option is valid only on the in
- Page 475 and 476:
Options FilePlace this option in th
- Page 477 and 478:
SchedcmddisabledExamplesCommand lin
- Page 479 and 480:
“Schedcmddisabled” on page 449S
- Page 481 and 482:
SchedlogretentionRelated informatio
- Page 483 and 484:
►►SCHEDMODePOllingPRompted►
- Page 485 and 486:
ParametersnumberSpecifies the numbe
- Page 487 and 488:
If you set the sessioninitiation op
- Page 489 and 490:
Supported ClientsThis option is val
- Page 491 and 492:
SkipntsecuritycrcExamplesOptions fi
- Page 493 and 494:
||||vvvbeen manually deleted from T
- Page 495 and 496:
Supported ClientsThis option is val
- Page 497 and 498:
SnapshotcachesizeUse the snapshotca
- Page 499 and 500:
Snapshotfsidlewaitsnapshot file sys
- Page 501 and 502:
ExamplesOptions file:Snapshotprovid
- Page 503 and 504:
VSSSpecifies that the VSS should be
- Page 505 and 506:
1. Ensure that the snapshotroot ref
- Page 507 and 508:
Options FilePlace this option in th
- Page 509 and 510:
Syntax►►SSLNoYes►◄Stagingdi
- Page 511 and 512:
Options FilePlace this option in th
- Page 513 and 514:
Options FilePlace this option in th
- Page 515 and 516:
ParametersNo You are not prompted f
- Page 517 and 518:
TcpcadaddressThe tcpcadaddress opti
- Page 519 and 520:
Syntax►► TCPCLIENTPort client_p
- Page 521 and 522:
Options FilePlace this option in th
- Page 523 and 524:
vvvvvvvvvvvvvvvvvvvdelete archivede
- Page 525 and 526:
PreferredSpecifies that Tivoli Stor
- Page 527 and 528:
A transaction is the unit of work e
- Page 529 and 530:
Supported ClientsThis option is val
- Page 531 and 532:
This option differs from the fileso
- Page 533 and 534:
Syntax►► VERIFYImage ►◄Para
- Page 535 and 536:
Command line:-virtualn=bansheeThis
- Page 537 and 538:
You can specify a VMware file-level
- Page 539 and 540:
||||||||||||||||||||||||VMMCExample
- Page 541 and 542:
Use the VirtualCenter if it is avai
- Page 543 and 544:
ParametersusernameSpecifies the use
- Page 545 and 546:
Does not apply.WebportsThe webports
- Page 547 and 548:
Chapter 13. Using commandsTivoli St
- Page 549 and 550:
Table 61. Commands (continued)Comma
- Page 551 and 552:
Table 61. Commands (continued)Comma
- Page 553 and 554:
Enter client command names, options
- Page 555 and 556:
vWildcard charactersvvWhen entering
- Page 557 and 558:
that is stored on the Tivoli Storag
- Page 559 and 560:
Archive FastBackTo control an open
- Page 561 and 562:
Table 64. Archive FastBack command:
- Page 563 and 564:
Backup CertserverdbRelated informat
- Page 565 and 566:
If a policy specification contains
- Page 567 and 568:
epository. Use this command to back
- Page 569 and 570:
Table 66. Backup Group command: Rel
- Page 571 and 572:
Table 67. Backup Image command: Rel
- Page 573 and 574:
You can perform the backup only on
- Page 575 and 576:
performed. If a full image exists,
- Page 577 and 578:
Syntax►► Backup REgistry ►◄
- Page 579 and 580:
|vvvvvCertificate Server DatabaseCO
- Page 581 and 582:
||enables a complete restore of the
- Page 583 and 584:
You can back up the virtual machine
- Page 585 and 586:
You can only cancel one restartable
- Page 587 and 588:
You can specify a UNC name; drive l
- Page 589 and 590:
objtypeSpecifies the type of backup
- Page 591 and 592:
Important: When you delete a file s
- Page 593 and 594:
Command:delete group {virtfs}\group
- Page 595 and 596:
Parameterscommand-name [subcommand-
- Page 597 and 598:
A full incremental backs up all fil
- Page 599 and 600:
TaskTaskTaskTaskTaskCommand: ic:d:e
- Page 601 and 602:
processes directories and wildcarde
- Page 603 and 604:
Manager attempted to transfer durin
- Page 605 and 606:
ParametersmacronameSpecifies the fu
- Page 607 and 608:
The preview backup command generate
- Page 609 and 610:
#+=For example, "cn=test#" is enter
- Page 611 and 612:
marks or double quotation marks are
- Page 613 and 614:
Table 78. Query ASR command: Relate
- Page 615 and 616:
Table 79. Query Backup command: Rel
- Page 617 and 618:
Syntax►►Query BACKUPSEToptionsB
- Page 619 and 620:
tapedeviceSpecifies the name of the
- Page 621 and 622:
Table 83. Query Eventlog command: R
- Page 623 and 624:
Query NAS file spacesUse the nasnod
- Page 625 and 626:
vvvvvFile system typeBackup date an
- Page 627 and 628:
If the test pattern has no errors,
- Page 629 and 630:
ParametersTable 88. Query Node comm
- Page 631 and 632:
When such a failure occurs, the fil
- Page 633 and 634:
Syntax►►Query SYSFilesoptions
- Page 635 and 636:
vvCLUSTER - Windows cluster informa
- Page 637 and 638:
The output indicates whether the ob
- Page 639 and 640:
tsm> QUERY VM * -INA -vmbackuptype=
- Page 641 and 642:
Supported ClientsThis command is va
- Page 643 and 644:
destinationfilespecSpecifies the pa
- Page 645 and 646:
Table 97. Restore command: Related
- Page 647 and 648:
network name for the file. The syst
- Page 649 and 650:
Table 98. Restore Adobjects command
- Page 651 and 652:
Supported ClientsThis command is va
- Page 653 and 654:
Table 100. Restore Backupset comman
- Page 655 and 656:
vvLimited support is provided for r
- Page 657 and 658:
the backup set. This parameter is v
- Page 659 and 660:
Table 101. Restore Complusdb comman
- Page 661 and 662:
Table 103. Restore Group command: R
- Page 663 and 664:
vvvvIt is not necessary to format a
- Page 665 and 666:
TaskTaskIf bad sectors present on t
- Page 667 and 668:
Table 105. Restore NAS command: Rel
- Page 669 and 670:
Note: You can use the restore syste
- Page 671 and 672:
Restore SystemstateUse the restore
- Page 673 and 674:
For file-level backup, VMware data
- Page 675 and 676:
TSM Scrollable PICK Window - Restor
- Page 677 and 678:
v Stop the retrieval, and change th
- Page 679 and 680:
Table 112. Retrieve command: Relate
- Page 681 and 682:
If you are using TCP/IP communicati
- Page 683 and 684:
ParametersfilespecSpecifies the pat
- Page 685 and 686:
Set Accesssnapshotcachelocation, sn
- Page 687 and 688:
have access to all files and direct
- Page 689 and 690:
eleaseAllows normal event-controlle
- Page 691 and 692:
newpwSpecifies the new password for
- Page 693 and 694:
Command: dsmc set password -type=fi
- Page 695 and 696:
Appendix. Accessibility features fo
- Page 697 and 698:
NoticesThis information was develop
- Page 699 and 700:
TrademarksIBM, the IBM logo, and ib
- Page 701 and 702:
GlossaryThis glossary includes term
- Page 703 and 704:
authorityThe right to access object
- Page 705 and 706:
Common Programming Interface forCom
- Page 707 and 708:
dynamic serializationA type of copy
- Page 709 and 710:
space management has been added whe
- Page 711 and 712:
files are deleted from aggregate fi
- Page 713 and 714:
management. The hierarchical storag
- Page 715 and 716:
named .SpaceMan in each file system
- Page 717 and 718:
from a local file system to Tivoli
- Page 719 and 720:
information that can be used to eli
- Page 721 and 722:
on local shadow volumes or on Tivol
- Page 723 and 724:
IndexNumerics128-bit AES encryption
- Page 725 and 726:
client user-optionscreating multipl
- Page 727 and 728:
environment prerequisites 5environm
- Page 729 and 730:
local backup setenabling GUI for lo
- Page 731 and 732:
options (continued)tapeprompt 486tc
- Page 733 and 734:
etrieve (continued)files belonging
- Page 735 and 736:
updates_622_client 7, 123, 125, 126
- Page 738:
Program Number: 5608-E01, 5608-E02,


