- Page 1 and 2:
GENESYS User Manual Issue 1.13.1 Ve
- Page 3 and 4:
Servicing is required when the appa
- Page 5 and 6:
Health & Safety Notice FOR YOUR OWN
- Page 7 and 8:
Console Overview A 16 fader console
- Page 9 and 10:
Table of Contents IMPORTANT SAFTY I
- Page 11 and 12:
MONO...............................
- Page 13 and 14:
PC.................................
- Page 15 and 16:
About this manual This manual consi
- Page 17 and 18:
The Computer Cassette IMPORTANT: Be
- Page 19 and 20:
Optional Console Hardware EQ Casset
- Page 21 and 22:
Channels Digital Converter System (
- Page 23 and 24:
Optional Software Packages Automati
- Page 25 and 26:
Wiring connections / Setup for DAW
- Page 27 and 28:
DAW Computer Settings Mac OS X (DAW
- Page 29 and 30:
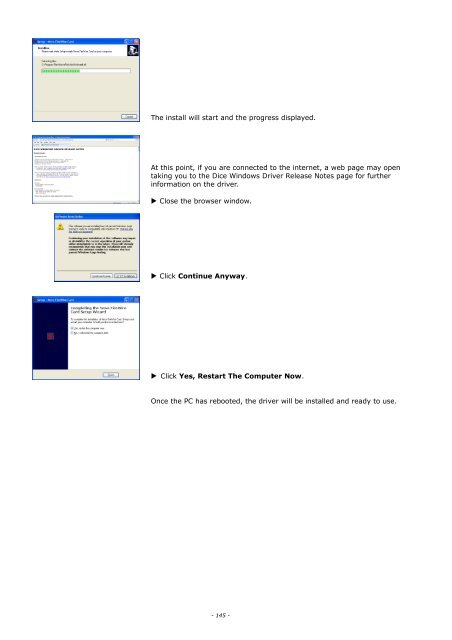
After installation the driver ports
- Page 31 and 32:
There are two audio connectors on e
- Page 33 and 34:
Master SEL mode ▶ Master SEL mode
- Page 35 and 36:
An Overview of the Genesys Signal F
- Page 37 and 38:
Recording in Stereo ▶ Before powe
- Page 39 and 40:
Mixing In Surround If you have LCR
- Page 41 and 42:
Surround system. ▶ Ensure that th
- Page 43 and 44:
The speaker button will light when
- Page 45 and 46:
will be able to swap between listen
- Page 47 and 48:
90Hz filter Switches a hi pass filt
- Page 49 and 50:
Channel and Monitor Path Drag and D
- Page 51 and 52:
DIRECT OUTPUT Section Master Level
- Page 53 and 54:
CH Allows you to send the Channel i
- Page 55 and 56:
REVERB RETURNS / AUX MASTERS Sectio
- Page 57 and 58:
AUX MASTERS Section Master Send Set
- Page 59 and 60:
Master SEL mode on the 8T AUXES Sec
- Page 61 and 62:
2T/MIX Sends tone to the 2T and Mix
- Page 63 and 64:
MASTER SEL Section LOCK ▶ Lights
- Page 65 and 66:
Momentary Solo mode is also availab
- Page 67 and 68:
ROUTE SEL Section This section enab
- Page 69 and 70:
▶ For later LCR/Stereo channel st
- Page 71 and 72:
CUE MIX Section Each of the Cue mix
- Page 73 and 74:
CONTROL ROOM MONITOR Section Sets t
- Page 75 and 76:
EXT ▶ Will light yellow when sele
- Page 77 and 78:
It is possible to tie a set of loud
- Page 79 and 80:
• 30% indicates you are listening
- Page 81 and 82:
To Lock Relative Levels Within a Lo
- Page 83 and 84:
setups using LOCK/RTE SEL, can be s
- Page 85 and 86:
DAW / CONSOLE CONTROL Screen The Mo
- Page 87 and 88:
have the following functions: Encod
- Page 89 and 90:
8T Faders The 8T faders can either
- Page 91 and 92:
Meterbridge CHANNEL Meters Each fad
- Page 93 and 94: of each meter. PPM Sets all meter i
- Page 95 and 96: Master Screen The SETUP screen allo
- Page 97 and 98: At the bottom of the EQ screen are
- Page 99 and 100: DYN Only functions if at least one
- Page 101 and 102: Gate/Expander The Dynamics screen i
- Page 103 and 104: DAW Setup and control for the Digit
- Page 105 and 106: Speaker Trims ▶ Click the speaker
- Page 107 and 108: NB: 1 - When setting levels using t
- Page 109 and 110: FILING Provides facility to Save an
- Page 111 and 112: RTE This screen is a graphic repres
- Page 113 and 114: RECALL Recall Overview Recall is an
- Page 115 and 116: Saving a Recall file In effect, a R
- Page 117 and 118: Hold mode / Auto mode The above pro
- Page 119 and 120: Important Information There are two
- Page 121 and 122: This is a two-function button, and
- Page 123 and 124: AD/DA & FireWire System Digital Con
- Page 125 and 126: Channel Master Overview The Channel
- Page 127 and 128: Serial In / Out Provided for daisy-
- Page 129 and 130: Channel Slave Overview The Slave AD
- Page 131 and 132: Monitor Section Overview This card
- Page 133 and 134: Switchblock Contains 4 switches, th
- Page 135 and 136: This zip file contains a single dri
- Page 137 and 138: 1 - 8 9 - 16 17 - 24 25 - 32 Monito
- Page 139 and 140: Monitor card This card will always
- Page 141 and 142: CAT 5 connections on systems withou
- Page 143: FireWire From DAW A B A B A B A B A
- Page 147 and 148: Software Operation ▶ When the Gen
- Page 149 and 150: andwidth is limited and the capabil
- Page 151 and 152: Channels DLINE Input This covers wh
- Page 153 and 154: ⌥ On the console surface, the dig
- Page 155 and 156: Windows 7 Drivers This section only
- Page 157 and 158: Recommended OHCI Chipsets To get th
- Page 159 and 160: Channel Controls Each channel can b
- Page 161 and 162: Rear Connectors / Pin-out informati
- Page 163 and 164: Female XLR 3 9 Insert IN 3 hot 2 3
- Page 165 and 166: Connecting the 4081 to Genesys with
- Page 167 and 168: ▶ Click Settings Within Software
- Page 169 and 170: Digital Audio Workstation (DAW) Con
- Page 171 and 172: encoder, it will toggle the selecte
- Page 173 and 174: TRANSPORT The Transport buttons on
- Page 175 and 176: Control and click Add. This will ad
- Page 177 and 178: switched over to showing the meteri
- Page 179 and 180: y looking at Logic Pro and Genesys
- Page 181 and 182: already) to indicate you have selec
- Page 183 and 184: automation mode. ▶ Pressing the f
- Page 185 and 186: ▶ In the left Devices column sele
- Page 187 and 188: DAW Metering (Genesys software ) Wh
- Page 189 and 190: ▶ F1, F2 or the fader SEL buttons
- Page 191 and 192: ◀ and ▶ Buttons They are used t
- Page 193 and 194: ▶ A pop-up will appear on screen
- Page 195 and 196:
USB Recovery - Complete Software Re
- Page 197 and 198:
Integrated Peripherals Menu OnChip
- Page 199 and 200:
The Recovery Process ▶ Once the s
- Page 201 and 202:
Audio Monitoring Boards Accessible
- Page 203 and 204:
Monitor Board 2 (Mix Insert) This b
- Page 205 and 206:
Genesys Audio Specification Record
- Page 207 and 208:
Genesys Physical Information Dimens
- Page 209 and 210:
1 Screen 2 Hi 3 Lo RS 232 9-pin D-t
- Page 211 and 212:
Loudspeaker Outputs A & M1 (25-way
- Page 213 and 214:
Console Outputs - 8Ts (25-way D-typ
- Page 215 and 216:
Channel Section Connectors As shown
- Page 217 and 218:
Channel Insert 2 Send (25-way D-typ
- Page 219 and 220:
Master AD/DA Channels cassette, SMN
- Page 221 and 222:
Slave AD/DA Channels cassette AES R
- Page 223 and 224:
AES TX / AUX / 2T L & R / MIX L & R
- Page 225 and 226:
General Fuses - Ratings & Location
- Page 227 and 228:
Alphabetical Index 1 1/2...........
- Page 229 and 230:
I/P 2..............................
- Page 231 and 232:
To DAW via FireWire................