You also want an ePaper? Increase the reach of your titles
YUMPU automatically turns print PDFs into web optimized ePapers that Google loves.
y looking at Logic Pro and <strong>Genesys</strong> software.<br />
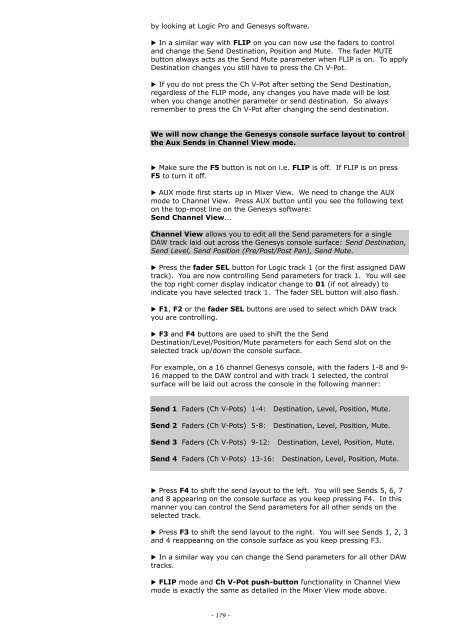
▶ In a similar way with FLIP on you can now use the faders to control<br />
and change the Send Destination, Position and Mute. The fader MUTE<br />
button always acts as the Send Mute parameter when FLIP is on. To apply<br />
Destination changes you still have to press the Ch V-Pot.<br />
▶ If you do not press the Ch V-Pot after setting the Send Destination,<br />
regardless of the FLIP mode, any changes you have made will be lost<br />
when you change another parameter or send destination. So always<br />
remember to press the Ch V-Pot after changing the send destination.<br />
We will now change the <strong>Genesys</strong> console surface layout to control<br />
the Aux Sends in Channel View mode.<br />
▶ Make sure the F5 button is not on i.e. FLIP is off. If FLIP is on press<br />
F5 to turn it off.<br />
▶ AUX mode first starts up in Mixer View. We need to change the AUX<br />
mode to Channel View. Press AUX button until you see the following text<br />
on the top-most line on the <strong>Genesys</strong> software:<br />
Send Channel View...<br />
Channel View allows you to edit all the Send parameters for a single<br />
DAW track laid out across the <strong>Genesys</strong> console surface: Send Destination,<br />
Send Level, Send Position (Pre/Post/Post Pan), Send Mute.<br />
▶ Press the fader SEL button for Logic track 1 (or the first assigned DAW<br />
track). You are now controlling Send parameters for track 1. You will see<br />
the top right corner display indicator change to 01 (if not already) to<br />
indicate you have selected track 1. The fader SEL button will also flash.<br />
▶ F1, F2 or the fader SEL buttons are used to select which DAW track<br />
you are controlling.<br />
▶ F3 and F4 buttons are used to shift the the Send<br />
Destination/Level/Position/Mute parameters for each Send slot on the<br />
selected track up/down the console surface.<br />
For example, on a 16 channel <strong>Genesys</strong> console, with the faders 1-8 and 9-<br />
16 mapped to the DAW control and with track 1 selected, the control<br />
surface will be laid out across the console in the following manner:<br />
Send 1 Faders (Ch V-Pots) 1-4: Destination, Level, Position, Mute.<br />
Send 2 Faders (Ch V-Pots) 5-8: Destination, Level, Position, Mute.<br />
Send 3 Faders (Ch V-Pots) 9-12: Destination, Level, Position, Mute.<br />
Send 4 Faders (Ch V-Pots) 13-16: Destination, Level, Position, Mute.<br />
▶ Press F4 to shift the send layout to the left. You will see Sends 5, 6, 7<br />
and 8 appearing on the console surface as you keep pressing F4. In this<br />
manner you can control the Send parameters for all other sends on the<br />
selected track.<br />
▶ Press F3 to shift the send layout to the right. You will see Sends 1, 2, 3<br />
and 4 reappearing on the console surface as you keep pressing F3.<br />
▶ In a similar way you can change the Send parameters for all other DAW<br />
tracks.<br />
▶ FLIP mode and Ch V-Pot push-button functionality in Channel View<br />
mode is exactly the same as detailed in the Mixer View mode above.<br />
- 179 -


