ABI Prism® 7900HT Sequence Detection System ... - OpenWetWare
ABI Prism® 7900HT Sequence Detection System ... - OpenWetWare
ABI Prism® 7900HT Sequence Detection System ... - OpenWetWare

You also want an ePaper? Increase the reach of your titles
YUMPU automatically turns print PDFs into web optimized ePapers that Google loves.
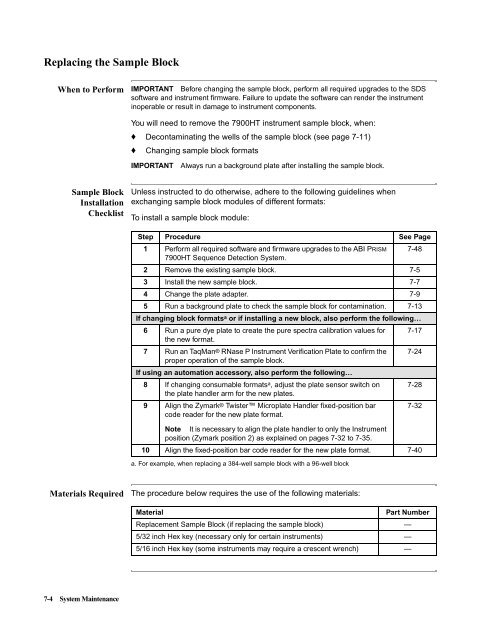
Replacing the Sample Block<br />
When to Perform IMPORTANT Before changing the sample block, perform all required upgrades to the SDS<br />
software and instrument firmware. Failure to update the software can render the instrument<br />
inoperable or result in damage to instrument components.<br />
Sample Block<br />
Installation<br />
Checklist<br />
7-4 <strong>System</strong> Maintenance<br />
You will need to remove the <strong>7900HT</strong> instrument sample block, when:<br />
♦ Decontaminating the wells of the sample block (see page 7-11)<br />
♦ Changing sample block formats<br />
IMPORTANT Always run a background plate after installing the sample block.<br />
Unless instructed to do otherwise, adhere to the following guidelines when<br />
exchanging sample block modules of different formats:<br />
To install a sample block module:<br />
Step Procedure See Page<br />
1 Perform all required software and firmware upgrades to the <strong>ABI</strong> PRISM<br />
<strong>7900HT</strong> <strong>Sequence</strong> <strong>Detection</strong> <strong>System</strong>.<br />
7-48<br />
2 Remove the existing sample block. 7-5<br />
3 Install the new sample block. 7-7<br />
4 Change the plate adapter. 7-9<br />
5 Run a background plate to check the sample block for contamination. 7-13<br />
If changing block formats a or if installing a new block, also perform the following…<br />
6 Run a pure dye plate to create the pure spectra calibration values for<br />
the new format.<br />
7 RunanTaqMan® RNase P Instrument Verification Plate to confirm the<br />
proper operation of the sample block.<br />
If using an automation accessory, also perform the following…<br />
8 If changing consumable formatsa , adjust the plate sensor switch on<br />
the plate handler arm for the new plates.<br />
9 Align the Zymark® Twister Microplate Handler fixed-position bar<br />
code reader for the new plate format.<br />
Note It is necessary to align the plate handler to only the Instrument<br />
position (Zymark position 2) as explained on pages 7-32 to 7-35.<br />
a. For example, when replacing a 384-well sample block with a 96-well block<br />
Materials Required The procedure below requires the use of the following materials:<br />
7-17<br />
7-24<br />
7-28<br />
7-32<br />
10 Align the fixed-position bar code reader for the new plate format. 7-40<br />
Material Part Number<br />
Replacement Sample Block (if replacing the sample block) —<br />
5/32 inch Hex key (necessary only for certain instruments) —<br />
5/16 inch Hex key (some instruments may require a crescent wrench) —