ABI Prism® 7900HT Sequence Detection System ... - OpenWetWare
ABI Prism® 7900HT Sequence Detection System ... - OpenWetWare
ABI Prism® 7900HT Sequence Detection System ... - OpenWetWare

Create successful ePaper yourself
Turn your PDF publications into a flip-book with our unique Google optimized e-Paper software.
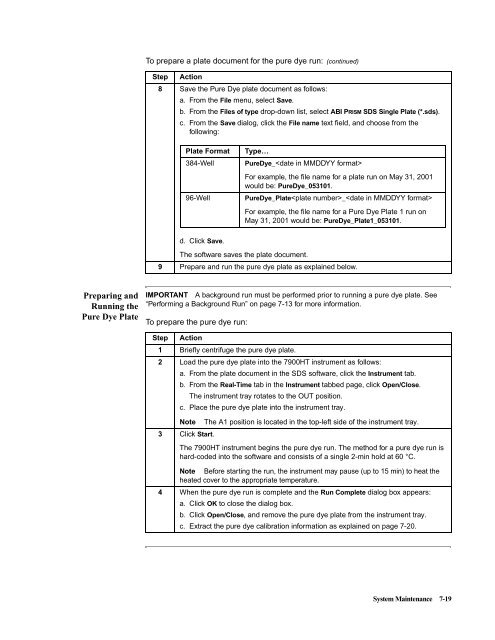
Preparing and<br />
Running the<br />
Pure Dye Plate<br />
To prepare a plate document for the pure dye run: (continued)<br />
Step Action<br />
8 Save the Pure Dye plate document as follows:<br />
a. From the File menu, select Save.<br />
b. From the Files of type drop-down list, select <strong>ABI</strong> PRISM SDS Single Plate (*.sds).<br />
c. From the Save dialog, click the File name text field, and choose from the<br />
following:<br />
Plate Format Type…<br />
384-Well PureDye_<br />
For example, the file name for a plate run on May 31, 2001<br />
would be: PureDye_053101.<br />
96-Well PureDye_Plate_<br />
d. Click Save.<br />
For example, the file name for a Pure Dye Plate 1 run on<br />
May 31, 2001 would be: PureDye_Plate1_053101.<br />
The software saves the plate document.<br />
9 Prepare and run the pure dye plate as explained below.<br />
IMPORTANT A background run must be performed prior to running a pure dye plate. See<br />
“Performing a Background Run” on page 7-13 for more information.<br />
To prepare the pure dye run:<br />
Step Action<br />
1 Briefly centrifuge the pure dye plate.<br />
2 Load the pure dye plate into the <strong>7900HT</strong> instrument as follows:<br />
a. From the plate document in the SDS software, click the Instrument tab.<br />
b. From the Real-Time tab in the Instrument tabbed page, click Open/Close.<br />
The instrument tray rotates to the OUT position.<br />
c. Place the pure dye plate into the instrument tray.<br />
Note TheA1positionislocatedinthetop-leftsideoftheinstrumenttray.<br />
3 Click Start.<br />
The <strong>7900HT</strong> instrument begins the pure dye run. The method for a pure dye run is<br />
hard-coded into the software and consists of a single 2-min hold at 60 °C.<br />
Note Before starting the run, the instrument may pause (up to 15 min) to heat the<br />
heated cover to the appropriate temperature.<br />
4 When the pure dye run is complete and the Run Complete dialog box appears:<br />
a. Click OK to close the dialog box.<br />
b. Click Open/Close, and remove the pure dye plate from the instrument tray.<br />
c. Extract the pure dye calibration information as explained on page 7-20.<br />
<strong>System</strong> Maintenance 7-19