ABI Prism® 7900HT Sequence Detection System ... - OpenWetWare
ABI Prism® 7900HT Sequence Detection System ... - OpenWetWare
ABI Prism® 7900HT Sequence Detection System ... - OpenWetWare

Create successful ePaper yourself
Turn your PDF publications into a flip-book with our unique Google optimized e-Paper software.
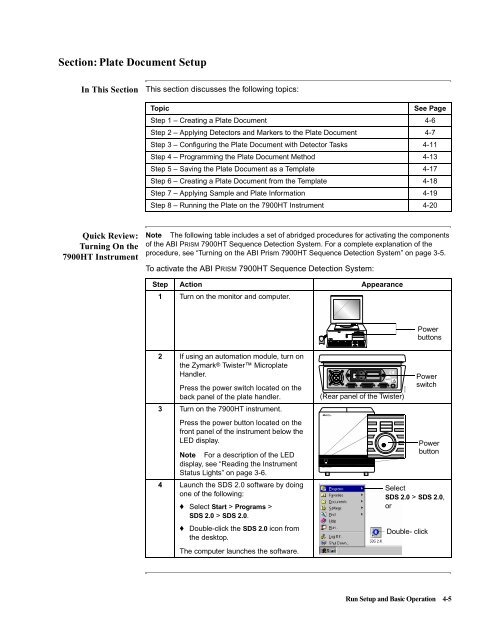
Section: Plate Document Setup<br />
In This Section This section discusses the following topics:<br />
Quick Review:<br />
Turning On the<br />
<strong>7900HT</strong> Instrument<br />
Topic See Page<br />
Step 1 – Creating a Plate Document 4-6<br />
Step 2 – Applying Detectors and Markers to the Plate Document 4-7<br />
Step 3 – Configuring the Plate Document with Detector Tasks 4-11<br />
Step 4 – Programming the Plate Document Method 4-13<br />
Step 5 – Saving the Plate Document as a Template 4-17<br />
Step 6 – Creating a Plate Document from the Template 4-18<br />
Step 7 – Applying Sample and Plate Information 4-19<br />
Step 8 – Running the Plate on the <strong>7900HT</strong> Instrument 4-20<br />
Note The following table includes a set of abridged procedures for activating the components<br />
of the <strong>ABI</strong> PRISM <strong>7900HT</strong> <strong>Sequence</strong> <strong>Detection</strong> <strong>System</strong>. For a complete explanation of the<br />
procedure, see “Turning on the <strong>ABI</strong> Prism <strong>7900HT</strong> <strong>Sequence</strong> <strong>Detection</strong> <strong>System</strong>” on page 3-5.<br />
To activate the <strong>ABI</strong> PRISM <strong>7900HT</strong> <strong>Sequence</strong> <strong>Detection</strong> <strong>System</strong>:<br />
Step Action Appearance<br />
1 Turn on the monitor and computer.<br />
2 If using an automation module, turn on<br />
the Zymark® Twister Microplate<br />
Handler.<br />
Press the power switch located on the<br />
back panel of the plate handler.<br />
3 Turn on the <strong>7900HT</strong> instrument.<br />
Press the power button located on the<br />
front panel of the instrument below the<br />
LED display.<br />
Note For a description of the LED<br />
display, see “Reading the Instrument<br />
Status Lights” on page 3-6.<br />
4 Launch the SDS 2.0 software by doing<br />
one of the following:<br />
♦ Select Start > Programs ><br />
SDS 2.0 > SDS 2.0.<br />
♦ Double-click the SDS 2.0 icon from<br />
the desktop.<br />
The computer launches the software.<br />
GR2009<br />
A B C<br />
HI-POT<br />
D<br />
(Rear panel of the Twister)<br />
Power<br />
buttons<br />
Run Setup and Basic Operation 4-5<br />
GR2010<br />
GR1728<br />
Power<br />
switch<br />
Double- click<br />
Power<br />
button<br />
Select<br />
SDS 2.0 > SDS 2.0,<br />
or