ABI Prism® 7900HT Sequence Detection System ... - OpenWetWare
ABI Prism® 7900HT Sequence Detection System ... - OpenWetWare
ABI Prism® 7900HT Sequence Detection System ... - OpenWetWare

You also want an ePaper? Increase the reach of your titles
YUMPU automatically turns print PDFs into web optimized ePapers that Google loves.
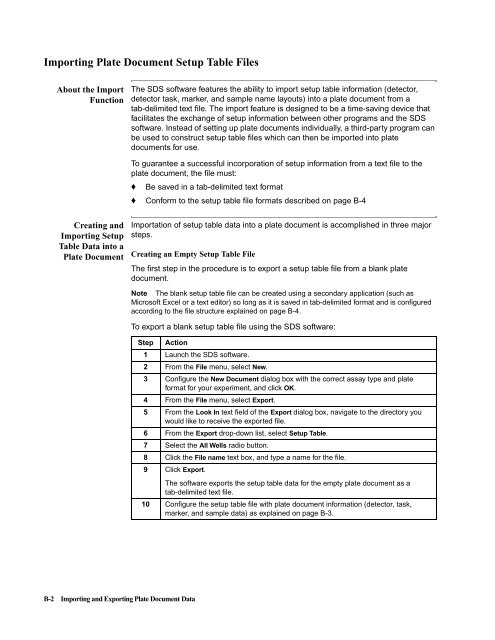
Importing Plate Document Setup Table Files<br />
About the Import<br />
Function<br />
Creating and<br />
Importing Setup<br />
TableDataintoa<br />
Plate Document<br />
B-2 Importing and Exporting Plate Document Data<br />
The SDS software features the ability to import setup table information (detector,<br />
detector task, marker, and sample name layouts) into a plate document from a<br />
tab-delimited text file. The import feature is designed to be a time-saving device that<br />
facilitates the exchange of setup information between other programs and the SDS<br />
software. Instead of setting up plate documents individually, a third-party program can<br />
be used to construct setup table files which can then be imported into plate<br />
documents for use.<br />
To guarantee a successful incorporation of setup information from a text file to the<br />
plate document, the file must:<br />
♦ Be saved in a tab-delimited text format<br />
♦ Conform to the setup table file formats described on page B-4<br />
Importation of setup table data into a plate document is accomplished in three major<br />
steps.<br />
Creating an Empty Setup Table File<br />
Thefirststepintheprocedureistoexportasetuptablefilefromablankplate<br />
document.<br />
Note The blank setup table file can be created using a secondary application (such as<br />
Microsoft Excel or a text editor) so long as it is saved in tab-delimited format and is configured<br />
according to the file structure explained on page B-4.<br />
To export a blank setup table file using the SDS software:<br />
Step Action<br />
1 Launch the SDS software.<br />
2 From the File menu, select New.<br />
3 Configure the New Document dialog box with the correct assay type and plate<br />
format for your experiment, and click OK.<br />
4 From the File menu, select Export.<br />
5 From the Look In text field of the Export dialog box, navigate to the directory you<br />
wouldliketoreceivetheexportedfile.<br />
6 From the Export drop-down list, select Setup Table.<br />
7 Select the All Wells radio button.<br />
8 Click the File name text box, and type a name for the file.<br />
9 Click Export.<br />
The software exports the setup table data for the empty plate document as a<br />
tab-delimited text file.<br />
10 Configure the setup table file with plate document information (detector, task,<br />
marker, and sample data) as explained on page B-3.