ABI Prism® 7900HT Sequence Detection System ... - OpenWetWare
ABI Prism® 7900HT Sequence Detection System ... - OpenWetWare
ABI Prism® 7900HT Sequence Detection System ... - OpenWetWare

You also want an ePaper? Increase the reach of your titles
YUMPU automatically turns print PDFs into web optimized ePapers that Google loves.
Copying and<br />
Applying Detectors<br />
to the Plate<br />
Document<br />
4-8 Run Setup and Basic Operation<br />
To create detectors for the plate document: (continued)<br />
Step Action<br />
8 Click OK to save the detector and return to the Detector Manager dialog box.<br />
The software saves the new detector and displays it in the detector list.<br />
9 Repeat steps 2 to 8 to create detectors for all remaining assays on the plate.<br />
Note Click the button for information on the features of the Detector Manager<br />
10<br />
dialog box or to view the procedures for editing, deleting, or searching for detectors.<br />
Choose from the following:<br />
If constructing a<br />
plate document for… Then…<br />
absolute quantification copy the detector(s) to the plate document as<br />
explained in the procedure below.<br />
allelic discrimination create markers to the plate document as explained<br />
on page 4-9.<br />
IMPORTANT Once copied to the plate document, a detector is no longer linked to the<br />
corresponding entry in the Detector Manager. Therefore, if a detector is modified in the Detector<br />
Manager after it has been copied to a plate document, the detector must be removed from the<br />
plate and copied again to update the plate document with the changes.<br />
To copy and assign the detectors to the plate document:<br />
Step Action<br />
1 From the Detector Manager dialog box of the SDS software, copy the detectors to<br />
the plate document as follows:<br />
a. While pressing and holding the Ctrl key, click the detectors you want to apply to<br />
the plate document.<br />
The software highlights the selected detectors.<br />
b. Click Copy to Plate Document.<br />
The software adds the detectors to the well inspector of the plate document.<br />
2 Click Done to close the Detector Manager dialog box.<br />
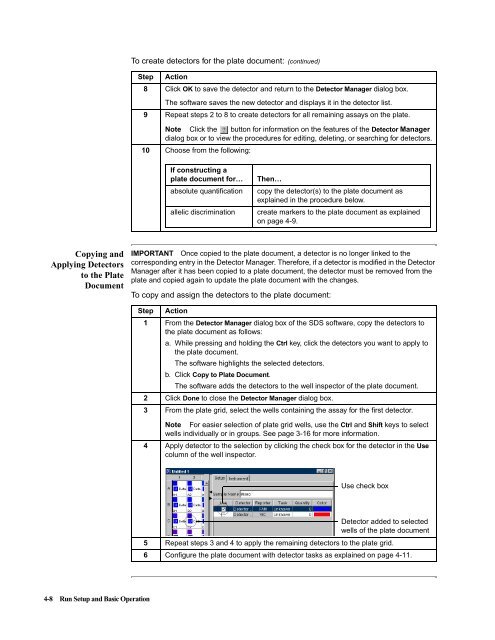
3 From the plate grid, select the wells containing the assay for the first detector.<br />
Note For easier selection of plate grid wells, use the Ctrl and Shift keys to select<br />
wells individually or in groups. See page 3-16 for more information.<br />
4 Apply detector to the selection by clicking the check box for the detector in the Use<br />
column of the well inspector.<br />
Use check box<br />
Detector added to selected<br />
wells of the plate document<br />
5 Repeat steps 3 and 4 to apply the remaining detectors to the plate grid.<br />
6 Configure the plate document with detector tasks as explained on page 4-11.