- Page 1 and 2:
FTOS Configuration Guide for the C-
- Page 3 and 4:
Listed below are the new features i
- Page 5 and 6:
Layer 3 C-Series • 31-Bit Prefix
- Page 7 and 8:
• Multiple Port Monitoring Sessio
- Page 9 and 10:
Contents New Features . . . . . . .
- Page 11 and 12:
enable diagnostics on an SFM . . .
- Page 13 and 14:
Idle Time . . . . . . . . . . . . .
- Page 15 and 16:
LACP Configuration Tasks . . . . .
- Page 17 and 18:
Interface Range . . . . . . . . . .
- Page 19 and 20:
Directed Broadcast . . . . . . . .
- Page 21 and 22:
Replacing an Existing Line Card . .
- Page 23 and 24:
Enable preempt . . . . . . . . . .
- Page 25 and 26:
Capturing PDUs . . . . . . . . . .
- Page 27 and 28:
Weighted Fair Queuing for Multicast
- Page 29 and 30:
Related configuration tasks . . . .
- Page 31 and 32:
Example of using the show configura
- Page 33 and 34:
Appendix A Standards Compliance . .
- Page 35 and 36:
Preface About this Guide Objectives
- Page 37 and 38:
Chapter 1 Configuration Fundamental
- Page 39 and 40:
Figure 2 CLI Modes in FTOS EXEC EXE
- Page 41 and 42:
Table 2 FTOS Command Modes CLI Comm
- Page 43 and 44:
Figure 5 Undoing a command with the
- Page 45 and 46:
Table 3 Short-Cut Keys and their Ac
- Page 47 and 48:
If either of these messages appears
- Page 49 and 50:
Chapter 2 Getting Started This chap
- Page 51 and 52:
Configuring a Host Name The host na
- Page 53 and 54:
To configure a username and passwor
- Page 55 and 56:
Copying Files to and from the Syste
- Page 57 and 58:
Task Command Syntax Command Mode Sa
- Page 59 and 60:
Viewing Configuration Files Configu
- Page 61 and 62:
1. On the E-Series, the cache boot
- Page 63 and 64:
View your cache boot configuration
- Page 65 and 66:
Chapter 3 Management Management is
- Page 67 and 68:
specify logging to a Syslog server
- Page 69 and 70:
In the lines above, local7 is the l
- Page 71 and 72:
configure a UNIX logging facility l
- Page 73 and 74:
To have FTOS include a timestamp wi
- Page 75 and 76:
To view the configured NTP time ser
- Page 77 and 78:
To view whether NTP is configured o
- Page 79 and 80:
configure FTP client parameters To
- Page 81 and 82:
Command Syntax Command Mode Purpose
- Page 83 and 84:
To enter the LINE mode to configure
- Page 85 and 86:
Step Command Syntax Command Mode Pu
- Page 87 and 88:
Locking CONFIGURATION mode FTOS all
- Page 89 and 90:
Chapter 4 Simple Network Management
- Page 91 and 92:
To configure an SNMP host to store
- Page 93 and 94:
set SNMP information To set the con
- Page 95 and 96:
Table 6 MIB Objects for Copying Con
- Page 97 and 98:
Table 7 Copying Configuration Files
- Page 99 and 100:
Figure 44 shows the command syntax
- Page 101 and 102:
Query q-bride MIB object, dot1qVlan
- Page 103 and 104:
To assign ports 1-23 (line card 0)
- Page 105 and 106:
Changing Administrative Status with
- Page 107 and 108:
SNMP Table 9 contains SNMP traps an
- Page 109 and 110:
Table 9 SNMP Traps and OIDs OID Str
- Page 111 and 112:
Table 49 lists the traps sent by FT
- Page 113 and 114:
Figure 49 SNMP Traps and Error Mess
- Page 115 and 116:
Figure 49 SNMP Traps and Error Mess
- Page 117 and 118:
Chapter 5 Configuration Replace and
- Page 119 and 120:
Enabling the Archive Service Before
- Page 121 and 122:
Figure 52 Replacing the Running-con
- Page 123 and 124:
Figure 57 Configuring the Maximum N
- Page 125 and 126:
Viewing and Editing the Contents of
- Page 127 and 128:
Chapter 6 Remote Monitoring (RMON)
- Page 129 and 130:
Set rmon alarm To set an alarm on a
- Page 131 and 132:
The following example shows the rmo
- Page 133 and 134:
Chapter 7 Security Security feature
- Page 135 and 136:
Configuring Accounting of EXEC and
- Page 137 and 138:
Configuring AAA Authentication logi
- Page 139 and 140:
To use local authentication for ena
- Page 141 and 142:
To configure a user name and passwo
- Page 143 and 144:
Step Command Syntax Command Mode Pu
- Page 145 and 146:
To view the password configured for
- Page 147 and 148:
Configuration Task List for RADIUS
- Page 149 and 150:
If you want to change an optional p
- Page 151 and 152:
To select TACACS as the login authe
- Page 153 and 154:
TACACS+ Remote Authentication and A
- Page 155 and 156:
If rejected by the AAA server, the
- Page 157 and 158:
VTY Line Remote Authentication and
- Page 159 and 160:
Figure 74 Specifying an SSH version
- Page 161 and 162:
Figure 76 illustrates an outbound S
- Page 163 and 164:
Secure Shell Secure Shell (SSH) is
- Page 165 and 166:
Step Task Command Syntax Command Mo
- Page 167 and 168:
Enabling and Disabling the Telnet D
- Page 169 and 170:
Step Command Syntax Command Mode Pu
- Page 171 and 172:
To configure a filter for a Trace l
- Page 173 and 174:
To enable a Trace list, use the fol
- Page 175 and 176:
Chapter 8 Port Monitoring Port Moni
- Page 177 and 178:
FTOS Behavior: On the C-Series and
- Page 179 and 180:
Flow-based Monitoring Flow-based Mo
- Page 181 and 182:
Chapter 9 Layer 2 Layer 2 features
- Page 183 and 184:
In Step 2, the show vlan command in
- Page 185 and 186:
To create a port-based VLAN, use th
- Page 187 and 188:
Except for hybrid ports, only a tag
- Page 189 and 190:
Step Task Command Command Mode 3 Co
- Page 191 and 192:
• Source MAC host address • Des
- Page 193 and 194:
Step Command Syntax Command Mode Pu
- Page 195 and 196:
Step Command Syntax Command Mode Pu
- Page 197 and 198:
Step Command Syntax Command Mode Pu
- Page 199 and 200:
• MAC Address Learning Limit feat
- Page 201 and 202:
The no-station-move and station-mov
- Page 203 and 204:
Figure 111 Configuring mac-address-
- Page 205 and 206:
Figure 114 Server Cluster: Failover
- Page 207 and 208:
In Figure 116, interface 3/41 is a
- Page 209 and 210:
Chapter 10 Link Aggregation Control
- Page 211 and 212:
FTOS supports LAGs in the following
- Page 213 and 214:
Setting the LACP long timeout PDUs
- Page 215 and 216:
Step Task Command Command Mode 2 Cr
- Page 217 and 218:
Configure LACP to be hitless using
- Page 219 and 220:
Figure 131 Inspecting Configuration
- Page 221 and 222:
Summary of the configuration on ALP
- Page 223 and 224:
Figure 135 Using the show interface
- Page 225 and 226:
Figure 137 Using the show lacp Comm
- Page 227 and 228:
Chapter 11 VLAN Stacking The Stacka
- Page 229 and 230:
Single-Tag and Untagged Support on
- Page 231 and 232:
Use the show config command in the
- Page 233 and 234:
Note: On the E-Series, only the fir
- Page 235 and 236:
Creating a VLAN-Stack network Figur
- Page 237 and 238:
E1200-1 Configuration (continued) i
- Page 239 and 240:
Making a hybrid port a trunk port a
- Page 241 and 242:
Chapter 12 GARP VLAN Registration P
- Page 243 and 244:
Enabling GVRP Globally Enable GVRP
- Page 245 and 246:
Chapter 13 Interfaces Interfaces ar
- Page 247 and 248:
When an interface is in either mode
- Page 249 and 250:
Enabling an interface To determine
- Page 251 and 252:
To view IP information on an interf
- Page 253 and 254:
To configure a Management interface
- Page 255 and 256:
To configure a Loopback interface,
- Page 257 and 258:
A physical interface can belong to
- Page 259 and 260:
To view the interface’s configura
- Page 261 and 262:
Reassign an interface to a new port
- Page 263 and 264:
To see which port channels are memb
- Page 265 and 266:
IPv4, IPv6, and non-IP traffic hand
- Page 267 and 268:
A consideration for including VLANs
- Page 269 and 270:
Excluding duplicate entries Duplica
- Page 271 and 272:
Choosing an Interface-range Macro T
- Page 273 and 274:
Displaying Only Configured Interfac
- Page 275 and 276:
Dynamic Counters By default, counti
- Page 277 and 278:
Enabling Link Dampening Enable link
- Page 279 and 280:
The SONET ring has its own restore
- Page 281 and 282:
Configuring MTU Size on an Interfac
- Page 283 and 284:
Chapter 14 Link Layer Discovery Pro
- Page 285 and 286:
Organizationally Specific TLVs Orga
- Page 287 and 288:
• storing the information that en
- Page 289 and 290:
The application type is a represent
- Page 291 and 292:
Important Points to Remember • LL
- Page 293 and 294:
Step Task Command Command Mode * No
- Page 295 and 296:
Figure 196 Viewing All Information
- Page 297 and 298:
Configuring Transmit and Recieve Mo
- Page 299 and 300:
Figure 200 debug lldp detail—LLDP
- Page 301 and 302:
Table 29 LLDP System MIB Objects TL
- Page 303 and 304:
Chapter 15 sFlow Configuring sFlow
- Page 305 and 306:
Enabling and Disabling on an Interf
- Page 307 and 308:
Figure 205 is a sample output from
- Page 309 and 310:
Note: Sampling rate backoff can cha
- Page 311 and 312:
The previous points are summarized
- Page 313 and 314:
Chapter 16 IP Addressing IP Address
- Page 315 and 316:
To assign an IP address to an inter
- Page 317 and 318:
To view the configured routes, use
- Page 319 and 320:
The server replies with source port
- Page 321 and 322:
Command Syntax Command Mode Purpose
- Page 323 and 324:
These entries do not age and can on
- Page 325 and 326:
To reenable the creation of ICMP un
- Page 327 and 328:
Configuring a Broadcast Address Con
- Page 329 and 330:
In Figure 221, Packet 1 has the des
- Page 331 and 332:
Use the command debug ip dhcp when
- Page 333 and 334:
Chapter 17 IP Access Control Lists,
- Page 335 and 336:
V • L3 Egress Access list Note: I
- Page 337 and 338:
Configuring IP ACLs To configure an
- Page 339 and 340:
Figure 228 illustrates a standard I
- Page 341 and 342:
Step Command Syntax Command Mode Pu
- Page 343 and 344:
Configuring Layer 2 and Layer 3 ACL
- Page 345 and 346:
To view which IP ACL is applied to
- Page 347 and 348:
To create an egress ACLs, use the i
- Page 349 and 350:
To apply ACLs on loopback, use the
- Page 351 and 352:
Step Command Syntax Command Mode Pu
- Page 353 and 354:
To view all configured prefix lists
- Page 355 and 356:
ACL Resequencing ACL Resequencing a
- Page 357 and 358:
For example, in Figure 243, remark
- Page 359 and 360:
The default action is permit and th
- Page 361 and 362:
In the above route-map, only if a r
- Page 363 and 364:
To configure a set condition, use a
- Page 365 and 366:
Note: If the continue clause is con
- Page 367 and 368:
Chapter 18 High Availability High A
- Page 369 and 370:
If a different line card is inserte
- Page 371 and 372:
Standby RPM The E-Series supports t
- Page 373 and 374:
RPM High Availability Configuration
- Page 375 and 376:
Table 37 lists the data categories
- Page 377 and 378:
copy files between RPMs To copy fil
- Page 379 and 380:
Figure 260 Inserting a Line Card in
- Page 381 and 382:
Replacing an Existing Line Card Whe
- Page 383 and 384:
RPM Failover When a system with two
- Page 385 and 386:
Chapter 19 Spanning Tree Protocol S
- Page 387 and 388:
Configuring Interfaces for Layer 2
- Page 389 and 390:
oot R1 R2 1/1 1/2 3/1 3/2 R3 1/3 1/
- Page 391 and 392:
Modifying Global Parameters You can
- Page 393 and 394:
To enable PortFast on an interface:
- Page 395 and 396:
FTOS Behavior: BPDU Guard and BPDU
- Page 397 and 398:
Chapter 20 Per-VLAN Spanning Tree P
- Page 399 and 400:
Step Command Syntax Command Mode Pu
- Page 401 and 402:
Force10(conf)# protocol spanning-tr
- Page 403 and 404:
The following command configures th
- Page 405 and 406:
Viewing the PVST+ Configuration To
- Page 407 and 408:
Per-Port BPDU Block In metro Ethern
- Page 409 and 410:
Chapter 21 Rapid Spanning Tree Prot
- Page 411 and 412:
R1(conf-if-gi-1/1)#show config ! in
- Page 413 and 414:
R1#show spanning-tree rstp Root Ide
- Page 415 and 416:
Table 43 displays the default value
- Page 417 and 418:
Influence RSTP Root Selection The R
- Page 419 and 420:
Chapter 22 Multiple Spanning Tree P
- Page 421 and 422:
Enable Multiple Spanning Tree Globa
- Page 423 and 424:
Influence MSTP Root Selection MSTP
- Page 425 and 426:
Task Command Syntax Command Mode Ch
- Page 427 and 428:
Verify that EdgePort is enabled on
- Page 429 and 430:
Chapter 23 Virtual Router Redundanc
- Page 431 and 432:
VRRP Benefits With VRRP configured
- Page 433 and 434:
To create a virtual router, use the
- Page 435 and 436:
Figure 312 shows the same VRRP grou
- Page 437 and 438:
To view the password, use the show
- Page 439 and 440:
To track an interface, use the foll
- Page 441 and 442:
Figure 316 Configure VRRP Router 2
- Page 443 and 444:
Chapter 24 Routing Information Prot
- Page 445 and 446:
Enable RIP globally By default, RIP
- Page 447 and 448:
Control RIP routing updates By defa
- Page 449 and 450:
Figure 320 shows an example of the
- Page 451 and 452:
Summarize routes Routes in the RIPv
- Page 453 and 454:
Configuring RIPv2 on Core 2 Figure
- Page 455 and 456:
RIP Configuration on Core 3 Figure
- Page 457 and 458:
RIP Configuration Summary Figure 33
- Page 459 and 460:
Chapter 25 Border Gateway Protocol
- Page 461 and 462:
A stub AS is one that is connected
- Page 463 and 464:
Establishing a session Information
- Page 465 and 466:
BGP Attributes Routes learned via B
- Page 467 and 468:
• A path with no AS_PATH configur
- Page 469 and 470:
An MED is a non-transitive attribut
- Page 471 and 472:
Next Hop The Next Hop is the IP add
- Page 473 and 474:
When you complete your migration, a
- Page 475 and 476:
Configuration Information The softw
- Page 477 and 478:
• Enable route flap dampening •
- Page 479 and 480:
Figure 345 Command example: show ip
- Page 481 and 482:
Figure 347 Command example: show ru
- Page 483 and 484:
Use the show config command in the
- Page 485 and 486:
The BGP fast fall-over feature is c
- Page 487 and 488:
Use the show ip bgp peer-group comm
- Page 489 and 490:
Disable this feature, using the no
- Page 491 and 492:
• Save all FIB and CAM entries on
- Page 493 and 494:
Use these commands in the following
- Page 495 and 496:
Table 50 Regular Expressions Regula
- Page 497 and 498:
To view the configuration, use the
- Page 499 and 500:
Step Command Syntax Command Mode Pu
- Page 501 and 502:
Change LOCAL_PREFERENCE attribute I
- Page 503 and 504:
Use the following command in the CO
- Page 505 and 506:
Step Command Syntax Command Mode Pu
- Page 507 and 508:
Aggregate routes FTOS provides mult
- Page 509 and 510:
The CLI example below shows configu
- Page 511 and 512:
Use the following command in EXEC P
- Page 513 and 514:
Use the clear ip bgp command in EXE
- Page 515 and 516:
FTOS MBGP is implemented as per IET
- Page 517 and 518:
Storing Last and Bad PDUs FTOS stor
- Page 519 and 520:
• A neighbor is unconfigured •
- Page 521 and 522:
Figure 367 Enable BGP - Router 1 R1
- Page 523 and 524:
Figure 369 Enable BGP - Router 3 R2
- Page 525 and 526:
Figure 371 Enable Peer Groups - Rou
- Page 527 and 528:
Figure 373 Enable Peer Group - Rout
- Page 529 and 530:
_ls Chapter 26 Open Shortest Path F
- Page 531 and 532:
An OSPF backbone is responsible for
- Page 533 and 534:
Area Border Router (ABR) Within an
- Page 535 and 536:
• 3: connection to a stub network
- Page 537 and 538:
• AS External (type 5) • NSSA E
- Page 539 and 540:
OSPF ACK Packing The OSPF ACK Packi
- Page 541 and 542:
Use these commands on one of the in
- Page 543 and 544:
Use the show config command in CONF
- Page 545 and 546:
Use the following command in the RO
- Page 547 and 548:
Use any or all of the following com
- Page 549 and 550:
Enable graceful restart Graceful Re
- Page 551 and 552:
• authentication-key: authenticat
- Page 553 and 554:
Redistribute routes You can add rou
- Page 555 and 556:
Troubleshooting OSPF FTOS has sever
- Page 557 and 558:
Basic OSPF Router Topology The foll
- Page 559 and 560:
Chapter 27 Quality of Service Quali
- Page 561 and 562:
Table 51 FTOS Support for Port-base
- Page 563 and 564:
Honor dot1p Priorities on Ingress T
- Page 565 and 566:
• Apply rate shaping to outgoing
- Page 567 and 568:
Determine the order in which ACLs a
- Page 569 and 570:
Set a DSCP value for egress packets
- Page 571 and 572:
Specify WRED drop precedence Specif
- Page 573 and 574:
• You cannot apply an input Layer
- Page 575 and 576:
Apply a WRED profile to traffic Onc
- Page 577 and 578:
• Allocate a specific bandwidth p
- Page 579 and 580:
Note: The command show cam-usage pr
- Page 581 and 582:
Chapter 28 Storm Control Storm Cont
- Page 583 and 584:
Chapter 29 Internet Group Managemen
- Page 585 and 586:
Leaving a Multicast Group 1. A host
- Page 587 and 588:
Figure 412 IGMP Membership Reports:
- Page 589 and 590:
Viewing IGMP Enabled Interfaces Int
- Page 591 and 592:
Adjusting the IGMP Querier Timeout
- Page 593 and 594:
IGMP Snooping IGMP Snooping version
- Page 595 and 596:
• When enabled, IGMP snooping Que
- Page 597 and 598:
Chapter 30 Bidirectional Forwarding
- Page 599 and 600:
Figure 419 BFD in IPv4 Packet Forma
- Page 601 and 602:
BFD sessions BFD must be enabled on
- Page 603 and 604:
Figure 421 BFD State Machine Down c
- Page 605 and 606:
Figure 423 Establishing a BFD Sessi
- Page 607 and 608:
View session parameters using the s
- Page 609 and 610:
To establish a BFD session: Step Ta
- Page 611 and 612:
Establishing sessions with OSPF nei
- Page 613 and 614:
To disable BFD sessions with all OS
- Page 615 and 616:
View the established sessions using
- Page 617 and 618:
Figure 433 Establishing Sessions wi
- Page 619 and 620:
To change parameters for a particul
- Page 621 and 622:
View the established sessions using
- Page 623 and 624:
Figure 438 Establishing Sessions on
- Page 625 and 626:
To enable Protocol Liveness: Step T
- Page 627 and 628:
Chapter 31 PIM Sparse Mode PIM Spar
- Page 629 and 630:
Configuring PIM-SM Configuring PIM-
- Page 631 and 632:
Identify an RP by the IP address of
- Page 633 and 634: If a graceful-restart capable route
- Page 635 and 636: Chapter 32 Multicast Features The M
- Page 637 and 638: To trace a multicast route use the
- Page 639 and 640: You may do one or more for the foll
- Page 641 and 642: Chapter 33 Power over Ethernet This
- Page 643 and 644: Figure 450 Enabling PoE R1(conf)# i
- Page 645 and 646: • If the device advertises its po
- Page 647 and 648: Recovering from a Failed Power Supp
- Page 649 and 650: Creating VLANs for an Office VOIP D
- Page 651 and 652: Honoring the incoming dot1p value O
- Page 653 and 654: Figure 462 Classifying VOIP Traffic
- Page 655 and 656: Chapter 34 Force10 Service Agent Fo
- Page 657 and 658: Designating an administrator email
- Page 659 and 660: Each command in the procedure, abov
- Page 661 and 662: Using FTSA The purpose of FTSA is t
- Page 663 and 664: To configure a policy, you select f
- Page 665 and 666: Inspecting files stored locally Whe
- Page 667 and 668: Figure 467 contains examples of an
- Page 669 and 670: Figure 469 contains an example of t
- Page 671 and 672: Debugging FTSA Use the debug call-h
- Page 673 and 674: Chapter 35 802.1X 802.1X is support
- Page 675 and 676: Figure 474 RADIUS Frame Format Code
- Page 677 and 678: Configuring 802.1X Configuring 802.
- Page 679 and 680: Configuring Request Identity Re-tra
- Page 681 and 682: • ForceUnauthorized an unauthoriz
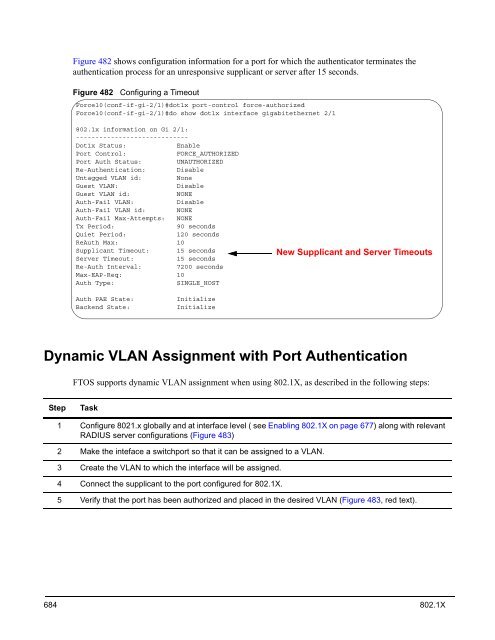
- Page 683: Figure 481 Configuring a Reauthenti
- Page 687 and 688: Figure 485 Configuring an Authentic
- Page 689 and 690: Chapter 36 C-Series Debugging and D
- Page 691 and 692: Table 66 FTOS Link Monitoring Syslo
- Page 693 and 694: Table 69 Poll Manager Syslog Messag
- Page 695 and 696: — CP trace log file (look for a f
- Page 697 and 698: 1. Use the show environment command
- Page 699 and 700: CP Software Exceptions When a RPM r
- Page 701 and 702: Force10#debug ? aaa AAA debug infor
- Page 703 and 704: Monitoring CPU and Memory Usage via
- Page 705 and 706: Table 77 SNMP Traps and OIDs OID St
- Page 707 and 708: Taking the Line Card Offline Place
- Page 709 and 710: Figure 501 Viewing Offline Diagnost
- Page 711 and 712: Bringing the Line Card Online Bring
- Page 713 and 714: • Fast burst - Sufficient time li
- Page 715 and 716: Table 80 Buffer Allocation Error on
- Page 717 and 718: Figure 503 C-Series - Single Queue
- Page 719 and 720: Chapter 37 Upgrade Procedures This
- Page 721 and 722: Step Task Command Command Mode 5 Wh
- Page 723 and 724: Upgrading the Boot Flash Image on S
- Page 725 and 726: Figure 510 Determining if the Runni
- Page 727 and 728: To upgrade the RPM FPGA image: Step
- Page 729 and 730: The flash selector may be set to ei
- Page 731 and 732: Figure 515 Upgrading E-Series SFM F
- Page 733 and 734: Appendix A Standards Compliance Thi
- Page 735 and 736:
General IPv6 Protocols FTOS support
- Page 737 and 738:
Multicast FTOS support, per platfor
- Page 739 and 740:
Network Management (continued) RFC#
- Page 741 and 742:
Numerics 10/100/1000 Base-T Etherne
- Page 743 and 744:
directed broadcast 318 disable-on-s
- Page 745 and 746:
link MTU configuring 281 maximum si
- Page 747 and 748:
Portfast 392, 416 Port-pipe error 6
- Page 749 and 750:
Syslog servers 66 System crash 664