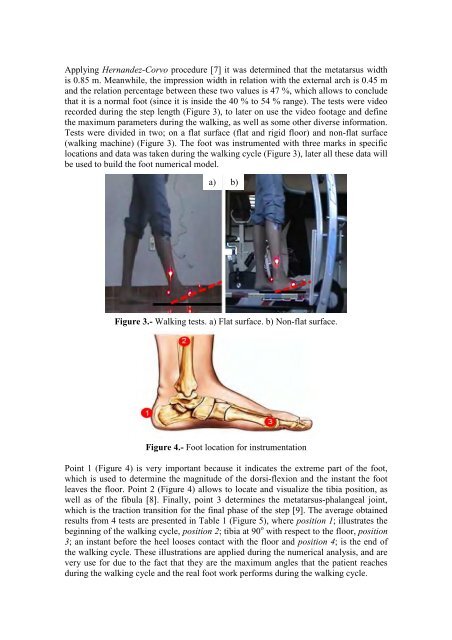
- Page 1 and 2:
The Proceedings of the 10 th Intern
- Page 3 and 4:
Install Adobe Reader 8 or 9 (http:/
- Page 5 and 6:
Content: POSTERS: BRAIN: CELL: EVAL
- Page 7 and 8:
Modeling of blood flow through a fl
- Page 9 and 10:
The mesh generation of the model wa
- Page 11 and 12:
Figure6 . The stroke volume data fo
- Page 13 and 14:
Digital Subtraction Phonocardiograp
- Page 15 and 16:
mobile cart for easy recording in c
- Page 17 and 18:
Figure 7. This image shows PCG samp
- Page 19 and 20:
Our approach is an improvement in t
- Page 21 and 22:
one cements as well as its behaviou
- Page 23 and 24:
Typical dimensions of lumbar verteb
- Page 25 and 26:
attributed to the change of stiffne
- Page 27 and 28:
lifestyle and obesity. In that cont
- Page 29 and 30:
T was the temperature in Kelvin and
- Page 31 and 32:
sustained tensile strains stimulate
- Page 33 and 34:
An approach aiming at determining a
- Page 35 and 36:
failure load. 2.4 Simulation of reh
- Page 37 and 38:
REFERENCES 1. Vunjak-Novakovic G, A
- Page 39 and 40:
3. FIF-BAL BIOREACTOR The FIF devic
- Page 41 and 42:
value of p nearest to dqc=0 we cont
- Page 43 and 44:
(Wanless, 1999). This low value cou
- Page 45 and 46:
3. MATERIALS AND METHODS A CAD mode
- Page 47 and 48:
did not allow gap closure. Maximum
- Page 49 and 50:
hand, if the IFM is too large, remo
- Page 51 and 52:
2. INTRODUCTION Intervertebral disc
- Page 53 and 54:
Figure 3. T1 signal enhancement in
- Page 55 and 56:
1. ABSTRACT TIP CELLS AT THE TOP: M
- Page 57 and 58:
Fig. 1. Schematic overview of the m
- Page 59 and 60:
Fig. 3. Image of the amount of VEGF
- Page 61 and 62:
THE COMPUTATIONAL MODEL OF DENTAL I
- Page 63 and 64:
processing application STL Model Cr
- Page 65 and 66:
For the implant/bone interaction as
- Page 67 and 68:
ABSTRACT THE IMPACT OF SELECTION BI
- Page 69 and 70:
Figure 1: flow chart showing the op
- Page 71 and 72:
Figure 2: Time course of cytosolic
- Page 73 and 74:
CONSTITUTIVE MODELLING OF THE ANNUL
- Page 75 and 76:
it is well known the non-linear nat
- Page 77 and 78:
Therefore, we have decided to carry
- Page 79 and 80:
EXTRACTION OF PHALANGEAL JOINT PARA
- Page 81 and 82:
column vectors of P. Denoting the v
- Page 83 and 84:
End i joint angles and length offse
- Page 85 and 86:
Validation of Strain Mapping for th
- Page 87 and 88:
allows the calculation of strain ma
- Page 89 and 90:
RMS error was 0.054 and the strains
- Page 91 and 92:
AN APPROACH FOR THE REDUCTION OF TH
- Page 93 and 94:
The relation between the time-deriv
- Page 95 and 96:
Error in position [mm] Error in pos
- Page 97 and 98:
ANALYSIS OF THE INTRAINDIVIDUAL DIF
- Page 99 and 100:
Fig.1: Frontal view on all subchond
- Page 101 and 102:
[6] M. Bozkurt, B. B. Kentel, G. Ya
- Page 103 and 104:
on the actual necessary time needed
- Page 105 and 106:
Illustration 2: The initially spher
- Page 107 and 108:
cell if it is hardly able to deform
- Page 109 and 110:
fit with a reference anatomy in min
- Page 111 and 112:
show that patellar mal-positioning
- Page 113 and 114:
Experimental and numerical analysis
- Page 115 and 116:
stenosis in both simulations and ex
- Page 117 and 118:
stented case, corresponding to the
- Page 119 and 120:
EVALUATION OF DIFFERENT LOADING CON
- Page 121 and 122:
were modeled with identical geometr
- Page 123 and 124:
each simulation and the position of
- Page 125 and 126:
FINITE ELEMENT MODEL ANALYSIS OF HU
- Page 127 and 128:
Figure 1: Maximal principal strains
- Page 129 and 130:
Method for classification of porcin
- Page 131 and 132:
3.3 Identification of Paths Accordi
- Page 133 and 134:
Table. 1. Descriptive Patterns used
- Page 135 and 136:
CHARACTERIZING THE MECHANICAL MICRO
- Page 137 and 138:
3.1.3 Cell proliferation It is assu
- Page 139 and 140:
Stress [Pa] 4 3 2 1 0 Mean stress A
- Page 141 and 142:
REFERENCES [1] A.M. Bratt-Leal, R.L
- Page 143 and 144:
y exposure to interstitial fluid sh
- Page 145 and 146:
according to (Eq. 2), nor averaged
- Page 147 and 148:
emoved the oscillations partially a
- Page 149 and 150:
static load and a dynamic load. A s
- Page 151 and 152:
positive effect of the number of ac
- Page 153 and 154:
pathways and their interactions tha
- Page 155 and 156:
applications, the need for accuracy
- Page 157 and 158:
avoid violating the initial geometr
- Page 159 and 160:
6. CONCLUSION The examples of appli
- Page 161 and 162:
Fig. 1 Semicircular canal structure
- Page 163 and 164:
4. RESULT Fig. 6 FSI model of semic
- Page 165 and 166:
6. ACKNOWLEDGEMENT This research wa
- Page 167 and 168:
ods to the biocompatible plastic po
- Page 169 and 170:
Table 1: Analysis conditions Static
- Page 171 and 172:
[3] Brantigan, J. W., Steffee, A. D
- Page 173 and 174:
femoral head fracture, the femoral
- Page 175 and 176:
Fig 3. Schematic drawing of the ste
- Page 177 and 178:
6. CONCLUSION Fig 7. Analysis resul
- Page 179 and 180:
and angular rates were registered b
- Page 181 and 182:
former, there were assumed the foll
- Page 183 and 184:
delivered dynamic support, which pr
- Page 185 and 186:
insertion of provisional restoratio
- Page 187 and 188:
Figure 4: Implant displacements obt
- Page 189:
5. DISCUSSION AND CONCLUSION Initia
- Page 192 and 193:
at which microdamage originates. Fo
- Page 194 and 195:
4. RESULTS The load response varied
- Page 196 and 197:
current study to explore the effect
- Page 198 and 199:
implant correctly from the finite e
- Page 200 and 201:
(a) (b) (c) (d) (e) Figure 3. The s
- Page 202 and 203:
(a) (b) Figure 6. The meshed model
- Page 204 and 205:
(a) (b) Figure 9. Cumulative probab
- Page 206 and 207:
NUMERICAL EVALUATION AND MEDICAL CO
- Page 208 and 209:
compared by overlaying the real dat
- Page 210 and 211:
four sample patient data, outcomes
- Page 212 and 213:
A POROELASTIC APPROACH FOR AN OPEN
- Page 214 and 215:
where indexes U, P refer to the unk
- Page 216 and 217:
RESULTS As a preliminary test, a 0.
- Page 218 and 219:
BIOMECHANICAL BEHAVIOR OF CANCELLOU
- Page 220 and 221:
cement acts perfectly, therefore it
- Page 222 and 223:
cancellous bone of natural joints a
- Page 224 and 225:
COMPUTATIONAL MODELING OF TANGLED A
- Page 226 and 227:
The centers of the simulated cells
- Page 228 and 229:
untangled, the local fiber displace
- Page 230 and 231:
TOWARDS A WAVELET BASED MEDICAL IMA
- Page 232 and 233:
however at each decomposition scale
- Page 234 and 235:
the MATLAB software (for the Modifi
- Page 236 and 237:
A FLUID STRUCTURE INTERACTION MODEL
- Page 238 and 239:
hyperelastic based on available exp
- Page 240 and 241:
t [ms] 30 70 160 220 270 Pressure [
- Page 242 and 243:
MECHANICAL BAHAVIOR OF DIFFERENT NI
- Page 244 and 245:
parameters necessaries to use this
- Page 246 and 247:
F1 and Mtwo were directly related t
- Page 248 and 249:
MECHANICAL EFFECT ON METABOLIC TRAN
- Page 250 and 251:
an initial nil lactate concentratio
- Page 252 and 253:
present study, such values were phe
- Page 254 and 255:
EVALUATION OF FEMORAL COMPONENT MIC
- Page 256 and 257:
TS implants employed a “hybrid”
- Page 258 and 259:
5. DISCUSSION i ii Figure 2: Compar
- Page 260 and 261:
THE MECHANICAL ENVIRONMENT IN THE D
- Page 262 and 263:
instead the femur was supported by
- Page 264 and 265:
It must be noted however, that in t
- Page 266 and 267:
1. ABSTRACT MODELING OF ARTICULAR C
- Page 268 and 269:
exp 1 1 2 1 where and are i
- Page 270 and 271:
Implant Fig.2. Axisymmetric represe
- Page 272 and 273:
A MULTI-SCALE ANISOTROPIC CONSTITUT
- Page 274 and 275:
3.2 Decoupled invariant formulation
- Page 276 and 277:
Fig. 1. Experimental data from unia
- Page 278 and 279:
VALIDATION AND CALIBRATION PROCESSE
- Page 280 and 281:
Figure 1: A three-step process simu
- Page 282 and 283:
The validation process employed on
- Page 284 and 285:
FLUID-STRUCTURE INTERACTION ANALYSI
- Page 286 and 287:
The coupled SQA model and the conve
- Page 288 and 289:
Point P7, located at the toe of the
- Page 290 and 291:
THE INFLUENCE OF UNCERTAIN ANATOMIC
- Page 292 and 293:
Figure 3 exemplifies for intradisca
- Page 294 and 295:
8. CONCLUSIONS Unsurprisingly, the
- Page 296 and 297:
COMPARISON OF DIFFERENT LOADING CON
- Page 298 and 299:
Figure 1 Finite element model of th
- Page 300 and 301:
6 CONCLUSION It is a feasible way t
- Page 302 and 303:
FROM CELL CONTRACTILITY TO CURVATUR
- Page 304 and 305:
4. MODEL When cells adhere on a sub
- Page 306 and 307:
organisation. Understanding the pri
- Page 308 and 309:
PREOPERATIVE PLANNING SUPPORT SYSTE
- Page 310 and 311:
[9]. Stenosis of 25, 45, 65 and 85
- Page 312 and 313:
Fig. 1:Dependent and independent va
- Page 314 and 315:
1. ABSTRACT Local strain measuremen
- Page 316 and 317:
around 100µm (halfway through the
- Page 318 and 319:
sampling points at different cross
- Page 320 and 321:
CLASSIFICATION OF PHYSICAL ACTIVITY
- Page 322 and 323:
induces a vertical alignment of the
- Page 324 and 325:
accelerations combination). However
- Page 326 and 327:
line under translation. Information
- Page 328 and 329:
In this study, we apply a meshless
- Page 330 and 331:
used the PAC constitutive constants
- Page 332 and 333:
1006031) is gratefully acknowledged
- Page 334 and 335:
improvements were seen in both grou
- Page 336 and 337:
Pre-augmentation Position 1, V=3mL
- Page 338 and 339:
5. ACKNOWLEDGEMENTS Funding for thi
- Page 340 and 341:
the hemodynamics in cerebral aneury
- Page 342 and 343:
4. RESULTS AND DISCUSSION In order
- Page 344 and 345:
processing methods need to be devel
- Page 346 and 347:
3. METHODS 3.1 Experimental Method
- Page 348 and 349:
Figure 2 - Micrographs for tensile
- Page 350 and 351:
analysis of the tissue mechanics. B
- Page 352 and 353:
3. METHODS 3.1 Specimen Preparation
- Page 354 and 355:
of five points across the mid mid-c
- Page 356 and 357:
equired to replicate the deformatio
- Page 358 and 359:
pre-load within the plate (compress
- Page 360 and 361:
4. RESULTS The load-deformation beh
- Page 362 and 363:
fracture fixation. Medical Engineer
- Page 364 and 365:
model. It approximates knee kinemat
- Page 366 and 367:
computational cost remains moderate
- Page 368 and 369:
Concerning the optimization procedu
- Page 370 and 371:
aesthetic recovery. However, in som
- Page 372 and 373:
atio experimented by both wounds is
- Page 374 and 375:
VARIATION OF MICRO-ARCHITECTURE AND
- Page 376 and 377:
osteoporotic (OP). The sample volum
- Page 378 and 379:
Figure 4: Mean error in orthotropy
- Page 380 and 381:
INVESTIGATION OF CORTICAL SHELL STR
- Page 382 and 383:
When creating the degenerated FE mo
- Page 384 and 385:
Figure 4. Degeneration sensitivity
- Page 386 and 387:
METHODS TO ACCELERATE FINITE ELEMEN
- Page 388 and 389:
the “joint” constraints configu
- Page 390 and 391:
Figure 4: Absolute prediction error
- Page 392 and 393:
EFFECT OF POST TREATMENT FOR MULTIP
- Page 394 and 395:
Fig.2 Inlet velocity profile indica
- Page 396 and 397:
4.3 WSS results Figure 8 shows the
- Page 398 and 399:
approximated by the so-called Ritz
- Page 400 and 401:
Figure 2: Viscohyperelastic cube: (
- Page 402 and 403:
There is no optimal density-elastic
- Page 404 and 405:
Fig. 2 Cut view of FE-model. Shown
- Page 406 and 407:
5. Weis JA, Miga MI, Granero-Moltó
- Page 408 and 409:
3. SYSTEM DESIGN Sheep eyes, as the
- Page 410 and 411:
which provides natural tactile feed
- Page 412 and 413:
113:341-342 20. Henderson B. A., Gr
- Page 414 and 415:
health area. According to estimates
- Page 416 and 417:
Table 1. RMS Value based on subject
- Page 418 and 419:
6. REFERENCES 1. http://www.disable
- Page 420 and 421:
ehavior [5]. From the viewpoint of
- Page 422 and 423:
Fig. 1 Average Male and Female's L4
- Page 424 and 425:
4. Deyo, R.A., and Weinstein, J. N.
- Page 426 and 427:
geometry of the cell and ECM degrad
- Page 428 and 429:
Shown in Fig. 2(b) is a plot of the
- Page 430 and 431:
6. REFERENCES 1. Dubin-Thaler B.J.,
- Page 432 and 433:
We implemented our individual-based
- Page 434 and 435:
3.3.1 Centers of mass Table 1: Base
- Page 436 and 437:
average coordination num ber averag
- Page 438 and 439:
BIOMECHANICAL ANALYSIS OF THE MUSCU
- Page 440 and 441:
of the ligament strain; a linear re
- Page 442 and 443:
lengthening, respectively, if compa
- Page 444 and 445:
THE EFFECT OF HIGH TIBIAL OSTEOTOMY
- Page 446 and 447:
The 3D LiveWire tool was used as an
- Page 448 and 449:
Table II: Peak medial and lateral f
- Page 450 and 451:
INVESTIGATING CHANGES IN JOINT LOAD
- Page 452 and 453:
4. RESULTS Table 1 shows the mean m
- Page 454 and 455:
Fig.5 displays the OKS and KOS pre
- Page 456 and 457:
Dynamic Touch of Effective Golf Swi
- Page 458 and 459:
properties of a golf club and hand
- Page 460 and 461:
perturbation in e3 whereas player B
- Page 462 and 463:
1. Kim, W., Response to letter to t
- Page 464 and 465:
configuration.[4] have explained ho
- Page 466 and 467:
compartments as well as a single mu
- Page 468 and 469:
5. Shabana, A.A., Dynamics of multi
- Page 470 and 471:
Five healthy volunteers (age: 38.3
- Page 472 and 473: internal lumbar spinal shape was de
- Page 480 and 481: Airflow Simulation of Nasal Cavity
- Page 482: temperature [5], and Wbl is the wat
- Page 485 and 486: Figure 8. Figure 8(a) illustrates t
- Page 487 and 488: Finite element models of the hip ca
- Page 489 and 490: 3.2 Finite Element Analysis Followi
- Page 491 and 492: 5. DISCUSSION Previous DEA implemen
- Page 493 and 494: STATISTICAL SHAPE MODELING OF CAM-T
- Page 495 and 496: Thirty-three control femurs (25 mal
- Page 497 and 498: asymptomatic subjects 7,9 . The Hot
- Page 499 and 500: 6. REFERENCES 1. Ganz, R., Parvizi,
- Page 501 and 502: NUMERICAL IDENTIFICATION OF THE PER
- Page 503 and 504: 2. METHOD AND NUMERICAL MODEL. 2.1
- Page 505 and 506: 1 u dV V u. (Eq. 2) V The permeab
- Page 507 and 508: 1. ABSTRACT PASSIVE AND ACTIVE MUSC
- Page 509 and 510: presented in figure 2 the simulatio
- Page 511 and 512: Indenter Stroke [mm] Muscle Force [
- Page 513 and 514: Objectives Long bone failure charac
- Page 515 and 516: the specimens in three point bendin
- Page 517 and 518: developing a subject-specific finit
- Page 519 and 520: Models used in the past, mostly bas
- Page 521: In this work it is presented the de
- Page 525 and 526: angles for the step of 2.28° and 8
- Page 527 and 528: insufficiency syndrome (TIS), defin
- Page 529 and 530: a) b) c) Fig. 5 - Contact interface
- Page 531 and 532: EOS. Among these options, VEPTR has
- Page 533 and 534: dissection occurs when blood intrud
- Page 535 and 536: mean value of 0.0310 m s -1 . The o
- Page 537 and 538: progression. It can in turn contrib
- Page 539 and 540: dependent data. They conclude that
- Page 541 and 542: found that it is extremely difficul
- Page 543 and 544: endering loop is started and the ra
- Page 545 and 546: 3.1 Imaging protocol of the knee A
- Page 547 and 548: Fig. 3: Pressure distribution in th
- Page 549 and 550: 7. REFERENCES 1. Masouros, S.D., Bu
- Page 551 and 552: and estimate in vivo tissue strains
- Page 553 and 554: tendon has a larger moment arm abou
- Page 555 and 556: Song, H. M., Smith, R. L., Longaker
- Page 557 and 558: Fig. 1. Single line transducer resu
- Page 559 and 560: Let P INT be the data set of the lo
- Page 561 and 562: could quantify the initial structur
- Page 563 and 564: expansion of a stent, a metallic sc
- Page 565 and 566: immediately after stent expansion a
- Page 567 and 568: 6. ACKNOWLEDGMENT This research is
- Page 569 and 570: Deformation of the arterial surface
- Page 571 and 572: separate study to be described in a
- Page 573 and 574:
3. Timmins, L.H., Miller M.W. Clubb
- Page 575 and 576:
migrate in a unique fashion to the
- Page 577 and 578:
Fig. 1: Domain and schematic repres
- Page 579 and 580:
Furthermore, the values are spread
- Page 581 and 582:
this study, our goal is to establis
- Page 583 and 584:
Figure 3. Relative length change in
- Page 585 and 586:
5. Erdemir A, Sibole S. Open Knee:
- Page 587 and 588:
lateralis (inferior and superior) f
- Page 589 and 590:
during mouth closing and chewing. O
- Page 591 and 592:
BIOMECHANICAL MODELING OF THE HUMAN
- Page 593 and 594:
appropriates mechanical properties
- Page 595 and 596:
Fig. 4: Correlation of the location
- Page 597 and 598:
1. ABSTRACT COMPUTER AIDED TUMOR RE
- Page 599 and 600:
B. Cutting planes The surgeon defin
- Page 601 and 602:
4.RESULTS To test the developed sys
- Page 603 and 604:
FROM PATIENT-SPECIFIC DATA TO MULTI
- Page 605 and 606:
catheterization mean measurements (
- Page 607 and 608:
the different virtual surgical desi
- Page 609 and 610:
1. ABSTRACT DIGITAL ULTRASOUND DESP
- Page 611 and 612:
2.2 Filtering Based Wavelet 2.2.1 C
- Page 613 and 614:
Table 1: quantitative criteria used
- Page 615 and 616:
Mural Thrombosis in a Two-Level Com
- Page 617 and 618:
But, the soft repulsive force can n
- Page 619 and 620:
Ratio of adhered PLT a simplificati
- Page 621 and 622:
DEGRADATION OF MAGNESIUM ALLOY STEN
- Page 623 and 624:
study and the parameter setting can
- Page 625 and 626:
Fig. 5. Damage evolution of the thr
- Page 627 and 628:
NUMERICAL SIMULATIONS OF FATIGUE FO
- Page 629 and 630:
Figure 1. Scheme of the two approac
- Page 631 and 632:
Figure 3. On the left, alternating
- Page 633 and 634:
INVESTIGATION OF HEAD-NECK KINEMATI
- Page 635 and 636:
complexity of the vertebrae and sku
- Page 637 and 638:
nearly no tension occurred for the
- Page 639 and 640:
9. Ito S, Ivancic PC, Panjabi MM, C
- Page 641 and 642:
[Ntsinjana et al., 2011], commonly
- Page 643 and 644:
impedances were maintained within p
- Page 645 and 646:
6. Pennati G., Corsini C., Cosentin
- Page 647 and 648:
analyse the effect that different a
- Page 649 and 650:
attached cases this value was highe
- Page 651 and 652:
References 1. Nordin M and Frankel
- Page 653:
therapy to achieve the desired medi
- Page 657 and 658:
iomechanical response of the leg to
- Page 659 and 660:
algorithm has to be integrated into
- Page 661 and 662:
to a modification in the tooth disp
- Page 663 and 664:
5. CONCLUSIONS 5.1 Geometry and per
- Page 665 and 666:
present work is to show the ability
- Page 667 and 668:
[6,7]. In order to reproduce numeri
- Page 669 and 670:
5. DISCUSSION, CONCLUSIONS AND PERS
- Page 671 and 672:
3.1 Generation of the vertebral sur
- Page 673 and 674:
3.4 Modeling of the facet joints Th
- Page 675 and 676:
The column diagramm of Fig.8 shows
- Page 677 and 678:
tool to evaluate the drug distribut
- Page 679 and 680:
Figure 3: The mean value of the dos
- Page 681 and 682:
INFLUENCE OF KYPHOSIS ON SPINAL LOA
- Page 683 and 684:
(a) (b) (c) Fig. 1. The three repre
- Page 685 and 686:
etween T6 and T9 with a higher degr
- Page 687 and 688:
A COMPARISON BETWEEN STANDARD AND D
- Page 689 and 690:
the SB with a 2.5 mm balloon; ii) o
- Page 691 and 692:
A TAWSS [Pa] B OSI [Pa] C 0 0.25 0.
- Page 693 and 694:
ABSTRACT CONSTITUTIVE MODELLING OF
- Page 695 and 696:
20% compression strains were impose
- Page 697 and 698:
4. DISCUSSION The limited number of
- Page 699 and 700:
AN ALGORITHM FOR MODELING THE FIBRE
- Page 701 and 702:
1 - Compute the centre of the botto
- Page 703 and 704:
(a) (b) Figure 2. Load-displacement
- Page 705 and 706:
A bio-mechanics based methodology t
- Page 707 and 708:
to a particular body part based on
- Page 709 and 710:
Injury Cost (USD) Million 0.7 0.6 0
- Page 711 and 712:
A SENSITIVITY ANALYSIS OF ADAPTIVE
- Page 713 and 714:
elationships can be found that rela
- Page 715 and 716:
Fig. 2: Percentage of bone volume w
- Page 717 and 718:
APPLICATION OF REACTION-DIFFUSION W
- Page 719 and 720:
AIRFLOW VENTILATION THROUGH HUMAN M
- Page 721 and 722:
solve all the governing equations.
- Page 723 and 724:
Fig. 4 Streamlines through the osti
- Page 725 and 726:
MOLECULAR DYNAMICS SIMULATIONS FOR
- Page 727 and 728:
COARSE-GRAINED MOLECULAR DYNAMICS S
- Page 729 and 730:
DESIGN AND STRUCTURAL EVALUATION OF
- Page 731 and 732:
Figure 2 shows the optimal unit-cel
- Page 733 and 734:
ENUM (MPa) 100 90 80 70 60 50 40 30
- Page 735 and 736:
vivo menisco-tibial kinematics duri
- Page 737 and 738:
Loading the fully extended knee wit
- Page 739 and 740:
is also subject to variation due to
- Page 741 and 742:
environment in comparison to fixed
- Page 743 and 744:
4. RESULTS AND DISCUSSION Convergen
- Page 745 and 746:
Because of the orthotropic assumpti
- Page 747 and 748:
3D RECONSTRUCTION OF STENTED PORCIN
- Page 749 and 750:
Fluid model. The final configuratio
- Page 751 and 752:
Table 1: Computed slice measurement
- Page 753 and 754:
ANALYSIS OF THE EFFECT OF CONSIDERI
- Page 755 and 756:
For all these models, C1 = µ/2, µ
- Page 757 and 758:
the difference in percentage betwee
- Page 759 and 760:
A COMPUTATIONAL METHOD TO ESTIMATE
- Page 761 and 762:
C10, C01 and d were taken from [10]
- Page 763 and 764:
4. RESULTS Fig. 2 shows the results
- Page 765 and 766:
COMPUTATIONAL AND EXPERIMENTAL MODE
- Page 767 and 768:
data using commercial software (Mim
- Page 769 and 770:
vitro (40 vs 34%), at the expense o
- Page 771 and 772:
FINITE ELEMENT ANALYSES OF IN VIVO
- Page 773 and 774:
The non-linear behaviour of the art
- Page 775 and 776:
Figure 6. Constant-life diagram for
- Page 777 and 778:
Optimal acceleration adjustment to
- Page 779 and 780:
, , , ,
- Page 781 and 782:
The vertical force bump observed du
- Page 783 and 784:
NEURAL NETWORK-BASED PREDICTION OF
- Page 785 and 786:
3. MATERIAL AND METHODS 3.1 Experim
- Page 787 and 788:
from subjects S1, S2, S3, S5, and S
- Page 789 and 790:
APPLICATION OF A MODIFIED ELASTIC F
- Page 791 and 792:
h and h being the thickness of the
- Page 793 and 794:
0.3 were used for the flat surface
- Page 795 and 796:
simulations of the mechanical respo
- Page 797 and 798:
50000 images have been acquired. Th
- Page 799 and 800:
Fig.1 Modules of the proposed capsu
- Page 801 and 802:
5. CONCLUSION This paper describes
- Page 803 and 804:
dependent on the implementation of
- Page 805 and 806:
joint computer model was driven wit
- Page 807 and 808:
otation. The AP laxity test showed
- Page 809 and 810:
A COMPUTATIONAL MODEL OF THE GROWTH
- Page 811 and 812:
where n p is the number of prolifer
- Page 813 and 814:
Hypertrophic columnar cartilage 0.2
- Page 815 and 816:
SIMULATION OF DAILY LIVING MOVEMENT
- Page 817 and 818:
otations were kept at zero, since t
- Page 819 and 820:
cavity (van der Helm, 1994). Howeve
- Page 821 and 822:
Solving Overconstrained Kinematic i
- Page 823 and 824:
3.3. Muscles Muscles are modelled a
- Page 825 and 826:
5. DISCUSSION A musculoskeletal num
- Page 827 and 828:
EFFECT OF OSCILATORY FLOW ON MORPHO
- Page 829 and 830:
dimensionless frequency . With the
- Page 831 and 832:
Wntsignaling, J Clin Invest., 2006,
- Page 833 and 834:
Maximization (EM) algorithm witch e
- Page 835 and 836:
4. RESULTS: n 1 2 x f ( x ; )
- Page 837 and 838:
5. CONCLUSION In this work, a semi-
- Page 839 and 840:
allow cell construct image inspecti
- Page 841 and 842:
formula can be written as a linear
- Page 843 and 844:
( ) (4) Poisson‟s ratio was assum
- Page 845 and 846:
a) b) c) d) Figure 7 Validation: a)
- Page 847 and 848:
DEVELOPMENT OF A NEW COMPUTATIONAL
- Page 849 and 850:
The ScanIP wizard creates the new i
- Page 851 and 852:
Fig. 5: Computer experiments: poste
- Page 853 and 854:
A BIOMECHANICAL CONCEPT FOR CONSTRU
- Page 855 and 856:
Figure 3. Construction of the radia
- Page 857 and 858:
6. REFERENCES 1. Lees, S., A study
- Page 859 and 860:
from cadaver surgeries were recreat
- Page 861 and 862:
mean resection parameters and the p
- Page 863 and 864:
5. DISCUSSION This study proposes a
- Page 865 and 866:
simulations are evaluated by quanti
- Page 867 and 868:
improvement of the shoulder prosthe
- Page 869 and 870:
13. Coley B., Jolles B. M., Farron
- Page 871 and 872:
simulations. Implicit in this setup
- Page 873 and 874:
assigned zero fluid pressure bounda
- Page 875 and 876:
the efficacy of predicting cellular
- Page 877 and 878:
Another important function of the l
- Page 879 and 880:
The insert (Fig. 3) is the part aga
- Page 881 and 882:
changes due to the testing conditio
- Page 883 and 884:
3. IN VIVO MEASURED LOAD COMPONENTS
- Page 885 and 886:
anthropometric data - a data set fo
- Page 887 and 888:
COMPUTATIONAL MODELING OF HIGHLY PO
- Page 889 and 890:
objects smaller than one tenth of a
- Page 891 and 892:
as 221.5 MPa. This value is more th
- Page 893 and 894:
Macrostress and Macrostrain Finite
- Page 895 and 896:
3.2. Extraction of individual artic
- Page 897 and 898:
Unique strain patterns were observe
- Page 899 and 900:
poroviscoelastic simulation of the
- Page 901 and 902:
anchorage of the cartilage into a p
- Page 903 and 904:
load of 0.5 N) resulted in a 55 kPa
- Page 905 and 906:
properties as well as protect the h
- Page 907 and 908:
Dynamic cell seeding combines two c
- Page 909 and 910:
order (PB). The particles adhered (
- Page 911 and 912:
2. D. Wendt, A. Marsano, M. Jakob,
- Page 913 and 914:
2. Only a few high-level clinical s
- Page 915 and 916:
A quasi-static analysis was perform
- Page 917 and 918:
e increased by using stiffer or tig
- Page 919 and 920:
Despite the importance of taking th
- Page 921 and 922:
Table 2: Score chart presented to t
- Page 923 and 924:
We conclude that the model develope
- Page 925 and 926:
presented system - parallelization
- Page 927 and 928:
image is projected to the subsequen
- Page 929 and 930:
6. CONCLUSIONS The presented in the
- Page 931 and 932:
first simulation uses data provided
- Page 933 and 934:
Table 1: Models used in this study.
- Page 935 and 936:
direction at knee extension, placin
- Page 937 and 938:
3. METHODS 3.1. Model of heat trans
- Page 939 and 940:
condition before and after heating.
- Page 941 and 942:
during daily activities reported in
- Page 943 and 944:
samples of brain tissue were extrac
- Page 945 and 946:
5. DETERMINING MECHANICAL PROPERTIE
- Page 947 and 948:
2001, Vol. 38 (4), 335-345. 8. Vela
- Page 949 and 950:
chamber [4]. After obtaining the va
- Page 951 and 952:
4. RESULTS 4.2 Surface and solid me
- Page 953:
7. ACKNOWLEDGMENTS Financial fundin
- Page 956 and 957:
affect crack penetration into osteo
- Page 958 and 959:
Therefore, in order to examine the
- Page 960 and 961:
3. Mischinski, S., Ural, A., 2011,
- Page 962 and 963:
esearchers. The power of a finite-e
- Page 964 and 965:
figure 2, we can determine the node
- Page 966 and 967:
architecture, Muscle & Nerve, 2004,
- Page 968 and 969:
ensure good short-term and long-ter
- Page 970 and 971:
Table I - Micromotion results at th
- Page 972 and 973:
COMBINED BONE-IMPLANT FIXATION: A P
- Page 974 and 975:
FRICTIONAL PROPERTIES OF OSTEOARTHR
- Page 976 and 977:
With the following boundary conditi
- Page 978 and 979:
pressures higher than normal contac
- Page 980 and 981:
1. ABSTRACT DYNAMIC PRESSURE RESPON
- Page 982 and 983:
quasi-static solution, and both pos
- Page 984 and 985:
(excluding the cadaveric validation
- Page 987 and 988:
AN ANALYTICAL MODEL TO INVESTIGATE
- Page 989 and 990:
K sh = 2. 3E sh 2 ( ) 2 1 2 1−ν
- Page 991 and 992:
Fig. 7 modeling the oblique impact
- Page 993 and 994:
A NON-LINEAR BIPHASIC MODEL FOR THE
- Page 995 and 996:
system, it is convenient to write t
- Page 997 and 998:
only with very small damping parame
- Page 999 and 1000:
A PARAMETERIZED FE MODEL FOR SIMULA
- Page 1001 and 1002:
the study of Polikeit et al. [10].
- Page 1003 and 1004:
There are obvious limitations to ou
- Page 1005 and 1006:
Abnormal stresses are often cited a
- Page 1007 and 1008:
4. RESULTS The methods used to meas
- Page 1009 and 1010:
that muscle imbalance associated wi
- Page 1011 and 1012:
BIOCHEMICAL MODEL TO PREDICT THE ON
- Page 1013 and 1014:
3.1 Model description The regulator
- Page 1015 and 1016:
[3] Shier D., 2001, Hole’s Human
- Page 1017 and 1018:
Biomechanics of Human Gluteal Tissu
- Page 1019 and 1020:
information. Based on the indentati
- Page 1021 and 1022:
t 1 ⎧⎪ ⎫ 2 2 ⎪ ττττ ( t
- Page 1023 and 1024:
REFERENCES 1. Gefen A., Gefen N., L
- Page 1025 and 1026:
analysis of the large-scale human m
- Page 1027 and 1028:
λ σ = σ (8) act isom f f 0 ⋅
- Page 1029 and 1030:
In the absence of membranes, the mu
- Page 1031 and 1032:
predicted. This is possible for mod
- Page 1033 and 1034:
-7.2 mN. The average value of the m
- Page 1035:
efore the joint moment reaches zero