Manual - 8500A Series Peak Power Meter - Giga-tronics
Manual - 8500A Series Peak Power Meter - Giga-tronics
Manual - 8500A Series Peak Power Meter - Giga-tronics
You also want an ePaper? Increase the reach of your titles
YUMPU automatically turns print PDFs into web optimized ePapers that Google loves.
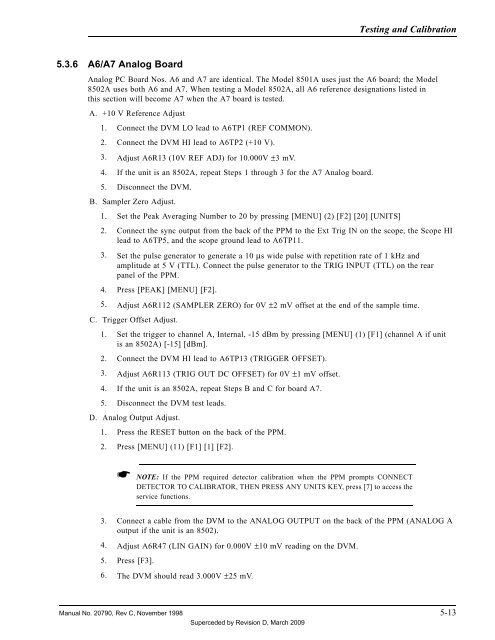
Testing and Calibration<br />
5.3.6 A6/A7 Analog Board<br />
Analog PC Board Nos. A6 and A7 are identical. The Model 8501A uses just the A6 board; the Model<br />
8502A uses both A6 and A7. When testing a Model 8502A, all A6 reference designations listed in<br />
this section will become A7 when the A7 board is tested.<br />
A. +10 V Reference Adjust<br />
1. Connect the DVM LO lead to A6TP1 (REF COMMON).<br />
2. Connect the DVM HI lead to A6TP2 (+10 V).<br />
3. Adjust A6R13 (10V REF ADJ) for 10.000V ±3 mV.<br />
4. If the unit is an 8502A, repeat Steps 1 through 3 for the A7 Analog board.<br />
5. Disconnect the DVM.<br />
B. Sampler Zero Adjust.<br />
1. Set the <strong>Peak</strong> Averaging Number to 20 by pressing [MENU] (2) [F2] [20] [UNITS]<br />
2. Connect the sync output from the back of the PPM to the Ext Trig IN on the scope, the Scope HI<br />
lead to A6TP5, and the scope ground lead to A6TP11.<br />
3. Set the pulse generator to generate a 10 µs wide pulse with repetition rate of 1 kHz and<br />
amplitude at 5 V (TTL). Connect the pulse generator to the TRIG INPUT (TTL) on the rear<br />
panel of the PPM.<br />
4. Press [PEAK] [MENU] [F2].<br />
5. Adjust A6R112 (SAMPLER ZERO) for 0V ±2 mV offset at the end of the sample time.<br />
C. Trigger Offset Adjust.<br />
1. Set the trigger to channel A, Internal, -15 dBm by pressing [MENU] (1) [F1] (channel A if unit<br />
is an 8502A) [-15] [dBm].<br />
2. Connect the DVM HI lead to A6TP13 (TRIGGER OFFSET).<br />
3. Adjust A6R113 (TRIG OUT DC OFFSET) for 0V ±1 mV offset.<br />
4. If the unit is an 8502A, repeat Steps B and C for board A7.<br />
5. Disconnect the DVM test leads.<br />
D. Analog Output Adjust.<br />
1. Press the RESET button on the back of the PPM.<br />
2. Press [MENU] (11) [F1] [1] [F2].<br />
☛ NOTE: If the PPM required detector calibration when the PPM prompts CONNECT<br />
DETECTOR TO CALIBRATOR, THEN PRESS ANY UNITS KEY, press [7] to access the<br />
service functions.<br />
3. Connect a cable from the DVM to the ANALOG OUTPUT on the back of the PPM (ANALOG A<br />
output if the unit is an 8502).<br />
4. Adjust A6R47 (LIN GAIN) for 0.000V ±10 mV reading on the DVM.<br />
5. Press [F3].<br />
6. The DVM should read 3.000V ±25 mV.<br />
<strong>Manual</strong> No. 20790, Rev C, November 1998 5-13<br />
Superceded by Revision D, March 2009


