

Manual - 8500A Series Peak Power Meter - Giga-tronics
Manual - 8500A Series Peak Power Meter - Giga-tronics
Manual - 8500A Series Peak Power Meter - Giga-tronics

Create successful ePaper yourself
Turn your PDF publications into a flip-book with our unique Google optimized e-Paper software.
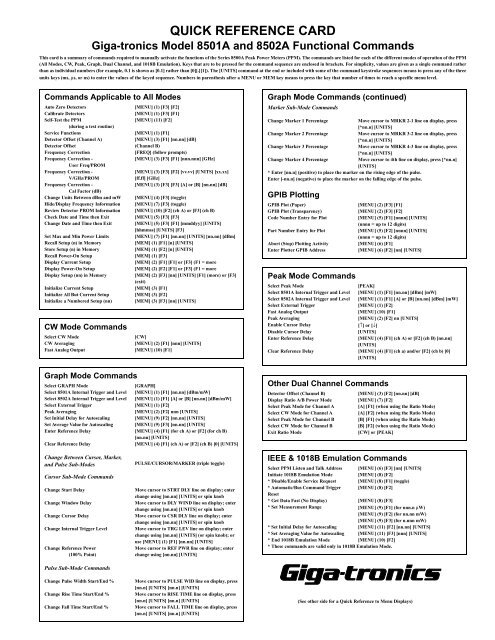
QUICK REFERENCE CARD<br />
<strong>Giga</strong>-<strong>tronics</strong> Model 8501A and 8502A Functional Commands<br />
This card is a summary of commands required to manually activate the functions of the <strong>Series</strong> <strong>8500A</strong> <strong>Peak</strong> <strong>Power</strong> <strong>Meter</strong>s (PPM). The commands are listed for each of the different modes of operation of the PPM<br />
(All Modes, CW, <strong>Peak</strong>, Graph, Dual Channel, and 1018B Emulation). Keys that are to be pressed for the command sequence are enclosed in brackets. For simplicity, values are given as a single command rather<br />
than as individual numbers (for example, 0.1 is shown as [0.1] rather than [0][.][1]). The [UNITS] command at the end or included with some of the command keystroke sequences means to press any of the three<br />
units keys (ms, µs, or ns) to enter the values of the keyed sequence. Numbers in parenthesis after a MENU or MEM key means to press the key that number of times to reach a specific menu level.<br />
Commands Applicable to All Modes<br />
Auto Zero Detectors<br />
[MENU] (1) [F3] [F2]<br />
Calibrate Detectors<br />
[MENU] (1) [F3] [F1]<br />
Self-Test the PPM<br />
[MENU] (11) [F2]<br />
(during a test routine)<br />
Service Functions<br />
[MENU] (1) [F1]<br />
Detector Offset (Channel A)<br />
[MENU] (3) [F1] [nn.nn] [dB]<br />
Detector Offset (Channel B)<br />
Frequency Correction<br />
[FREQ] (follow prompts)<br />
Frequency Correction -<br />
[MENU] (3) [F3] [F1] [nnn.nnn] [GHz]<br />
User Freq/PROM<br />
Frequency Correction -<br />
V/GHz/PROM<br />
[MENU] (3) [F3] [F2] [vv.vv] [UNITS] [xx.xx]<br />
[ff.ff] [GHz]<br />
Frequency Correction -<br />
[MENU] (3) [F3] [F3] [A] or [B] [nn.nn] [dB]<br />
Cal Factor (dB)<br />
Change Units Between dBm and mW [MENU] (4) [F3] (toggle)<br />
Hide/Display Frequency Information [MENU] (7) [F3] (toggle)<br />
Review Detector PROM Information [MENU] (10) [F2] (ch A) or [F3] (ch B)<br />
Check Date and Time then Exit<br />
[MENU] (5) [F3] [F3]<br />
Change Date and Time then Exit [MENU] (5) [F3] [F1] [mmddyy] [UNITS]<br />
[hhmmss] [UNITS] [F3]<br />
Set Max and Min <strong>Power</strong> Limits<br />
[MENU] (7) [F1] [nn.nn] [UNITS] [nn.nn] [dBm]<br />
Recall Setup (n) in Memory<br />
[MEM] (1) [F1] [n] [UNITS]<br />
Store Setup (n) in Memory<br />
[MEM] (1) [F2] [n] [UNITS]<br />
Recall <strong>Power</strong>-On Setup<br />
[MEM] (1) [F3]<br />
Display Current Setup<br />
[MEM] (2) [F1] [F1] or [F3] (F1 = more<br />
Display <strong>Power</strong>-On Setup<br />
[MEM] (2) [F2] [F1] or [F3] (F1 = more<br />
Display Setup (nn) in Memory<br />
[MEM] (2) [F3] [nn] [UNITS] [F1] (more) or [F3]<br />
(exit)<br />
Initialize Current Setup<br />
[MEM] (3) [F1]<br />
Initialize All But Current Setup<br />
[MEM] (3) [F2]<br />
Initialize a Numbered Setup (nn) [MEM] (3) [F3] [nn] [UNITS]<br />
CW Mode Commands<br />
Select CW Mode<br />
[CW]<br />
CW Averaging<br />
[MENU] (2) [F1] [nnn] [UNITS]<br />
Fast Analog Output<br />
[MENU] (10) [F1]<br />
Graph Mode Commands<br />
Select GRAPH Mode<br />
[GRAPH]<br />
Select 8501A Internal Trigger and Level [MENU] (1) [F1] [nn.nn] [dBm/mW]<br />
Select 8502A Internal Trigger and Level [MENU] (1) [F1] [A] or [B] [nn.nn] [dBm/mW]<br />
Select External Trigger<br />
[MENU] (1) [F2]<br />
<strong>Peak</strong> Averaging<br />
[MENU] (2) [F2] nnn [UNITS]<br />
Set Initial Delay for Autoscaling<br />
[MENU] (9) [F2] [nn.nn] [UNITS]<br />
Set Average Value for Autoscaling [MENU] (9) [F3] [nn.nn] [UNITS]<br />
Enter Reference Delay [MENU] (4) [F1] (for ch A) or [F2] (for ch B)<br />
[nn.nn] [UNITS]<br />
Clear Reference Delay<br />
[MENU] (4) [F1] (ch A) or [F2] (ch B) [0] [UNITS]<br />
Graph Mode Commands (continued)<br />
Marker Sub-Mode Commands<br />
Change Marker 1 Percentage<br />
Move cursor to MRKR 2-1 line on display, press<br />
[*nn.n] [UNITS]<br />
Change Marker 2 Percentage<br />
Move cursor to MRKR 3-2 line on display, press<br />
[*nn.n] [UNITS]<br />
Change Marker 3 Percentage<br />
Move cursor to MRKR 4-3 line on display, press<br />
[*nn.n] [UNITS]<br />
Change Marker 4 Percentage<br />
Move cursor to 4th line on display, press [*nn.n]<br />
[UNITS]<br />
* Enter [nn.n] (positive) to place the marker on the rising edge of the pulse.<br />
Enter [-nn.n] (negative) to place the marker on the falling edge of the pulse.<br />
GPIB Plotting<br />
GPIB Plot (Paper)<br />
GPIB Plot (Transparency)<br />
Code Number Entry for Plot<br />
Part Number Entry for Plot<br />
Abort (Stop) Plotting Activity<br />
Enter Plotter GPIB Address<br />
<strong>Peak</strong> Mode Commands<br />
[MENU] (2) [F3] [F1]<br />
[MENU] (2) [F3] [F2]<br />
[MENU] (5) [F1] [nnnn] [UNITS]<br />
(nnnn = up to 12 digits)<br />
[MENU] (5) [F2] [nnnn] [UNITS]<br />
(nnnn = up to 12 digits)<br />
[MENU] (6) [F1]<br />
[MENU] (6) [F2] [nn] [UNITS]<br />
Select <strong>Peak</strong> Mode<br />
[PEAK]<br />
Select 8501A Internal Trigger and Level [MENU] (1) [F1] [nn.nn] [dBm] [mW]<br />
Select 8502A Internal Trigger and Level [MENU] (1) [F1] [A] or [B] [nn.nn] [dBm] [mW]<br />
Select External Trigger<br />
[MENU] (1) [F2]<br />
Fast Analog Output<br />
[MENU] (10) [F1]<br />
<strong>Peak</strong> Averaging<br />
[MENU] (2) [F2] nn [UNITS]<br />
Enable Cursor Delay<br />
[↑] or [↓]<br />
Disable Cursor Delay<br />
[UNITS]<br />
Enter Reference Delay<br />
[MENU] (4) [F1] (ch A) or [F2] (ch B) [nn.nn]<br />
[UNITS]<br />
Clear Reference Delay [MENU] (4) [F1] (ch a) and/or [F2] (ch b) [0]<br />
[UNITS]<br />
Other Dual Channel Commands<br />
Detector Offset (Channel B)<br />
Display Ratio A/B <strong>Power</strong> Mode<br />
Select <strong>Peak</strong> Mode for Channel A<br />
Select CW Mode for Channel A<br />
Select <strong>Peak</strong> Mode for Channel B<br />
Select CW Mode for Channel B<br />
Exit Ratio Mode<br />
[MENU] (3) [F2] [nn.nn] [dB]<br />
[MENU] (7) [F2]<br />
[A] [F1] (when using the Ratio Mode)<br />
[A] [F2] (when using the Ratio Mode)<br />
[B] [F1] (when using the Ratio Mode)<br />
[B] [F2] (when using the Ratio Mode)<br />
[CW] or [PEAK]<br />
Change Between Cursor, Marker,<br />
and Pulse Sub-Modes<br />
Cursor Sub-Mode Commands<br />
Change Start Delay<br />
Change Window Delay<br />
Change Cursor Delay<br />
Change Internal Trigger Level<br />
Change Reference <strong>Power</strong><br />
(100% Point)<br />
Pulse Sub-Mode Commands<br />
Change Pulse Width Start/End %<br />
Change Rise Time Start/End %<br />
Change Fall Time Start/End %<br />
PULSE/CURSOR/MARKER (triple toggle)<br />
Move cursor to STRT DLY line on display; enter<br />
change using [nn.nn] [UNITS] or spin knob<br />
Move cursor to DLY WIND line on display; enter<br />
change using [nn.nn] [UNITS] or spin knob<br />
Move cursor to CSR DLY line on display; enter<br />
change using [nn.nn] [UNITS] or spin knob<br />
Move cursor to TRG LEV line on display; enter<br />
change using [nn.nn] [UNITS] (or spin knob); or<br />
use [MENU] (1) [F1] [nn.nn] [UNITS]<br />
Move cursor to REF PWR line on display; enter<br />
change using [nn.nn] [UNITS]<br />
Move cursor to PULSE WID line on display, press<br />
[nn.n] [UNITS] [nn.n] [UNITS]<br />
Move cursor to RISE TIME line on display, press<br />
[nn.n] [UNITS] [nn.n] [UNITS]<br />
Move cursor to FALL TIME line on display, press<br />
[nn.n] [UNITS] [nn.n] [UNITS]<br />
IEEE & 1018B Emulation Commands<br />
Select PPM Listen and Talk Address [MENU] (6) [F3] [nn] [UNITS]<br />
Initiate 1018B Emulation Mode<br />
[MENU] (8) [F2]<br />
* Disable/Enable Service Request [MENU] (8) [F1] (toggle)<br />
* Automatic/Bus Command Trigger [MENU] (8) [F2]<br />
Reset<br />
* Get Data Fast (No Display) [MENU] (8) [F3]<br />
* Set Measurement Range [MENU] (9) [F1] (for nnn.n µW)<br />
[MENU] (9) [F2] (for nn.nn mW)<br />
[MENU] (9) [F3] (for n.nnn mW)<br />
* Set Initial Delay for Autoscaling [MENU] (11) [F2] [nn.nn] [UNITS]<br />
* Set Averaging Value for Autoscaling [MENU] (11) [F3] [nnn] [UNITS]<br />
* End 1018B Emulation Mode [MENU] (10) [F2]<br />
* These commands are valid only in 1018B Emulation Mode.<br />
(See other side for a Quick Reference to Menu Displays)


