

Manual - 8500A Series Peak Power Meter - Giga-tronics
Manual - 8500A Series Peak Power Meter - Giga-tronics
Manual - 8500A Series Peak Power Meter - Giga-tronics

Create successful ePaper yourself
Turn your PDF publications into a flip-book with our unique Google optimized e-Paper software.
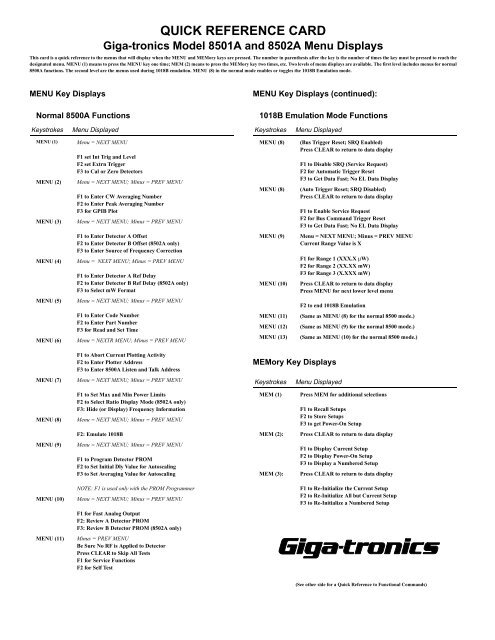
QUICK REFERENCE CARD<br />
<strong>Giga</strong>-<strong>tronics</strong> Model 8501A and 8502A Menu Displays<br />
This card is a quick reference to the menus that will display when the MENU and MEMory keys are pressed. The number in parenthesis after the key is the number of times the key must be pressed to reach the<br />
designated menu. MENU (1) means to press the MENU key one time; MEM (2) means to press the MEMory key two times, etc. Two levels of menu displays are available. The first level includes menus for normal<br />
<strong>8500A</strong> functions. The second level are the menus used during 1018B emulation. MENU (8) in the normal mode enables or toggles the 1018B Emulation mode.<br />
MENU Key Displays<br />
Normal <strong>8500A</strong> Functions<br />
MENU Key Displays (continued):<br />
1018B Emulation Mode Functions<br />
Keystrokes<br />
Menu Displayed<br />
Keystrokes<br />
Menu Displayed<br />
MENU (1)<br />
MENU (2)<br />
MENU (3)<br />
Menu = NEXT MENU<br />
F1 set Int Trig and Level<br />
F2 set Extrn Trigger<br />
F3 to Cal or Zero Detectors<br />
Menu = NEXT MENU; Minus = PREV MENU<br />
F1 to Enter CW Averaging Number<br />
F2 to Enter <strong>Peak</strong> Averaging Number<br />
F3 for GPIB Plot<br />
Menu = NEXT MENU; Minus = PREV MENU<br />
MENU (8)<br />
MENU (8)<br />
(Bus Trigger Reset; SRQ Enabled)<br />
Press CLEAR to return to data display<br />
F1 to Disable SRQ (Service Request)<br />
F2 for Automatic Trigger Reset<br />
F3 to Get Data Fast; No EL Data Display<br />
(Auto Trigger Reset; SRQ Disabled)<br />
Press CLEAR to return to data display<br />
F1 to Enable Service Request<br />
F2 for Bus Command Trigger Reset<br />
F3 to Get Data Fast; No EL Data Display<br />
MENU (4)<br />
F1 to Enter Detector A Offset<br />
F2 to Enter Detector B Offset (8502A only)<br />
F3 to Enter Source of Frequency Correction<br />
Menu = NEXT MENU; Minus = PREV MENU<br />
F1 to Enter Detector A Ref Delay<br />
F2 to Enter Detector B Ref Delay (8502A only)<br />
F3 to Select mW Format<br />
MENU (9)<br />
MENU (10)<br />
Menu = NEXT MENU; Minus = PREV MENU<br />
Current Range Value is X<br />
F1 for Range 1 (XXX.X µW)<br />
F2 for Range 2 (XX.XX mW)<br />
F3 for Range 3 (X.XXX mW)<br />
Press CLEAR to return to data display<br />
Press MENU for next lower level menu<br />
MENU (5)<br />
Menu = NEXT MENU; Minus = PREV MENU<br />
F2 to end 1018B Emulation<br />
MENU (6)<br />
F1 to Enter Code Number<br />
F2 to Enter Part Number<br />
F3 for Read and Set Time<br />
Menu = NEXTR MENU; Minus = PREV MENU<br />
MENU (11)<br />
MENU (12)<br />
MENU (13)<br />
(Same as MENU (8) for the normal 8500 mode.)<br />
(Same as MENU (9) for the normal 8500 mode.)<br />
(Same as MENU (10) for the normal 8500 mode.)<br />
MENU (7)<br />
F1 to Abort Current Plotting Activity<br />
F2 to Enter Plotter Address<br />
F3 to Enter <strong>8500A</strong> Listen and Talk Address<br />
Menu = NEXT MENU; Minus = PREV MENU<br />
MEMory Key Displays<br />
Keystrokes<br />
Menu Displayed<br />
MENU (8)<br />
F1 to Set Max and Min <strong>Power</strong> Limits<br />
F2 to Select Ratio Display Mode (8502A only)<br />
F3: Hide (or Display) Frequency Information<br />
Menu = NEXT MENU; Minus = PREV MENU<br />
MEM (1)<br />
Press MEM for additional selections<br />
F1 to Recall Setups<br />
F2 to Store Setups<br />
F3 to get <strong>Power</strong>-On Setup<br />
F2: Emulate 1018B<br />
MEM (2):<br />
Press CLEAR to return to data display<br />
MENU (9)<br />
Menu = NEXT MENU; Minus = PREV MENU<br />
F1 to Program Detector PROM<br />
F2 to Set Initial Dly Value for Autoscaling<br />
F3 to Set Averaging Value for Autoscaling<br />
MEM (3):<br />
F1 to Display Current Setup<br />
F2 to Display <strong>Power</strong>-On Setup<br />
F3 to Display a Numbered Setup<br />
Press CLEAR to return to data display<br />
MENU (10)<br />
NOTE: F1 is used only with the PROM Programmer<br />
Menu = NEXT MENU; Minus = PREV MENU<br />
F1 to Re-Initialize the Current Setup<br />
F2 to Re-Initialize All but Current Setup<br />
F3 to Re-Initialize a Numbered Setup<br />
F1 for Fast Analog Output<br />
F2: Review A Detector PROM<br />
F3: Review B Detector PROM (8502A only)<br />
MENU (11)<br />
Minus = PREV MENU<br />
Be Sure No RF is Applied to Detector<br />
Press CLEAR to Skip All Tests<br />
F1 for Service Functions<br />
F2 for Self Test<br />
(See other side for a Quick Reference to Functional Commands)


