- Page 1 and 2:
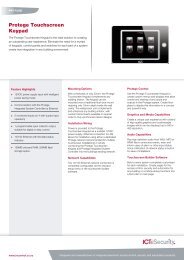
PRT-CTRL-SE Protege System Controll
- Page 3 and 4:
Contents Protege System ___________
- Page 5 and 6:
Intercom High Level Interface _____
- Page 7 and 8:
DVAC Surgard Trouble Zones ________
- Page 9 and 10:
Protege System Introduction This ma
- Page 11 and 12:
Menu Tree Menu Reference General op
- Page 13 and 14:
7. Bypass 8. System *Main Menu* 7.
- Page 15 and 16:
Area Control Area control allows yo
- Page 17 and 18:
Force Arming Force arming allows yo
- Page 19 and 20:
24HR Disabling The Protege System c
- Page 21 and 22:
• Press [MENU, 7] to access the b
- Page 23 and 24:
User Programming To access the user
- Page 25 and 26:
Access Level 1 End Date Setting the
- Page 27 and 28:
User Card Number When user requires
- Page 29 and 30:
Option 5 - Automatic Primary Area D
- Page 31 and 32:
Menu Group Name If the selected men
- Page 33 and 34:
• This option will not operate un
- Page 35 and 36:
Menu Group Extra 2 Menu Options All
- Page 37 and 38:
Block # Opt 1 Opt 2 Opt 3 Opt 4 Opt
- Page 39 and 40:
Block # Opt 1 Opt 2 Opt 3 Opt 4 Opt
- Page 41 and 42:
Secondary Access Level A secondary
- Page 43 and 44:
For this option to work, the Activa
- Page 45 and 46:
Selecting an Elevator Group to Modi
- Page 47 and 48:
Block # Opt 1 Opt 2 Opt 3 Opt 4 Opt
- Page 49 and 50:
Block # Opt 1 Opt 2 Opt 3 Opt 4 Opt
- Page 51 and 52:
Hex Review To access the hex event
- Page 53 and 54:
Modules To access the module progra
- Page 55 and 56:
Module Polling Time The polling tim
- Page 57 and 58:
Keypad Smoke Detector Reset PGM The
- Page 59 and 60:
Option 1 - Unlock Controlled Door
- Page 61 and 62:
Selecting a Zone Expander to Modify
- Page 63 and 64:
PGM Expander To access the PGM Expa
- Page 65 and 66:
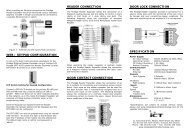
Reader Expander To access the Reade
- Page 67 and 68:
Option 3 - Multiple Reader Connecte
- Page 69 and 70:
Format Sentrax 9000 T2 Description
- Page 71 and 72:
Format Apollo 44 Bit Description De
- Page 73 and 74:
Reader Port 1 Multi Badge Operation
- Page 75 and 76:
• When the option is disabled and
- Page 77 and 78:
• Disabled the reader will turn o
- Page 79 and 80:
Reader Port 2 Reading Format The re
- Page 81 and 82:
Reader Port 2 Reader Options Option
- Page 83 and 84:
Option 8 - Arm User Area • Enable
- Page 85 and 86:
Option 4 - 8 - Reserved • Reserve
- Page 87 and 88:
To view the IP address of the modul
- Page 89 and 90:
Analog Channel 1 Update Time When t
- Page 91 and 92:
Selecting a Zone to Modify Each zon
- Page 93 and 94:
Option 4 - Zone Uses 6K8 and 2K2 EO
- Page 95 and 96:
Zone Fourth Area Assignment The zon
- Page 97 and 98:
Selecting a Trouble Zone to Modify
- Page 99 and 100:
Type Fire Loop Power Fault Bell/PGM
- Page 101 and 102:
Trouble Zone Type Third Area Assign
- Page 103 and 104:
Automation Control Point An automat
- Page 105 and 106:
Option 8 - Recycle Zone On Exit Del
- Page 107 and 108:
Zone Type Automation Options Automa
- Page 109 and 110:
Option 6 - Toggle Zone Control PGM
- Page 111 and 112:
Activation Schedule The activation
- Page 113 and 114:
Area An installation may contain an
- Page 115 and 116:
Re-Arm Delay Setting the re-arm del
- Page 117 and 118:
Area Interlock Group Assignment An
- Page 119 and 120:
Entry Delay PGM Pulse OFF Time The
- Page 121 and 122:
Disarmed PGM Pulse ON Time The disa
- Page 123 and 124:
Memory PGM or PGM Group You can ass
- Page 125 and 126:
Defer PGM Pulse OFF Time The defer
- Page 127 and 128:
Use this option when multiple areas
- Page 129 and 130:
• Disabled the area will arm rega
- Page 131 and 132:
Access Control To access the access
- Page 133 and 134:
Inside Area The inside area defines
- Page 135 and 136:
Pre Alarm PGM Pulse OFF Time The pr
- Page 137 and 138:
Option 2 - Door Open Event When On
- Page 139 and 140:
Option 4 - Deny Entry if Inside Are
- Page 141 and 142:
Door Type Name If the selected door
- Page 143 and 144:
Exit Options Exit options for the d
- Page 145 and 146:
Reader Expander The reader expander
- Page 147 and 148:
Floor Each floor is assigned a uniq
- Page 149 and 150:
PGM Number 2 In PGM Group Each PGM
- Page 151 and 152:
Secondary Keypad Group A secondary
- Page 153 and 154:
Controlling Services (Starting and
- Page 155 and 156:
Service Mode The service mode deter
- Page 157 and 158:
Option 5 - PABX Requires Pause •
- Page 159 and 160:
Reporting Table With the size of th
- Page 161 and 162:
Monitor Phone Service To program th
- Page 163 and 164:
Call Host Attempts The call host at
- Page 165 and 166:
Reporting Options The Reporting Opt
- Page 167 and 168:
Poll Time The poll time configures
- Page 169 and 170:
SIA Level 2 Reporting Service To pr
- Page 171 and 172:
Option 3 - Reserved • Reserved do
- Page 173 and 174:
Option 4 - 5 Digit Zone Code • En
- Page 175 and 176:
Off Hook PGM The off hook PGM is ac
- Page 177 and 178:
Device Address When the unit is con
- Page 179 and 180:
Miscellaneous Options The miscellan
- Page 181 and 182:
Communications Port Speed The commu
- Page 183 and 184:
ModBUS Area Control Group The area
- Page 185 and 186:
Data Options The data configure var
- Page 187 and 188:
Validation Mode The Validation Mode
- Page 189 and 190:
Intercom 2 Address The intercom 2 a
- Page 191 and 192:
Intercom Access PGM The Intercom Ac
- Page 193 and 194:
Reporting Protocol The reporting pr
- Page 195 and 196:
Secondary Port The Secondary port c
- Page 197 and 198:
Enabling/disabling or modifying the
- Page 199 and 200:
Link Me (IO) The Link Me (IO) Servi
- Page 201 and 202:
General Options The general options
- Page 203 and 204:
Telephone Numbers To access the tel
- Page 205 and 206:
Dial Attempt Number Phone Number Di
- Page 207 and 208:
Dial Attempt Number Phone Number Di
- Page 209 and 210:
Network Online Module View Viewing
- Page 211 and 212:
• Pressing the [] key will displa
- Page 213 and 214:
Zone Status Display When the zone i
- Page 215 and 216:
Door Control and Status Display Eac
- Page 217 and 218:
Controlling Functions (Starting and
- Page 219 and 220:
Logic Action The logic action deter
- Page 221 and 222:
OFF ON ON ON ON OFF • XOR Follow
- Page 223 and 224:
The pulse on action will arm the ar
- Page 225 and 226:
Enabled Control PGM Enabled Control
- Page 227 and 228:
Heating Stage 2 PGM The heat 2 PGM
- Page 229 and 230:
Register Offset Register Function 8
- Page 231 and 232:
Register Offset Register Function 9
- Page 233 and 234:
Function Mode The function mode det
- Page 235 and 236:
Cool On PGM The cool on PGM is acti
- Page 237 and 238:
Floor Temperature Register The floo
- Page 239 and 240:
Register Offset Register Function 1
- Page 241 and 242:
Ripple Off Time The ripple off time
- Page 243 and 244:
Door Action The action determines w
- Page 245 and 246:
Door Control Mode The control mode
- Page 247 and 248:
Virtual Door Forced Open Zone When
- Page 249 and 250:
Function Mode The function mode det
- Page 251 and 252:
• Pulse On The pulse on action wi
- Page 253 and 254:
Register Counter • Protege System
- Page 255 and 256:
Average The average function takes
- Page 257 and 258:
Compare Register Base This is the f
- Page 259 and 260:
Automation Name If the selected aut
- Page 261 and 262:
• Disabled the C-Bus processing w
- Page 263 and 264:
Character A a Function Show the AM/
- Page 265 and 266:
Host Verify ID The host verify ID i
- Page 267 and 268:
Panel Options 2 Option 1 - Short of
- Page 269 and 270:
System Controller Restart in Bios M
- Page 271 and 272:
Parity Start Block 1 to 4 The parit
- Page 273 and 274:
The second setting to edit is the s
- Page 275 and 276:
in Area Warehouse Press [ENTER] to
- Page 277 and 278:
The display will show the door lock
- Page 279 and 280:
Time The time menu allows a keypad
- Page 281 and 282:
Selecting an Schedule Entry to Modi
- Page 283 and 284:
Option 5 - Friday • Enabled the p
- Page 285 and 286:
Holiday Start Date Program a starti
- Page 287 and 288:
Daylight Savings End Month The end
- Page 289 and 290:
CP001:01 T-Zone is not BYPASSED •
- Page 291 and 292:
Reporting Tables Reporting tables a
- Page 293 and 294: Zone Number Contact ID Code Reporti
- Page 295 and 296: In the above table a reporting code
- Page 297 and 298: Zone Number Contact ID Code Reporti
- Page 299 and 300: In the above table a reporting code
- Page 301 and 302: Analog Input/Output Expander The An
- Page 303 and 304: Zone Number Contact ID Code Reporti
- Page 305 and 306: Analog Input/Output Expander The An
- Page 307 and 308: Zone Number Alarm Code Restore Code
- Page 309 and 310: Zone Number Alarm Code Restore Code
- Page 311 and 312: Zone Number Alarm Code Restore Code
- Page 313 and 314: Zone Number Alarm Code Restore Code
- Page 315 and 316: 16 PGM Output Expander The 16 PGM O
- Page 317 and 318: Zone Number Alarm Code Restore Code
- Page 319 and 320: Reporting Codes Custom reporting co
- Page 321 and 322: There are various options that can
- Page 323 and 324: Zone Number Description Type Group
- Page 325 and 326: Zone Number Description Type Group
- Page 327 and 328: Description Number User Names 2000
- Page 329 and 330: Description PGM Names 16 Floor Name
- Page 331 and 332: School Profile The school profile i
- Page 333 and 334: Description Number Areas 128 Access
- Page 335 and 336: Description Area Names 64 Access Le
- Page 337 and 338: Description Number Floor Names 0 El
- Page 339 and 340: Object Notation When selecting an a
- Page 341 and 342: System Type ZNT ATT DRT DTT AGT MGT
- Page 343: Programming the name or text value
- Page 347 and 348: Conversion When programming the Pro
- Page 349 and 350: ASCII Conversion In some cases it i
- Page 351 and 352: Contact Integrated Control Technolo