

The Gougeon Brothers on Boat Construction - WEST SYSTEM Epoxy
The Gougeon Brothers on Boat Construction - WEST SYSTEM Epoxy
The Gougeon Brothers on Boat Construction - WEST SYSTEM Epoxy

Create successful ePaper yourself
Turn your PDF publications into a flip-book with our unique Google optimized e-Paper software.
94 Core <strong>Boat</strong>building Techniques<br />
Figure 11-5 Cleats are screwed to a baseboard to force<br />
laminates into the shape required. Clamps in the pile in the<br />
upper right will be used during the dry run and the final<br />
laminati<strong>on</strong>.<br />
procedure. Shield the framework from clamp marks<br />
with the use of clamping pads and protect members<br />
against any excess epoxy with a plastic sheet barrier.<br />
Figure 11-4 shows some frames being laminated using<br />
the stringers as a form. Further details <strong>on</strong> this type of<br />
laminating procedure are discussed in Chapter 21.<br />
Allowance for Springback<br />
All laminati<strong>on</strong>s will relax from the curve that they have<br />
been clamped to. This springback may range from 1 ⁄16"<br />
to several inches, depending up<strong>on</strong> two factors: the<br />
severity of the curve the laminati<strong>on</strong> must take, and the<br />
number of pieces used to make up a laminati<strong>on</strong>. <str<strong>on</strong>g>The</str<strong>on</strong>g><br />
object, of course, is to try to anticipate what the springback<br />
might be and then to overbend your laminati<strong>on</strong><br />
so that when it relaxes, it will assume the exact shape<br />
desired. Refer to Figure 11-6 to determine the amount<br />
of springback that a laminati<strong>on</strong> will have. It is rare for<br />
a laminati<strong>on</strong> to end up exactly as desired, although<br />
you can come very close and then take several corrective<br />
measures, which will be discussed later.<br />
<str<strong>on</strong>g>The</str<strong>on</strong>g> Dry Run and Clamping Procedures<br />
If you d<strong>on</strong>’t have much experience or if you are faced<br />
with a complex or unusually shaped form, try a dry run<br />
of your laminati<strong>on</strong>. Assemble and clamp your pieces<br />
with no epoxy to see if there are any flaws in your<br />
approach. Also check at this time to be sure that you<br />
have enough clamps. Because there is no epoxy in the<br />
way, you will be able to see gaps and take appropriate<br />
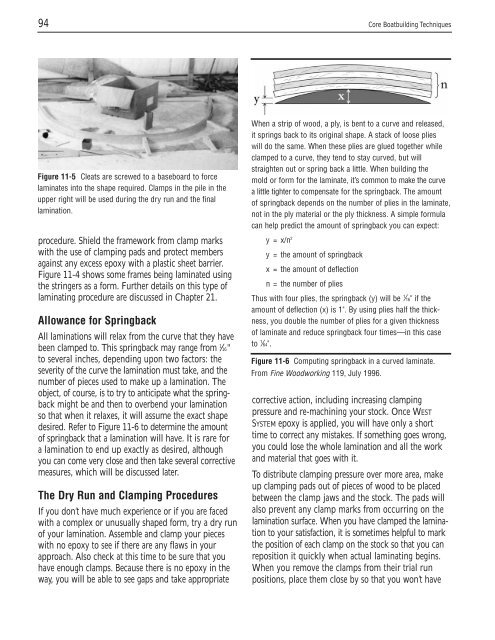
When a strip of wood, a ply, is bent to a curve and released,<br />
it springs back to its original shape. A stack of loose plies<br />
will do the same. When these plies are glued together while<br />
clamped to a curve, they tend to stay curved, but will<br />
straighten out or spring back a little. When building the<br />
mold or form for the laminate, it’s comm<strong>on</strong> to make the curve<br />
a little tighter to compensate for the springback. <str<strong>on</strong>g>The</str<strong>on</strong>g> amount<br />
of springback depends <strong>on</strong> the number of plies in the laminate,<br />
not in the ply material or the ply thickness. A simple formula<br />
can help predict the amount of springback you can expect:<br />
y = x/n2 y = the amount of springback<br />
x = the amount of deflecti<strong>on</strong><br />
n = the number of plies<br />
Thus with four plies, the springback (y) will be 1 ⁄16" if the<br />
amount of deflecti<strong>on</strong> (x) is 1". By using plies half the thickness,<br />
you double the number of plies for a given thickness<br />
of laminate and reduce springback four times—in this case<br />
to 1 ⁄64".<br />
Figure 11-6 Computing springback in a curved laminate.<br />
From Fine Woodworking 119, July 1996.<br />
corrective acti<strong>on</strong>, including increasing clamping<br />
pressure and re-machining your stock. Once <strong>WEST</strong><br />
<strong>SYSTEM</strong> epoxy is applied, you will have <strong>on</strong>ly a short<br />
time to correct any mistakes. If something goes wr<strong>on</strong>g,<br />
you could lose the whole laminati<strong>on</strong> and all the work<br />
and material that goes with it.<br />
To distribute clamping pressure over more area, make<br />
up clamping pads out of pieces of wood to be placed<br />
between the clamp jaws and the stock. <str<strong>on</strong>g>The</str<strong>on</strong>g> pads will<br />
also prevent any clamp marks from occurring <strong>on</strong> the<br />
laminati<strong>on</strong> surface. When you have clamped the laminati<strong>on</strong><br />
to your satisfacti<strong>on</strong>, it is sometimes helpful to mark<br />
the positi<strong>on</strong> of each clamp <strong>on</strong> the stock so that you can<br />
repositi<strong>on</strong> it quickly when actual laminating begins.<br />
When you remove the clamps from their trial run<br />
positi<strong>on</strong>s, place them close by so that you w<strong>on</strong>’t have


