

The Gougeon Brothers on Boat Construction - WEST SYSTEM Epoxy
The Gougeon Brothers on Boat Construction - WEST SYSTEM Epoxy
The Gougeon Brothers on Boat Construction - WEST SYSTEM Epoxy

You also want an ePaper? Increase the reach of your titles
YUMPU automatically turns print PDFs into web optimized ePapers that Google loves.
110 Core <strong>Boat</strong>building Techniques<br />
the surface, but pressed well together so that there is<br />
neither over nor under matching of the bevels (See<br />
Figure 12-3.) Determine straightness in the edge<br />
dimensi<strong>on</strong> by feeling the edges of the scarf with your<br />
gloved fingers or set up a straightedge <strong>on</strong> the flat<br />
surface against which you can assemble the two pieces<br />
of stock, thus ensuring straightness in both dimensi<strong>on</strong>s.<br />
When you have lined up the scarf joint perfectly, locate<br />
a staple al<strong>on</strong>g the edge of the scarf joint <strong>on</strong> <strong>on</strong>e surface,<br />
turn the stock over, realign the joint, and locate another<br />
staple <strong>on</strong> the opposite surface in the opposite scarf<br />
edge. <str<strong>on</strong>g>The</str<strong>on</strong>g>se temporary locating staples hold the scarf<br />
joint in proper positi<strong>on</strong> until you can apply clamping<br />
pressure.<br />
It is important that you clamp the joint firmly so that<br />
good c<strong>on</strong>tact is made between the surfaces. However,<br />
excessive clamping pressure is not needed and should<br />
be avoided because it may pre-stress the joint unnecessarily.<br />
To facilitate cleanup, remove any excess epoxy<br />
that has squeezed out of the joint before you apply any<br />
clamping pressure. <str<strong>on</strong>g>The</str<strong>on</strong>g>n wrap the scarf joint in wax<br />
paper or light polyethylene film to prevent inadvertent<br />
b<strong>on</strong>ding of the scarf joint with clamps or the flat<br />
surface. Apply clamping pressure with any number of<br />
clamps desired or make up simple clamping fixtures<br />
utilizing wedges to apply even pressure over the entire<br />
scarf joint. Often we insert a clamping pad between<br />
the clamp and the stock being clamped to distribute<br />
Figure 12-3 When b<strong>on</strong>ding thin stock or more than <strong>on</strong>e<br />
scarf, take care to avoid overmatching the bevels (A) or<br />
undermatching the bevels (B). Use wire brads or staples<br />
to hold a bevel in proper alignment (C) and prevent slipping<br />
during clamping.<br />
clamping pressure over more area and prevent clamp<br />
marks from appearing in the face of the stock.<br />
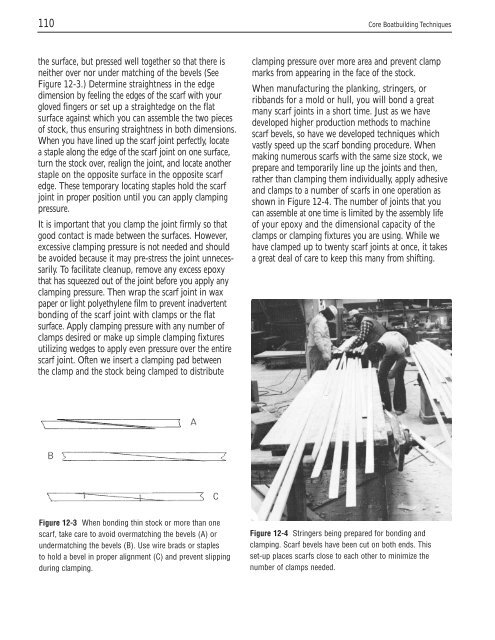
When manufacturing the planking, stringers, or<br />
ribbands for a mold or hull, you will b<strong>on</strong>d a great<br />
many scarf joints in a short time. Just as we have<br />
developed higher producti<strong>on</strong> methods to machine<br />
scarf bevels, so have we developed techniques which<br />
vastly speed up the scarf b<strong>on</strong>ding procedure. When<br />
making numerous scarfs with the same size stock, we<br />
prepare and temporarily line up the joints and then,<br />
rather than clamping them individually, apply adhesive<br />
and clamps to a number of scarfs in <strong>on</strong>e operati<strong>on</strong> as<br />
shown in Figure 12-4. <str<strong>on</strong>g>The</str<strong>on</strong>g> number of joints that you<br />
can assemble at <strong>on</strong>e time is limited by the assembly life<br />
of your epoxy and the dimensi<strong>on</strong>al capacity of the<br />
clamps or clamping fixtures you are using. While we<br />
have clamped up to twenty scarf joints at <strong>on</strong>ce, it takes<br />
a great deal of care to keep this many from shifting.<br />
Figure 12-4 Stringers being prepared for b<strong>on</strong>ding and<br />
clamping. Scarf bevels have been cut <strong>on</strong> both ends. This<br />
set-up places scarfs close to each other to minimize the<br />
number of clamps needed.


