

The Gougeon Brothers on Boat Construction - WEST SYSTEM Epoxy
The Gougeon Brothers on Boat Construction - WEST SYSTEM Epoxy
The Gougeon Brothers on Boat Construction - WEST SYSTEM Epoxy

You also want an ePaper? Increase the reach of your titles
YUMPU automatically turns print PDFs into web optimized ePapers that Google loves.
108 Core <strong>Boat</strong>building Techniques<br />
Now remove excess stock to get close to the lines you<br />
have drawn. <str<strong>on</strong>g>The</str<strong>on</strong>g>re are many ways to do this: you can<br />
make a careful cut with a sharp handsaw, sawing as<br />
close to the marks as your skill will allow, or you can<br />
use a wide chisel and mallet, a large plane with a deepset<br />
blade, or a power plane. When you have rough<br />
machined the bevel close to its marks, use a sharp<br />
block plane to finish it, watching the marked lines as<br />
you proceed.<br />
At this point, place the stock <strong>on</strong> a flat surface such as a<br />
workbench with a block under the feather edge of the<br />
bevel which can support the edge but will not interfere<br />
with the hand planing. C<strong>on</strong>tinually check the bevel for<br />
flatness in both directi<strong>on</strong>s so that when you plane the<br />
bevel to its final marked lines, you leave a fine, feathered<br />
edge at the very end of the stock. When you have<br />
completed the scarf bevel, check to make sure that it is<br />
flat in both the length and widths planed—we just set<br />
the edge of the plane <strong>on</strong> the bevel surface for a quick<br />
check. This ensures a totally flat surface, which will<br />
mate properly with another scarf bevel to form a<br />
dimensi<strong>on</strong>ally accurate and str<strong>on</strong>g scarf joint.<br />
<str<strong>on</strong>g>The</str<strong>on</strong>g> scarfing jig<br />
To save time, you can easily build a jig <strong>on</strong> which to<br />
mass produce accurate scarf bevels <strong>on</strong> various sizes of<br />
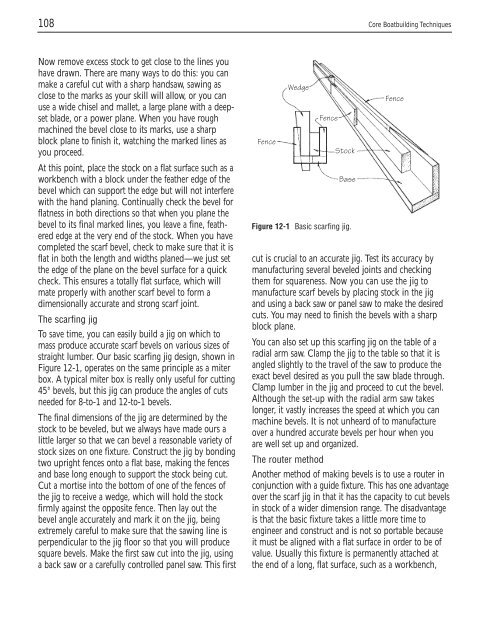
straight lumber. Our basic scarfing jig design, shown in<br />
Figure 12-1, operates <strong>on</strong> the same principle as a miter<br />
box. A typical miter box is really <strong>on</strong>ly useful for cutting<br />
45° bevels, but this jig can produce the angles of cuts<br />
needed for 8-to-1 and 12-to-1 bevels.<br />
<str<strong>on</strong>g>The</str<strong>on</strong>g> final dimensi<strong>on</strong>s of the jig are determined by the<br />
stock to be beveled, but we always have made ours a<br />
little larger so that we can bevel a reas<strong>on</strong>able variety of<br />
stock sizes <strong>on</strong> <strong>on</strong>e fixture. C<strong>on</strong>struct the jig by b<strong>on</strong>ding<br />
two upright fences <strong>on</strong>to a flat base, making the fences<br />
and base l<strong>on</strong>g enough to support the stock being cut.<br />
Cut a mortise into the bottom of <strong>on</strong>e of the fences of<br />
the jig to receive a wedge, which will hold the stock<br />
firmly against the opposite fence. <str<strong>on</strong>g>The</str<strong>on</strong>g>n lay out the<br />
bevel angle accurately and mark it <strong>on</strong> the jig, being<br />
extremely careful to make sure that the sawing line is<br />
perpendicular to the jig floor so that you will produce<br />
square bevels. Make the first saw cut into the jig, using<br />
a back saw or a carefully c<strong>on</strong>trolled panel saw. This first<br />
Fence<br />
Wedge<br />
Fence<br />
Stock<br />
Base<br />
Figure 12-1 Basic scarfing jig.<br />
Fence<br />
cut is crucial to an accurate jig. Test its accuracy by<br />
manufacturing several beveled joints and checking<br />
them for squareness. Now you can use the jig to<br />
manufacture scarf bevels by placing stock in the jig<br />
and using a back saw or panel saw to make the desired<br />
cuts. You may need to finish the bevels with a sharp<br />
block plane.<br />
You can also set up this scarfing jig <strong>on</strong> the table of a<br />
radial arm saw. Clamp the jig to the table so that it is<br />
angled slightly to the travel of the saw to produce the<br />
exact bevel desired as you pull the saw blade through.<br />
Clamp lumber in the jig and proceed to cut the bevel.<br />
Although the set-up with the radial arm saw takes<br />
l<strong>on</strong>ger, it vastly increases the speed at which you can<br />
machine bevels. It is not unheard of to manufacture<br />
over a hundred accurate bevels per hour when you<br />
are well set up and organized.<br />
<str<strong>on</strong>g>The</str<strong>on</strong>g> router method<br />
Another method of making bevels is to use a router in<br />
c<strong>on</strong>juncti<strong>on</strong> with a guide fixture. This has <strong>on</strong>e advantage<br />
over the scarf jig in that it has the capacity to cut bevels<br />
in stock of a wider dimensi<strong>on</strong> range. <str<strong>on</strong>g>The</str<strong>on</strong>g> disadvantage<br />
is that the basic fixture takes a little more time to<br />
engineer and c<strong>on</strong>struct and is not so portable because<br />
it must be aligned with a flat surface in order to be of<br />
value. Usually this fixture is permanently attached at<br />
the end of a l<strong>on</strong>g, flat surface, such as a workbench,


