

The Gougeon Brothers on Boat Construction - WEST SYSTEM Epoxy
The Gougeon Brothers on Boat Construction - WEST SYSTEM Epoxy
The Gougeon Brothers on Boat Construction - WEST SYSTEM Epoxy

Create successful ePaper yourself
Turn your PDF publications into a flip-book with our unique Google optimized e-Paper software.
116 Core <strong>Boat</strong>building Techniques<br />
Figure 12-13 Cutting scarf bevels <strong>on</strong> stacked panels.<br />
Clamping plywood scarf joints<br />
<str<strong>on</strong>g>The</str<strong>on</strong>g> potential problem with the plywood scarf joint is<br />
achieving proper clamping pressure. A large, flat work<br />
surface of the size used to fit the joint is required for<br />
clamping, but with <strong>on</strong>e additi<strong>on</strong>al provisi<strong>on</strong>. <str<strong>on</strong>g>The</str<strong>on</strong>g> work<br />
surface must be of a material which will receive staples<br />
or small nails. If needed, you can positi<strong>on</strong> several sheets<br />
of 3 /4" (18mm) thick sheathing grade plywood over<br />
your floor or the workbench to receive fasteners readily.<br />
Cover that part of the work surface that will be beneath<br />
the scarf joint with wax paper or polyethylene sheet.<br />
Apply the b<strong>on</strong>ding adhesive, positi<strong>on</strong> the panels <strong>on</strong> the<br />
flat surface, and join the bevel surfaces together so that<br />
the surmarks line up. <str<strong>on</strong>g>The</str<strong>on</strong>g>n positi<strong>on</strong> a locating staple in<br />
each edge of the joint to prevent any movement of the<br />
two panels while you are clamping. Cover the top of<br />
the joint with wax paper and place a strip of plywood<br />
over the paper at the scarf joint. This plywood strip<br />
should be about the same thickness as the material<br />
being spliced together and should be wide enough to<br />
cover at least the entire area of the splice. Drive a sufficient<br />
number of staples or nails through the strip and<br />
the scarf joint into the receiving material below,<br />
drawing the two beveled surfaces firmly together.<br />
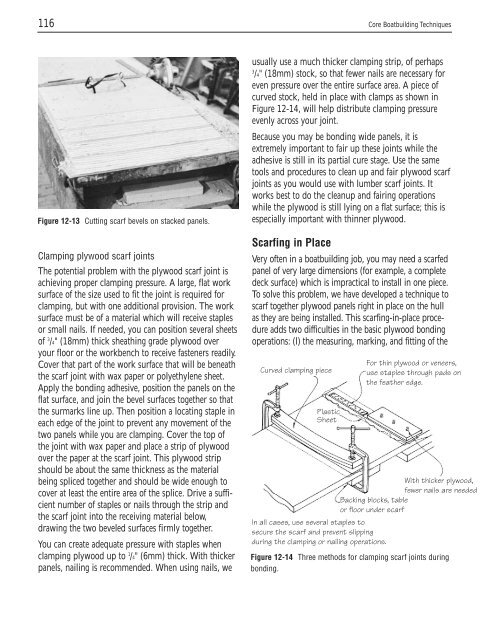
You can create adequate pressure with staples when<br />
clamping plywood up to 1 /4" (6mm) thick. With thicker<br />
panels, nailing is recommended. When using nails, we<br />
usually use a much thicker clamping strip, of perhaps<br />
3 /4" (18mm) stock, so that fewer nails are necessary for<br />
even pressure over the entire surface area. A piece of<br />
curved stock, held in place with clamps as shown in<br />
Figure 12-14, will help distribute clamping pressure<br />
evenly across your joint.<br />
Because you may be b<strong>on</strong>ding wide panels, it is<br />
extremely important to fair up these joints while the<br />
adhesive is still in its partial cure stage. Use the same<br />
tools and procedures to clean up and fair plywood scarf<br />
joints as you would use with lumber scarf joints. It<br />
works best to do the cleanup and fairing operati<strong>on</strong>s<br />
while the plywood is still lying <strong>on</strong> a flat surface; this is<br />
especially important with thinner plywood.<br />
Scarfing in Place<br />
Very often in a boatbuilding job, you may need a scarfed<br />
panel of very large dimensi<strong>on</strong>s (for example, a complete<br />
deck surface) which is impractical to install in <strong>on</strong>e piece.<br />
To solve this problem, we have developed a technique to<br />
scarf together plywood panels right in place <strong>on</strong> the hull<br />
as they are being installed. This scarfing-in-place procedure<br />
adds two difficulties in the basic plywood b<strong>on</strong>ding<br />
operati<strong>on</strong>s: (l) the measuring, marking, and fitting of the<br />
Curved clamping piece<br />
Plastic<br />
Sheet<br />
For thin plywood or veneers,<br />
use staples through pads <strong>on</strong><br />
the feather edge.<br />
With thicker plywood,<br />
fewer nails are needed<br />
Backing blocks, table<br />
or floor under scarf<br />
In all cases, use several staples to<br />
secure the scarf and prevent slipping<br />
during the clamping or nailing operati<strong>on</strong>s.<br />
Figure 12-14 Three methods for clamping scarf joints during<br />
b<strong>on</strong>ding.


