

The Gougeon Brothers on Boat Construction - WEST SYSTEM Epoxy
The Gougeon Brothers on Boat Construction - WEST SYSTEM Epoxy
The Gougeon Brothers on Boat Construction - WEST SYSTEM Epoxy

Create successful ePaper yourself
Turn your PDF publications into a flip-book with our unique Google optimized e-Paper software.
230 Hull C<strong>on</strong>structi<strong>on</strong> Methods<br />
however, usually arrives with rough sawn edges, which<br />
must be straightened. Over the years, we have developed<br />
a quick and easy way to work <strong>on</strong> a number of<br />
pieces of veneer, up to 17' (5m) l<strong>on</strong>g, at <strong>on</strong>e time.<br />
We set up our cutting jig <strong>on</strong> three sawhorses, storing<br />
it when it’s not needed.<br />
Lay four to eight pieces of veneer <strong>on</strong> a 2" � 12" (38mm<br />
� 286mm) plank so that their rough edges are slightly<br />
inboard from the plank’s edge. Make a straightedge<br />
from a piece of clear 3 ⁄4" � 8" (18mm � 200mm)<br />
stock, carefully dressing the edge for overall straightness.<br />
Positi<strong>on</strong> this <strong>on</strong> top of the veneers to serve as a<br />
guide for a hand-held circular saw. Try to waste as little<br />
wood as possible, but place the straightedge far enough<br />
back from the edges of your veneers to guarantee that<br />
you will be able to transfer a straight line to all your<br />
pieces. Sandwich the veneers between the straightedge<br />
and the plank and hold the assembly with large clamps<br />
at either end. Tighten the clamps so the veneers can’t<br />
shift.<br />
Set your circular saw blade deep enough to cut through<br />
all the veneers. A little overcut into the plank is acceptable.<br />
Run the saw al<strong>on</strong>g the stack, as shown in Figure<br />
21-1. When your pieces have <strong>on</strong>e accurate edge, cut<br />
parallel straight edges <strong>on</strong> their other sides. <str<strong>on</strong>g>The</str<strong>on</strong>g> easiest<br />
way to do this is to run the veneers through a table saw.<br />
Some very l<strong>on</strong>g veneers taper significantly from <strong>on</strong>e<br />
end to the other. Truing these up results in a lot of<br />
waste, especially since you can use them for interior<br />
layers of the laminate by alternating the tapered ends<br />
from piece to piece so that there is no angle change.<br />
When we receive tapered veneers, we use our straightening<br />
jig <strong>on</strong> both sides rather than just <strong>on</strong> <strong>on</strong>e.<br />
Two factors determine the width of laminating material:<br />
the amount of compound curve in your hull and how<br />
you want your boat to look. You can use much wider<br />
pieces of veneer at the ends of your boat, where there<br />
is less compounding, than in its middle secti<strong>on</strong>s, where<br />
curvature is likely to be more severe. Most people<br />
prefer uniform veneer widths <strong>on</strong> naturally finished<br />
interior and exterior surfaces, but this is not particularly<br />
necessary. Thin pieces or, less comm<strong>on</strong>ly, wide pieces,<br />
can be very pleasing to the eye when arranged so that<br />
their colors c<strong>on</strong>trast.<br />
Most commercial veneers are between 5" and 12"<br />
(125mm and 300mm) wide after straightening. Wait<br />
to saw them into thinner strips until you have experimented<br />
enough to know which width will bend and<br />
look best <strong>on</strong> your hull. It’s a shame to saw 12" (300mm)<br />
wide veneer into three 4" (100mm) strips when two 6"<br />
(150mm) strips may bend just as well with much less<br />
labor. You will find out very quickly if your veneers<br />
are too wide. If they are, the edges will be increasingly<br />
difficult to hold down as the pieces resist bending in<br />
two directi<strong>on</strong>s at <strong>on</strong>ce.<br />
Sort the veneers into piles according to their quality and<br />
color. Collect your finest pieces and save them for your<br />
first and last laminati<strong>on</strong>s, particularly if you plan to<br />
bright-finish your hull. Further sort this pile into dark,<br />
medium and light-t<strong>on</strong>ed pieces. Some woods, such as<br />
Douglas fir and Sitka spruce, show very little color<br />
variati<strong>on</strong>, while others, including Western red cedar<br />
and some of the mahoganies, have a great deal. Knotty<br />
veneers can be used <strong>on</strong> all but the first and last layers.<br />
In most cases, 25% of the material you purchase will<br />
end up as scrap and <strong>on</strong>ly 75% will actually become<br />
part of your boat. Most waste is in length because small<br />
cut-off ends are almost useless. It makes sense, therefore,<br />
to try to reduce your scrap rate by ordering veneer<br />
in the most ec<strong>on</strong>omical lengths for your project. If you<br />
do this, however, you may find that your supplier is<br />
unable to fill your order. He probably doesn’t have<br />
much c<strong>on</strong>trol over the lengths of wood he purchases.<br />
<str<strong>on</strong>g>The</str<strong>on</strong>g> opposite approach—making decisi<strong>on</strong>s based <strong>on</strong><br />
what is available—is usually more successful. A typical<br />
boat hull requires a range of veneer lengths, from very<br />
short to very l<strong>on</strong>g. <str<strong>on</strong>g>The</str<strong>on</strong>g>se dimensi<strong>on</strong>s depend to some<br />
extent <strong>on</strong> the angle at which you laminate. You may wish<br />
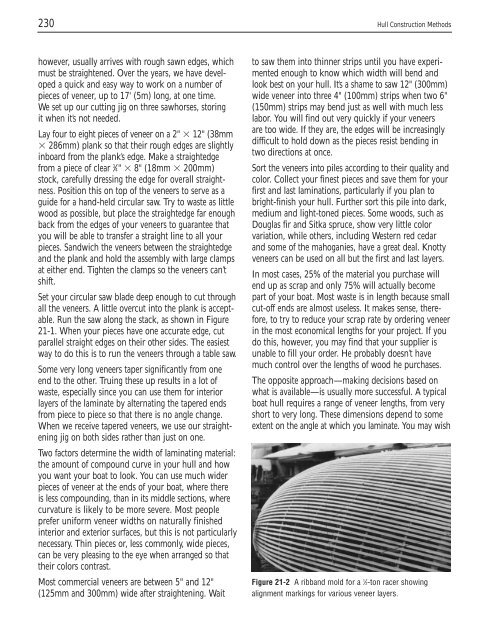
Figure 21-2 A ribband mold for a 1 ⁄2-t<strong>on</strong> racer showing<br />
alignment markings for various veneer layers.


