

The Gougeon Brothers on Boat Construction - WEST SYSTEM Epoxy
The Gougeon Brothers on Boat Construction - WEST SYSTEM Epoxy
The Gougeon Brothers on Boat Construction - WEST SYSTEM Epoxy

Create successful ePaper yourself
Turn your PDF publications into a flip-book with our unique Google optimized e-Paper software.
Chapter 11 – Laminating and B<strong>on</strong>ding Techniques 95<br />
to hunt around for them and can positi<strong>on</strong> each clamp<br />
as quickly as possible.<br />
Clamps are usually heavy and cumbersome, and they<br />
can take a lot of time to positi<strong>on</strong> and tighten. It is<br />
extremely important, before laminating begins, that<br />
there is a reserve of clamps close by, that they are of<br />
sufficient size, and that they have been checked for<br />
workability (i.e., that no glue lumps are <strong>on</strong> the threads).<br />
Whenever we are preparing for laminating without the<br />
luxury of a dry run, we line up more clamps and clamp<br />
pads than we actually think will be needed and place<br />
them at various intervals around the laminating area for<br />
quick access. For speed, we recommend that you use<br />
the adjustable bar-type clamps rather than C-clamps,<br />
which take much l<strong>on</strong>ger to fit into place. If you do use<br />
C-clamps, we suggest that you open them all beforehand<br />
to the approximate dimensi<strong>on</strong> you will need.<br />
Applying <strong>WEST</strong> <strong>SYSTEM</strong> ® <strong>Epoxy</strong><br />
For laminati<strong>on</strong>s that are large and composed of many<br />
pieces, you should organize the adhesive applicati<strong>on</strong><br />
procedure so that it can progress quickly. Cover a bench<br />
with polyethylene sheet and nail several sticks across it<br />
to keep the laminati<strong>on</strong>s from touching the bench surface<br />
when they are covered with adhesive and turned over.<br />
Coat <strong>on</strong>e surface of the laminati<strong>on</strong> with an adhesive<br />
mixture, roll the piece over <strong>on</strong> the strips, and coat the<br />
opposite surface. <str<strong>on</strong>g>The</str<strong>on</strong>g> bottom and top pieces of the<br />
laminati<strong>on</strong>, of course, need coating <strong>on</strong> <strong>on</strong>e surface <strong>on</strong>ly.<br />
As you coat the pieces with adhesive, assemble them in<br />
a neat stack in preparati<strong>on</strong> for inserti<strong>on</strong> in the form.<br />
From the time that you begin, you will have about an<br />
hour to apply the adhesive to all of the laminati<strong>on</strong><br />
members, insert the members in the form, and apply<br />
the clamping pressure. If the temperature is over 85°F<br />
(29°C), you may not have this much time, even when<br />
using a slow hardener. When laminating, adhesive<br />
applicati<strong>on</strong> usually requires the most time, but several<br />
applicators working simultaneously can speed up this<br />
operati<strong>on</strong>.<br />
We almost always use a high-density filler to make up<br />
the adhesive mixture for laminating, determining the<br />
thickness of this mixture according to the quality of our<br />
wood. Rough sawn surfaces may require epoxy and<br />
filler mixed to gap-filling, thick syrup c<strong>on</strong>sistency. With<br />
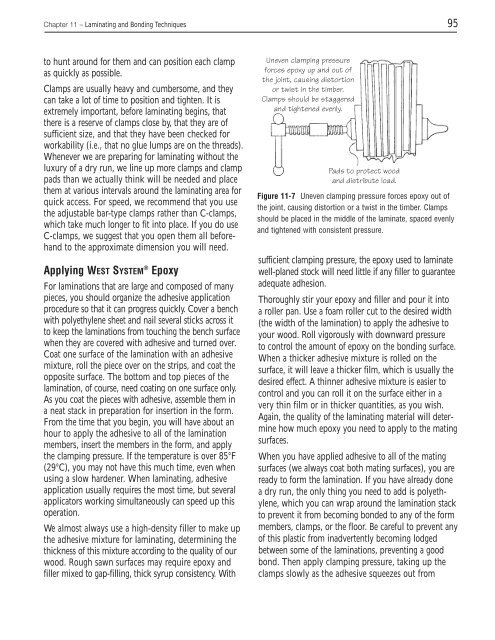
Uneven clamping pressure<br />
forces epoxy up and out of<br />
the joint, causing distorti<strong>on</strong><br />
or twist in the timber.<br />
Clamps should be staggered<br />
and tightened evenly.<br />
Pads to protect wood<br />
and distribute load.<br />
Figure 11-7 Uneven clamping pressure forces epoxy out of<br />
the joint, causing distorti<strong>on</strong> or a twist in the timber. Clamps<br />
should be placed in the middle of the laminate, spaced evenly<br />
and tightened with c<strong>on</strong>sistent pressure.<br />
sufficient clamping pressure, the epoxy used to laminate<br />
well-planed stock will need little if any filler to guarantee<br />
adequate adhesi<strong>on</strong>.<br />
Thoroughly stir your epoxy and filler and pour it into<br />
a roller pan. Use a foam roller cut to the desired width<br />
(the width of the laminati<strong>on</strong>) to apply the adhesive to<br />
your wood. Roll vigorously with downward pressure<br />
to c<strong>on</strong>trol the amount of epoxy <strong>on</strong> the b<strong>on</strong>ding surface.<br />
When a thicker adhesive mixture is rolled <strong>on</strong> the<br />
surface, it will leave a thicker film, which is usually the<br />
desired effect. A thinner adhesive mixture is easier to<br />
c<strong>on</strong>trol and you can roll it <strong>on</strong> the surface either in a<br />
very thin film or in thicker quantities, as you wish.<br />
Again, the quality of the laminating material will determine<br />
how much epoxy you need to apply to the mating<br />
surfaces.<br />
When you have applied adhesive to all of the mating<br />
surfaces (we always coat both mating surfaces), you are<br />
ready to form the laminati<strong>on</strong>. If you have already d<strong>on</strong>e<br />
a dry run, the <strong>on</strong>ly thing you need to add is polyethylene,<br />
which you can wrap around the laminati<strong>on</strong> stack<br />
to prevent it from becoming b<strong>on</strong>ded to any of the form<br />
members, clamps, or the floor. Be careful to prevent any<br />
of this plastic from inadvertently becoming lodged<br />
between some of the laminati<strong>on</strong>s, preventing a good<br />
b<strong>on</strong>d. <str<strong>on</strong>g>The</str<strong>on</strong>g>n apply clamping pressure, taking up the<br />
clamps slowly as the adhesive squeezes out from


