

The Gougeon Brothers on Boat Construction - WEST SYSTEM Epoxy
The Gougeon Brothers on Boat Construction - WEST SYSTEM Epoxy
The Gougeon Brothers on Boat Construction - WEST SYSTEM Epoxy

You also want an ePaper? Increase the reach of your titles
YUMPU automatically turns print PDFs into web optimized ePapers that Google loves.
Chapter 17 – Mold Frames and Permanent Frames 189<br />
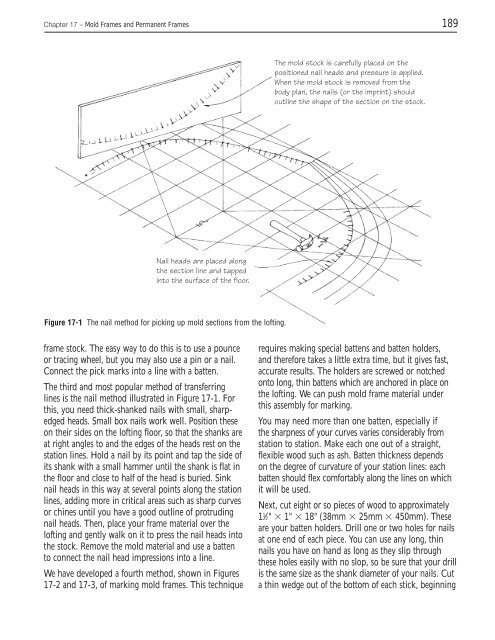
Nail heads are placed al<strong>on</strong>g<br />
the secti<strong>on</strong> line and tapped<br />
into the surface of the floor.<br />
Figure 17-1 <str<strong>on</strong>g>The</str<strong>on</strong>g> nail method for picking up mold secti<strong>on</strong>s from the lofting.<br />
frame stock. <str<strong>on</strong>g>The</str<strong>on</strong>g> easy way to do this is to use a pounce<br />
or tracing wheel, but you may also use a pin or a nail.<br />
C<strong>on</strong>nect the pick marks into a line with a batten.<br />
<str<strong>on</strong>g>The</str<strong>on</strong>g> third and most popular method of transferring<br />
lines is the nail method illustrated in Figure 17-1. For<br />
this, you need thick-shanked nails with small, sharpedged<br />
heads. Small box nails work well. Positi<strong>on</strong> these<br />
<strong>on</strong> their sides <strong>on</strong> the lofting floor, so that the shanks are<br />
at right angles to and the edges of the heads rest <strong>on</strong> the<br />
stati<strong>on</strong> lines. Hold a nail by its point and tap the side of<br />
its shank with a small hammer until the shank is flat in<br />
the floor and close to half of the head is buried. Sink<br />
nail heads in this way at several points al<strong>on</strong>g the stati<strong>on</strong><br />
lines, adding more in critical areas such as sharp curves<br />
or chines until you have a good outline of protruding<br />
nail heads. <str<strong>on</strong>g>The</str<strong>on</strong>g>n, place your frame material over the<br />
lofting and gently walk <strong>on</strong> it to press the nail heads into<br />
the stock. Remove the mold material and use a batten<br />
to c<strong>on</strong>nect the nail head impressi<strong>on</strong>s into a line.<br />
We have developed a fourth method, shown in Figures<br />
17-2 and 17-3, of marking mold frames. This technique<br />
<str<strong>on</strong>g>The</str<strong>on</strong>g> mold stock is carefully placed <strong>on</strong> the<br />
positi<strong>on</strong>ed nail heads and pressure is applied.<br />
When the mold stock is removed from the<br />
body plan, the nails (or the imprint) should<br />
outline the shape of the secti<strong>on</strong> <strong>on</strong> the stock.<br />
requires making special battens and batten holders,<br />
and therefore takes a little extra time, but it gives fast,<br />
accurate results. <str<strong>on</strong>g>The</str<strong>on</strong>g> holders are screwed or notched<br />
<strong>on</strong>to l<strong>on</strong>g, thin battens which are anchored in place <strong>on</strong><br />
the lofting. We can push mold frame material under<br />
this assembly for marking.<br />
You may need more than <strong>on</strong>e batten, especially if<br />
the sharpness of your curves varies c<strong>on</strong>siderably from<br />
stati<strong>on</strong> to stati<strong>on</strong>. Make each <strong>on</strong>e out of a straight,<br />
flexible wood such as ash. Batten thickness depends<br />
<strong>on</strong> the degree of curvature of your stati<strong>on</strong> lines: each<br />
batten should flex comfortably al<strong>on</strong>g the lines <strong>on</strong> which<br />
it will be used.<br />
Next, cut eight or so pieces of wood to approximately<br />
11 ⁄2" � 1" � 18" (38mm � 25mm � 450mm). <str<strong>on</strong>g>The</str<strong>on</strong>g>se<br />
are your batten holders. Drill <strong>on</strong>e or two holes for nails<br />
at <strong>on</strong>e end of each piece. You can use any l<strong>on</strong>g, thin<br />
nails you have <strong>on</strong> hand as l<strong>on</strong>g as they slip through<br />
these holes easily with no slop, so be sure that your drill<br />
is the same size as the shank diameter of your nails. Cut<br />
a thin wedge out of the bottom of each stick, beginning


