

The Gougeon Brothers on Boat Construction - WEST SYSTEM Epoxy
The Gougeon Brothers on Boat Construction - WEST SYSTEM Epoxy
The Gougeon Brothers on Boat Construction - WEST SYSTEM Epoxy

Create successful ePaper yourself
Turn your PDF publications into a flip-book with our unique Google optimized e-Paper software.
270 Hull C<strong>on</strong>structi<strong>on</strong> Methods<br />
not insurmountable, but the double run planking<br />
system takes a good deal of extra time in comparis<strong>on</strong> to<br />
the run out method where you have to do little or no<br />
fitting at all.<br />
Applying <strong>Epoxy</strong><br />
Assume that you are going to run bottom planking<br />
parallel to the keel and topsides planking parallel to the<br />
sheer in a double run planking system and that you<br />
have accurately marked the set-up to receive the master<br />
plank. Install this plank, using screws that are about<br />
twice as l<strong>on</strong>g as the thickness of the planking to hold it<br />
temporarily to the mold frames. We used to use<br />
inexpensive roundhead sheet metal screws with large<br />
washers. <str<strong>on</strong>g>The</str<strong>on</strong>g>se made it possible to apply more pressure<br />
without damage to the wood fiber. Now drywall screws<br />
would be used with washers instead. Chipboard frames<br />
require l<strong>on</strong>ger screws than wood frames because<br />
chipboard’s holding power is not as good as that of<br />
wood. In areas where you need extra holding power,<br />
screw or staple and b<strong>on</strong>d a piece of wood to the side of<br />
a chipboard frame and screw the planking into this.<br />
Step drill bits, which can cut a pilot hole in the temporary<br />
frame and a shank-sized hole in the plank in <strong>on</strong>e<br />
operati<strong>on</strong>, save the added step of switching between<br />
two different drills or changing bits.<br />
Use alloy screws and epoxy thickened with highdensity<br />
filler to attach planking to all permanent parts<br />
of the boat. <str<strong>on</strong>g>The</str<strong>on</strong>g>se screws will be left in the hull.<br />
Countersink them enough so they w<strong>on</strong>’t interfere with<br />
fairing. You will be using two different types and<br />
perhaps sizes of screws: <strong>on</strong>e to attach planking to<br />
temporary frames and the other to attach it to permanent<br />
members. Two drill motors set up with two<br />
different size bits will save time. If you are using<br />
drywall screws for temporary fasteners, you can get by<br />
with a single c<strong>on</strong>venti<strong>on</strong>al drill bit because the drywall<br />
screw’s shank is smaller in diameter than the threads.<br />
When you have installed the master plank, set up a<br />
procedure to easily and efficiently apply the rest of the<br />
planking to the frames. Mark the planks with surmarks<br />
that line up with a stati<strong>on</strong> in the middle of the hull so<br />
that you can accurately positi<strong>on</strong> them without having<br />
to guess if they are centered.<br />
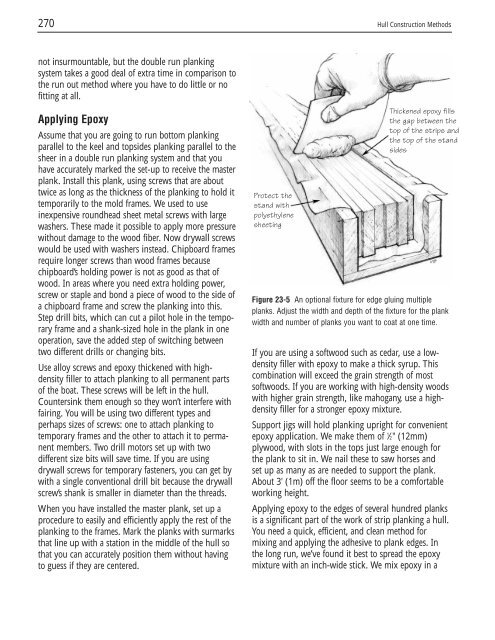
Protect the<br />
stand with<br />
polyethylene<br />
sheeting<br />
Thickened epoxy fills<br />
the gap between the<br />
top of the strips and<br />
the top of the stand<br />
sides<br />
Figure 23-5 An opti<strong>on</strong>al fixture for edge gluing multiple<br />
planks. Adjust the width and depth of the fixture for the plank<br />
width and number of planks you want to coat at <strong>on</strong>e time.<br />
If you are using a softwood such as cedar, use a lowdensity<br />
filler with epoxy to make a thick syrup. This<br />
combinati<strong>on</strong> will exceed the grain strength of most<br />
softwoods. If you are working with high-density woods<br />
with higher grain strength, like mahogany, use a highdensity<br />
filler for a str<strong>on</strong>ger epoxy mixture.<br />
Support jigs will hold planking upright for c<strong>on</strong>venient<br />
epoxy applicati<strong>on</strong>. We make them of 1 ⁄2" (12mm)<br />
plywood, with slots in the tops just large enough for<br />
the plank to sit in. We nail these to saw horses and<br />
set up as many as are needed to support the plank.<br />
About 3' (1m) off the floor seems to be a comfortable<br />
working height.<br />
Applying epoxy to the edges of several hundred planks<br />
is a significant part of the work of strip planking a hull.<br />
You need a quick, efficient, and clean method for<br />
mixing and applying the adhesive to plank edges. In<br />
the l<strong>on</strong>g run, we’ve found it best to spread the epoxy<br />
mixture with an inch-wide stick. We mix epoxy in a


