

The Gougeon Brothers on Boat Construction - WEST SYSTEM Epoxy
The Gougeon Brothers on Boat Construction - WEST SYSTEM Epoxy
The Gougeon Brothers on Boat Construction - WEST SYSTEM Epoxy

Create successful ePaper yourself
Turn your PDF publications into a flip-book with our unique Google optimized e-Paper software.
Chapter 23 – Strip Plank Laminated Veneer and Strip Composite C<strong>on</strong>structi<strong>on</strong> 273<br />
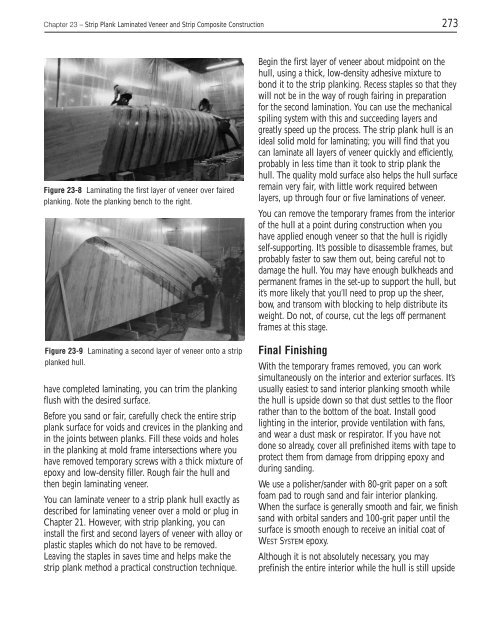
Figure 23-8 Laminating the first layer of veneer over faired<br />
planking. Note the planking bench to the right.<br />
Figure 23-9 Laminating a sec<strong>on</strong>d layer of veneer <strong>on</strong>to a strip<br />
planked hull.<br />
have completed laminating, you can trim the planking<br />
flush with the desired surface.<br />
Before you sand or fair, carefully check the entire strip<br />
plank surface for voids and crevices in the planking and<br />
in the joints between planks. Fill these voids and holes<br />
in the planking at mold frame intersecti<strong>on</strong>s where you<br />
have removed temporary screws with a thick mixture of<br />
epoxy and low-density filler. Rough fair the hull and<br />
then begin laminating veneer.<br />
You can laminate veneer to a strip plank hull exactly as<br />
described for laminating veneer over a mold or plug in<br />
Chapter 21. However, with strip planking, you can<br />
install the first and sec<strong>on</strong>d layers of veneer with alloy or<br />
plastic staples which do not have to be removed.<br />
Leaving the staples in saves time and helps make the<br />
strip plank method a practical c<strong>on</strong>structi<strong>on</strong> technique.<br />
Begin the first layer of veneer about midpoint <strong>on</strong> the<br />
hull, using a thick, low-density adhesive mixture to<br />
b<strong>on</strong>d it to the strip planking. Recess staples so that they<br />
will not be in the way of rough fairing in preparati<strong>on</strong><br />
for the sec<strong>on</strong>d laminati<strong>on</strong>. You can use the mechanical<br />
spiling system with this and succeeding layers and<br />
greatly speed up the process. <str<strong>on</strong>g>The</str<strong>on</strong>g> strip plank hull is an<br />
ideal solid mold for laminating; you will find that you<br />
can laminate all layers of veneer quickly and efficiently,<br />
probably in less time than it took to strip plank the<br />
hull. <str<strong>on</strong>g>The</str<strong>on</strong>g> quality mold surface also helps the hull surface<br />
remain very fair, with little work required between<br />
layers, up through four or five laminati<strong>on</strong>s of veneer.<br />
You can remove the temporary frames from the interior<br />
of the hull at a point during c<strong>on</strong>structi<strong>on</strong> when you<br />
have applied enough veneer so that the hull is rigidly<br />
self-supporting. It’s possible to disassemble frames, but<br />
probably faster to saw them out, being careful not to<br />
damage the hull. You may have enough bulkheads and<br />
permanent frames in the set-up to support the hull, but<br />
it’s more likely that you’ll need to prop up the sheer,<br />
bow, and transom with blocking to help distribute its<br />
weight. Do not, of course, cut the legs off permanent<br />
frames at this stage.<br />
Final Finishing<br />
With the temporary frames removed, you can work<br />
simultaneously <strong>on</strong> the interior and exterior surfaces. It’s<br />
usually easiest to sand interior planking smooth while<br />
the hull is upside down so that dust settles to the floor<br />
rather than to the bottom of the boat. Install good<br />
lighting in the interior, provide ventilati<strong>on</strong> with fans,<br />
and wear a dust mask or respirator. If you have not<br />
d<strong>on</strong>e so already, cover all prefinished items with tape to<br />
protect them from damage from dripping epoxy and<br />
during sanding.<br />
We use a polisher/sander with 80-grit paper <strong>on</strong> a soft<br />
foam pad to rough sand and fair interior planking.<br />
When the surface is generally smooth and fair, we finish<br />
sand with orbital sanders and 100-grit paper until the<br />
surface is smooth enough to receive an initial coat of<br />
<strong>WEST</strong> <strong>SYSTEM</strong> epoxy.<br />
Although it is not absolutely necessary, you may<br />
prefinish the entire interior while the hull is still upside


