

The Gougeon Brothers on Boat Construction - WEST SYSTEM Epoxy
The Gougeon Brothers on Boat Construction - WEST SYSTEM Epoxy
The Gougeon Brothers on Boat Construction - WEST SYSTEM Epoxy

Create successful ePaper yourself
Turn your PDF publications into a flip-book with our unique Google optimized e-Paper software.
Chapter 19 – Keels, Stems, and Sheer Clamps 209<br />
therefore are usually more desirable, but they usually<br />
have to get thicker to get wider. When trying to develop<br />
sufficient b<strong>on</strong>ding area at various stati<strong>on</strong> positi<strong>on</strong>s, you<br />
will find that the flatter areas in the middle of the hull<br />
permit the use of a thinner keel secti<strong>on</strong>, while the finer<br />
bow area will require a much thicker keel secti<strong>on</strong> to<br />
provide the same b<strong>on</strong>ding area. Stems may have to be<br />
two or three times thicker than keels because the sharpness<br />
with which the planking joins the hull at the stem<br />
limits b<strong>on</strong>dable area.<br />
When you have developed the keel shape at a few<br />
stati<strong>on</strong>s, you can loft and fair the keel at all of the<br />
stati<strong>on</strong>s <strong>on</strong> the lofting board. It is important to<br />
remember that you need to subtract the cap thickness<br />
from the outside lofted profile of the hull in order to<br />
define the keel and stem profile. <str<strong>on</strong>g>The</str<strong>on</strong>g> stem is sometimes<br />
difficult to project properly in the lofting. See Chapter<br />
16 for a detailed discussi<strong>on</strong> of this procedure. Chapter<br />
16 also gives instructi<strong>on</strong>s for the development of all<br />
stem dimensi<strong>on</strong>s.<br />
Also lay out the area, usually near the forefoot, where<br />
the keel and stem meet. A 10- or 12-to-1 scarf bevel is<br />
needed for adequate strength, so the joint may be quite<br />
l<strong>on</strong>g. Because its two parts may curve slightly, a<br />
keel/stem scarf joint can be difficult to manufacture.<br />
<str<strong>on</strong>g>The</str<strong>on</strong>g>re are no hard and fast rules about the directi<strong>on</strong>—<br />
stem over keel or keel over stem—the scarf should run.<br />
After lofting the stem and keel, locate the scarf. <str<strong>on</strong>g>The</str<strong>on</strong>g>n<br />
draw in the bearding line, which shows the inside<br />
intersecti<strong>on</strong> of the planking and the stem or keel. Make<br />
a pattern or template of the area where the stem and<br />
forward end of the keel join. <str<strong>on</strong>g>The</str<strong>on</strong>g> easiest way to do this<br />
is to use the nail method of transferring lines described<br />
in Chapter 17. It’s best to pick up all pertinent profile,<br />
sheer, scarf, stati<strong>on</strong>, and bearding lines at the same<br />
time. Check all measurements and label all lines clearly.<br />
Cut out the template and carefully trim it to the profile<br />
shape <strong>on</strong> the lofting.<br />
If you are planning to build your boat using the mold<br />
method for laminating hulls, the process of installing<br />
a permanent stem in your mold may involve a few<br />
extra steps. An inner mold stem may be necessary. Loft<br />
and shape this piece before you begin work <strong>on</strong> your<br />
keel/stem unit, following instructi<strong>on</strong>s in Chapter 20.<br />
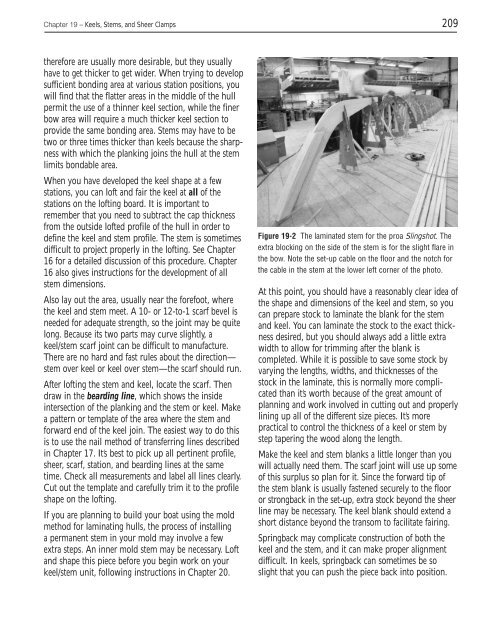
Figure 19-2 <str<strong>on</strong>g>The</str<strong>on</strong>g> laminated stem for the proa Slingshot. <str<strong>on</strong>g>The</str<strong>on</strong>g><br />
extra blocking <strong>on</strong> the side of the stem is for the slight flare in<br />
the bow. Note the set-up cable <strong>on</strong> the floor and the notch for<br />
the cable in the stem at the lower left corner of the photo.<br />
At this point, you should have a reas<strong>on</strong>ably clear idea of<br />
the shape and dimensi<strong>on</strong>s of the keel and stem, so you<br />
can prepare stock to laminate the blank for the stem<br />
and keel. You can laminate the stock to the exact thickness<br />
desired, but you should always add a little extra<br />
width to allow for trimming after the blank is<br />
completed. While it is possible to save some stock by<br />
varying the lengths, widths, and thicknesses of the<br />
stock in the laminate, this is normally more complicated<br />
than it’s worth because of the great amount of<br />
planning and work involved in cutting out and properly<br />
lining up all of the different size pieces. It’s more<br />
practical to c<strong>on</strong>trol the thickness of a keel or stem by<br />
step tapering the wood al<strong>on</strong>g the length.<br />
Make the keel and stem blanks a little l<strong>on</strong>ger than you<br />
will actually need them. <str<strong>on</strong>g>The</str<strong>on</strong>g> scarf joint will use up some<br />
of this surplus so plan for it. Since the forward tip of<br />
the stem blank is usually fastened securely to the floor<br />
or str<strong>on</strong>gback in the set-up, extra stock bey<strong>on</strong>d the sheer<br />
line may be necessary. <str<strong>on</strong>g>The</str<strong>on</strong>g> keel blank should extend a<br />
short distance bey<strong>on</strong>d the transom to facilitate fairing.<br />
Springback may complicate c<strong>on</strong>structi<strong>on</strong> of both the<br />
keel and the stem, and it can make proper alignment<br />
difficult. In keels, springback can sometimes be so<br />
slight that you can push the piece back into positi<strong>on</strong>.


