

The Gougeon Brothers on Boat Construction - WEST SYSTEM Epoxy
The Gougeon Brothers on Boat Construction - WEST SYSTEM Epoxy
The Gougeon Brothers on Boat Construction - WEST SYSTEM Epoxy

You also want an ePaper? Increase the reach of your titles
YUMPU automatically turns print PDFs into web optimized ePapers that Google loves.
Chapter 26 – Interior C<strong>on</strong>structi<strong>on</strong> 327<br />
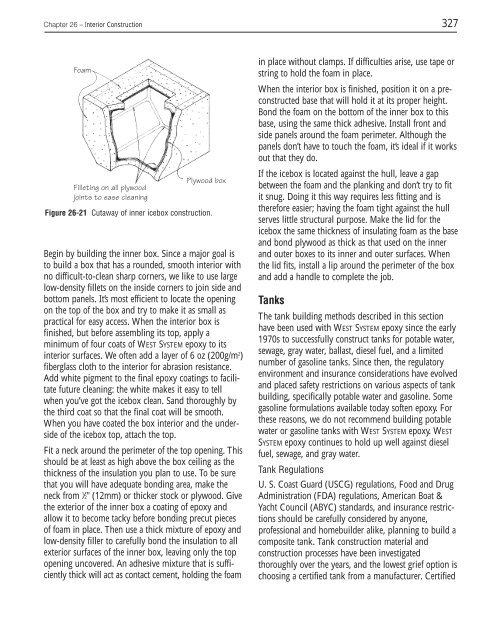
Foam<br />
Filleting <strong>on</strong> all plywood<br />
joints to ease cleaning<br />
Plywood box<br />
Figure 26-21 Cutaway of inner icebox c<strong>on</strong>structi<strong>on</strong>.<br />
Begin by building the inner box. Since a major goal is<br />
to build a box that has a rounded, smooth interior with<br />
no difficult-to-clean sharp corners, we like to use large<br />
low-density fillets <strong>on</strong> the inside corners to join side and<br />
bottom panels. It’s most efficient to locate the opening<br />
<strong>on</strong> the top of the box and try to make it as small as<br />
practical for easy access. When the interior box is<br />
finished, but before assembling its top, apply a<br />
minimum of four coats of <strong>WEST</strong> <strong>SYSTEM</strong> epoxy to its<br />
interior surfaces. We often add a layer of 6 oz (200g/m2 )<br />
fiberglass cloth to the interior for abrasi<strong>on</strong> resistance.<br />
Add white pigment to the final epoxy coatings to facilitate<br />
future cleaning: the white makes it easy to tell<br />
when you’ve got the icebox clean. Sand thoroughly by<br />
the third coat so that the final coat will be smooth.<br />
When you have coated the box interior and the underside<br />
of the icebox top, attach the top.<br />
Fit a neck around the perimeter of the top opening. This<br />
should be at least as high above the box ceiling as the<br />
thickness of the insulati<strong>on</strong> you plan to use. To be sure<br />
that you will have adequate b<strong>on</strong>ding area, make the<br />
neck from 1 ⁄2" (12mm) or thicker stock or plywood. Give<br />
the exterior of the inner box a coating of epoxy and<br />
allow it to become tacky before b<strong>on</strong>ding precut pieces<br />
of foam in place. <str<strong>on</strong>g>The</str<strong>on</strong>g>n use a thick mixture of epoxy and<br />
low-density filler to carefully b<strong>on</strong>d the insulati<strong>on</strong> to all<br />
exterior surfaces of the inner box, leaving <strong>on</strong>ly the top<br />
opening uncovered. An adhesive mixture that is sufficiently<br />
thick will act as c<strong>on</strong>tact cement, holding the foam<br />
in place without clamps. If difficulties arise, use tape or<br />
string to hold the foam in place.<br />
When the interior box is finished, positi<strong>on</strong> it <strong>on</strong> a prec<strong>on</strong>structed<br />
base that will hold it at its proper height.<br />
B<strong>on</strong>d the foam <strong>on</strong> the bottom of the inner box to this<br />
base, using the same thick adhesive. Install fr<strong>on</strong>t and<br />
side panels around the foam perimeter. Although the<br />
panels d<strong>on</strong>’t have to touch the foam, it’s ideal if it works<br />
out that they do.<br />
If the icebox is located against the hull, leave a gap<br />
between the foam and the planking and d<strong>on</strong>’t try to fit<br />
it snug. Doing it this way requires less fitting and is<br />
therefore easier; having the foam tight against the hull<br />
serves little structural purpose. Make the lid for the<br />
icebox the same thickness of insulating foam as the base<br />
and b<strong>on</strong>d plywood as thick as that used <strong>on</strong> the inner<br />
and outer boxes to its inner and outer surfaces. When<br />
the lid fits, install a lip around the perimeter of the box<br />
and add a handle to complete the job.<br />
Tanks<br />
<str<strong>on</strong>g>The</str<strong>on</strong>g> tank building methods described in this secti<strong>on</strong><br />
have been used with <strong>WEST</strong> <strong>SYSTEM</strong> epoxy since the early<br />
1970s to successfully c<strong>on</strong>struct tanks for potable water,<br />
sewage, gray water, ballast, diesel fuel, and a limited<br />
number of gasoline tanks. Since then, the regulatory<br />
envir<strong>on</strong>ment and insurance c<strong>on</strong>siderati<strong>on</strong>s have evolved<br />
and placed safety restricti<strong>on</strong>s <strong>on</strong> various aspects of tank<br />
building, specifically potable water and gasoline. Some<br />
gasoline formulati<strong>on</strong>s available today soften epoxy. For<br />
these reas<strong>on</strong>s, we do not recommend building potable<br />
water or gasoline tanks with <strong>WEST</strong> <strong>SYSTEM</strong> epoxy. <strong>WEST</strong><br />
<strong>SYSTEM</strong> epoxy c<strong>on</strong>tinues to hold up well against diesel<br />
fuel, sewage, and gray water.<br />
Tank Regulati<strong>on</strong>s<br />
U. S. Coast Guard (USCG) regulati<strong>on</strong>s, Food and Drug<br />
Administrati<strong>on</strong> (FDA) regulati<strong>on</strong>s, American <strong>Boat</strong> &<br />
Yacht Council (ABYC) standards, and insurance restricti<strong>on</strong>s<br />
should be carefully c<strong>on</strong>sidered by any<strong>on</strong>e,<br />
professi<strong>on</strong>al and homebuilder alike, planning to build a<br />
composite tank. Tank c<strong>on</strong>structi<strong>on</strong> material and<br />
c<strong>on</strong>structi<strong>on</strong> processes have been investigated<br />
thoroughly over the years, and the lowest grief opti<strong>on</strong> is<br />
choosing a certified tank from a manufacturer. Certified


